EASY ACTIVITIES TO BUILD YOUNG BRAINS: MAKE CHOCOLATES FOR FRIENDS!

Each year we set up a small chocolate factory at someone’s house and make simple chocolates with friends – we then divide the creations and give the assortment of chocolates to each family.

This year was a rather impromptu, and on a school day, so the younger members of the families represented their clan in the chocolate making.

If you feel like adding some home made treats to your gifts, then here are our top 3 child friendly chocolate making endeavours:

FullSizeRender
White chocolate (melted) mixed with shredded coconut and then simply heaped into blobs of sweet goodness on your foil/baking paper.

We then chose to add some sugar bling to these, just for fun.

IMG_0186

Similarly easy is dark chocolate (melted) mixed with nuts (we like slivered almonds, though any fruit and/nut will do). These then also become blobs of tasty treats on your baking paper.

IMG_0197

Each of these are delicious and very easy for even the youngest hands to master. If you want to get a little creative with an actual Easter egg then you may like to try the following. (Afraid we didn’t do this one this year so there are no pictures to go along with the instructions this time, but it is a simple activity even without pictures.)

  • Obtain a pre-made Easter egg and chocolate chips of the opposing colour. (Ie white chocolate egg with dark chocolate chips, or dark chocolate egg with white chocolate chips.) The colour of your base egg will be the primary taste, so choose as per your gift recipients tastes!
  • Open your Easter egg and sit in an egg cup.
  • Melt you chocolate chips in a separate bowl.
  • Using a paintbrush (suitably clean for edible artworks!) simply paint your own pattern onto the existing egg (using the melted chocolate chips of the opposing colour as the ‘paint’).

If you are ‘painting’ with white chocolate you can even add a little colour paste to your chocolate (just as you would normally when colouring chocolate) and this gave us a range of coloured ‘paints’ to work with. We did this last year and even added a few edible sparkles to our eggs.

Of course once you have finished your chocolates let them set while you make a card to accompany the chocolates, and lick the bowl clean!

IMG_0209

Enjoy your Easter creations.

EASY ACTIVITIES TO BUILD YOUNG BRAINS: EGG DECORATING.

IMG_0253Happy Easter holidays! Here’s a lovely little activity to do for Good Friday (durable for the whole family, and no shopping required, all you need is an egg, a pin and some paint – or pens etc).

Firstly make a pin hole in the top of your egg, and a slightly larger hole in the base of your egg (by poking the pin in a few times). Also poke the yoke inside your egg so it is broken.
IMG_0264
Now for the fun part! Hold the egg to your mouth and blow into the smaller top hole, holding the larger bottom hole over a bowl so you catch the egg that will come out! This will likely get a few little shrieks of delight. (If it is too hard to blow, simply make the bottom hole a little bigger.)
IMG_0262
Yay! You now have a blown egg! (At this point it is a good idea to rinse your egg out to prevent later smell!) Now you can decorate as you wish, we used paints – though pens, or glitter, or even melted crayons also work a treat. (To help hold the egg while painting we ‘mounted’ our creations on a sick over a small bowl. This allowed the children to turn the egg without smearing their creations.)
IMG_0235
The youngest member of our group to blow out their egg was 3yo, though the egg is surprisingly strong while being blown so I suspect younger children would also enjoy doing it with a little help. I am certain that older siblings (and indeed adults!) would excel at decorating a more elaborate egg for decoration.
IMG_0237
Once finished (and dry!) you can thread up your egg with beads to make a beautiful hanging decoration. Happy easter everyone!

WORKSHEETS: LIMITING CREATIVITY OR PROVIDING A FRAMEWORK?

IMG_9804

There are lots of ways to learn your  letters, and different things will work for different children.

My oldest child knew all the shapes and the names of the letters long before she had a grasp of their use or sound. My youngest is the opposite and can sound out any word and tell you the letters, but can not recognise (or form) many letters. Each child benefits from different learning methods (and indeed enjoys different styles of learning.)

In our house, with learners on different ends of the letter learning spectrum, we are going for a bit of an immersion style of learning environment focusing on each letter (yes, learning about P means we had pumpkin soup for dinner, then pomegranate for desert!) and this is wonderful to encourage the recognition of sounds (something Anica is learning fast and seems to come very naturally to Elkas learning style).

IMG_9795

This is fun, but doesn’t teach the formation of the letters (in Anica’s case to improve her hand writing, and in Elkas case to recognise and form the letters). For this we have a series of worksheets (enjoyed most by Anica as it appeals to her learning style, but perhaps of the most obvious benefit to Elka as she links the sounds she knows with the formation of letters.)

Of course worksheets are not the only solution. We’ve talked before about ‘finding the o‘ or ‘sparkle writing‘, forming letters on the screen… and indeed we write letters on each other’s skin, in the sand, have them on the fridge, in the bath and so on… But for Elka in particular it seems that these worksheets have the most direct improvement on her ability to recognise letters.

Perhaps it is the repetition of the letters, or the novelty of the formal learning style, but I wanted to test what seems to be a very effective way for my children to supplement their learning: Half way through our work on P (before we had done the worksheet, but had done a number of other activities), I asked Elka a series of questions about the letters we’d been working on. The only letter that she knew but still couldn’t form was P (having already completed the other letters). Immediately after the worksheets (and then again a couple of days after) she could then form the letter P to complete her knowledge of the letter (adding to what sound it makes, what words it starts etc – i.e. this image below is Elka realising that ‘pen’ starts with ‘P’ and she was writing P’s with a Pen – hilarious!) While printable worksheets are not always appropriate, as a small dose for my family they are working very well.

IMG_9806

If you are new to the site and want to re-visit the post where I detail all the free printable that we are working from then head back to: Setting up for simple success.

PADDOCK TO PLATE WITH KIDS.

IMG_9681

We are lucky enough to know a lovely couple who invited us to their small home farm for a day of fruit picking and pie making. If you don’t happen to know such a lovely couple with a farm, then there is apple and pear picking at Sorrel Fruit Farm (as we did earlier this year for strawberries) or another PYO farm will do just fine!

IMG_9673

We pilled in the car and headed 40min South. It has been a year since we last visited and but during our drive the girls recalled so much of our last visit (explaining it to us as though we hadn’t been there!) and looked forward to re-living each moment of it this year.
When we arrived we were greeted by smiles and fury friends who’s happy tail wags could brighten any day. My young ladies instantly wanted to start the harvest so we headed first for the blackberries, then the pears and apples, then the tomatoes.

IMG_9645 IMG_9651

It is wonderful for the kids to see how much this productive garden progresses each year, and indeed how much food it yields. (With our own vegetable garden still being constructed, it is the perfect opportunity to see how much we can grow and eat ourselves – indeed it wasn’t that long ago in our big history that home grown was the norm!)
IMG_9683
With old varieties of apples, and tomatoes fresh of the vine the taste is so different to the supermarket varieties, and for every spare patch of soil the kids want to know what will be planted there next.
Next it was off to the kitchen to make some pies (and indeed, we even tried our hand at ice-cream making to accompany our pies, though we have not quite mastered this one yet!) Each made (and then ate!) their own special pie (and of course the adults had a good share too!)


IMG_9703 IMG_9710

On our way home we stopped by to feed the fallen apples to the calves that the girls had chosen names for last year; Haha, Hoho and Alice are all growing into beautiful bovine. The girls asked after the calf they fed on their first visit (pictured below) and we explained that he had been sold on to make way for the new calves, and that the land could only sustain a certain number of cows healthily. Introducing farming practices in this gentle environment is the ideal way for children to grasp the early concepts needed to understand some of the larger environment issues that face our growing population who loves so much farm intensely so we can have steak for dinner every night!
269330_4182814814934_829934315_n
598621_4182812934887_282524477_n
After a busy weekend, this was the perfect way for the entire family to re-set for the week ahead. Thank you Jane and David for your wonderful hospitality!

EASY ACTIVITIES TO BUILD YOUNG BRAINS: PAPER PLATE POLAR BEAR.

This simple paper plate polar bear only takes a moment to make (in our case before school one morning) and is a fun way to add a little Arctic into your play space.

Send your little hunters to gather your supplies:

  • Paper plate
  • Pencil
  • Cotton balls
  • Scissors
  • Eyes (optional)

First fold your plate in half and draw on your polar bear – ensuring that the back is along the fold. (Anica drew her own bear but this ‘back along the fold was a tad tricky for Elka to grasp with her current stage of drawing – so while I usually avoid ‘tracing’ type activities, Elka had a template to work form so her bear would stand up at the end!)

IMG_9728

Cut your bear out.

IMG_9731

Dismantle a few cotton balls (this is always a fun thing to do, regardless of your age!)

IMG_9734

Glue your fur to your bear (as you might have read when we were talking about Polar Bears, their skin is actually black, and their fur is acutlay clear, so feel free to substitute or paint for a more accurate representation, in our case we were happy to just use what we happened to have on hand!)

IMG_9740

Add some eyes (or draw them on).

IMG_9751

TA DA! You have polar bear playmate for the rest of the morning… he can even go to tea at the dolls house and terrorise everyone inside… Have fun!

IMG_9755

EASY ACTIVITIES TO BUILD YOUNG BRAINS: TURN A STORY INTO ART.

Peter Pan is a delightfully whimsical tale (and for those adults who want a little whimsy in their life “Finding Neverland” is a movie worth watching). My children somehow do not scare when they fall asleep listening to tales of pirates and man eating crocodiles, and I hope that the portrayal of female characters is not effecting their subconscious. For a bonus activity here is a little pirate adventure.

FullSizeRenderSimply read your favourite pirate story (or in our case we have an audio book of petter pan that the children love) and give them a large piece of paper with the instructions to create a pirate ship. Our pirate ship contained some dialogue from the story, and a second ship was needed in order to continue the narrative.

The activity did not take any adult preparation (other than setting up a story and getting the pens out) and yet was enjoyed immensely as a perfect quite time activity. Imaginations fired, little hands worked hard to craft their vision and at the end we had a beautifully imagined pirate vessel to hang on our wall as part of our ocean themed lounge room!

FullSizeRender

THINGS TO SEE AND DO: MEET A PILOT.

IMG_9719
When we were kids we used to look forward to our mid flight visit to the cockpit to say hello to the captain. Then security measures changed and the cockpit was locked… But even now your young tots can still enjoy meeting the Captain next time you fly.
When flying simply ask the flight attendant if your child can visit the captain after you have landed. (This is at the discretion of the individual pilot, but most know how exciting it is for kids).
Once the attendant confirms you can visit (or more likely says ‘maybe’) you will need to wait in your seats until the other passengers have disembarked and then you can go forward and ask to see the captain.
"Me and the Captain together. He told me how the wind keeps the plane up" drawn by Anica just after her visit to the pilot.

“Me and the Captain together. He told me how the wind keeps the plane up” drawn by Anica just after her visit to the pilot.

Use the time waiting on the plane (while the other passengers leave) to talk with your kids about what they might like to ask the pilot (as the adult leading by example; try not to refer to the pilot solely as a male, while it still is a male dominated profession, there is no reason to presume only boys can fly planes!)
Anica wanted to know how the plane stays up (our pilot explained the basics of wind pressure over the curved wings lifting the plane) and Elka wanted to know how rainbows are made (while it wasn’t really a plane question, he was happy to answer).
While I didn’t take and photos in the cockpit (this photo was taken later at a flight simulation that we were lucky enough to visit in Malaysia) I was carrying a large intimidating camera with me when we entered the cockpit so I believe photos are allowed should you wish to get a snap with your pilot. Remember to thank him/her immensely for giving your tot the additional time.

EASY ACTIVITIES TO BUILD YOUNG BRAINS: FREE PENGUIN PRINTABLE.

This week we’ve got a little reader book for your young tots to colour (it’s a free download, but you will need to sign up to the free membership for Teachers Pay Teachers – I signed up myself and have not regretted it.)

Sample of the work found in the full pack of penguin printables made by teacher Jennifer Drake of Crayons and Cuties in Kindergarten.

This download is great for learning the different penguins and also early readers. Because my oldest is right at the transition into independent reading I splashed out the $10 and downloaded the full set of penguins for us to carry with us on our travels. You can see what is included at the creators blog. The books don’t just give an opportunity to colour, but also give great facts about the different types of penguins, their environments and what similarities and differences there are between the different species!

THINGS TO SEE AND DO: MAKE A GIANT SAND OCTOPUS.

IMG_4963 We have built large sand sculptures before, and they are a great hit for the young construction workers. This time however we had a change in focus beyond a simple sculpture, we want to talk a bit about camouflage.

We chose an appropriate spot and drew a large circle in the sand (for the body). Each child took control of one tentacle (mapping it out and digging around their shape to pile it up as a long 3d sand arm).

IMG_4947

We didn’t have 8 children building tentacles at once so this allowed for some great maths questions during construction; how many have we made now? How many do octopuses have? How many more do we need to make?

IMG_4969

As the tentacles shaped up the kids moved on and created the body and eyes in the centre, decorating with shells. The small group used great negotiation techniques throughout the process to organise themselves to finish the octopus, helping each other when they needed it, and collectively deciding on plans.

IMG_4952

Now, that’s a great physical project, but it was not our focus as we built. We wanted to talk as much as we could while building – What do the kids know about octopuses? (They take a long time to have their babies, they live in the water, they shoot ink at predators, they have no bones – these were the things the kids collectively knew about octopuses and it was a delight watching them inform each other and add to the knowledge that the other children were sharing.)

When we came to the idea of camouflage we stayed on the topic for a little longer. We talked about what would be good camouflage for an octopus, and how it can manipulate the shape of it’s skin to form different textures. It can change the shape of it’s body to mimic other creatures, and can even change the colour of it’s skin to form different patterns to blend into it’s surroundings! No other creature has all these camouflage skills.

IMG_4959

In our case we talked about our octopus being ‘camouflaged’ in the sand around it, but over the next couple of days we will revisit the concept as the opportunities present themselves. (See how that bird blends into it’s background? Why do you think that tiger in the book has stripes? What makes good camouflage? Why is it important for each of these animals to be able to hide?) Camouflage is a topic that is of great interest when learning about animals and it will come up time and time again as we work our way through the year, and a physically active project of building a sand sculpture is a fun way to introduce it!

BIG HISTORY CONCEPTS FOR LITTLE TOTS.

We’ve talked before about the importance of introducing a bit of ‘big history’ into early learning, and with everything from the dinosaurs to when mumma was born classed as ‘the olden days’ this project will help give a little perspective to our place in time.

IMG_0573

Our strategy for the year is to provide some understanding of big history concepts. We have created a time line on one wall and as we come across facts, figures, dates and details we add them to our timeline.

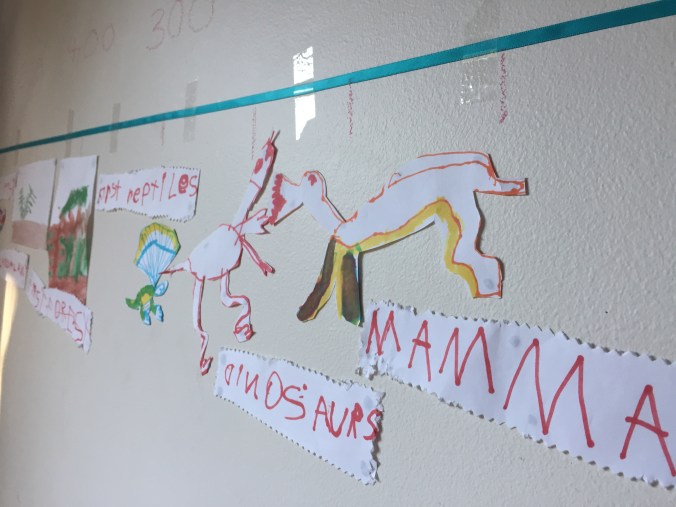
When we visited a cave (that began forming tens of millions of years ago) we added that to our timeline, giving the experience even more historical wonder than the simple beauty they saw. When we talked about how the waterwheel that was used to make flour in the ‘olden days’ we were able to add that to our time line and see that it is relatively recent in our history. When the kids asked when the first person was born (being a believer in evolution rather than creation) we added that to our timeline and could explain the idea of evolution far more simply when they could physically see the degree of time passing and the changes happening.

We have left some space for the future too, so they can imagine and dream about what might be in store in the near future. We hope to get to this after a few more history concepts are visited. (Over the coming months as we work through the letters we will look back at the first civilizations, dinosaurs, and so on). I am also excited to see a few more concepts overlapping (ie “this was happening at the same time the pyramids were being built” etc).

Now, if you plan to set up your own timeline you may wish to ‘cheat history’ a little as we did. Human history is so tiny in relation to many of the other big history concepts (such as the evolution of plants, Dinosaurs, mammals etc) that our entire human history is just a dot at the end of a 2m stretch of history (and that’s not even going back to the formation of planets etc!)

IMG_0575

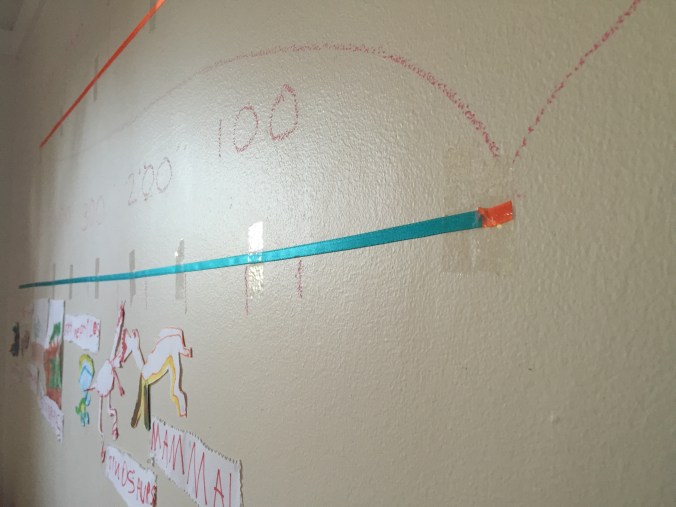
To solve this problem of scale we ‘expanded’ our little dot of history into another timeline to allow for more detail in the human history. We used a coloured ribbon for each timeline (blue for the overall time line, with a dot of orange at the end. And orange for the human history.) This colour reference made it easer for the little historians to understand that the orange line represented that tiny little dot at the end of the blue line. We marked up our history over a 3m stretch of wall, simply using chalk directly on the wall to label the periods in time, and to add new concepts. When adding new ideas the little historians often create an image (painting, gluing, drawing etc) and we blue-tack that image to the wall at the relevant place on the timeline. This visual cue that they created is far easier for them to remember and explain to the other adults in their life than a simple text ‘entry’ on our timeline. By re-visiting the concepts as they explain their work they re-enforce their understanding of what they have learnt.

If you wish to create a similar timeline in your own learning space, we used this as a guide for our own timeline (you can calculate and measure this out to fit your space, but we were not so precise as the exact accuracy of the spacing is not so important – it’s a general concept that we are working towards at this stage so just sketching up an approximation is totally fine!)

World History:

  • 600 million years (before common time) – until the year 3,000(ish)
  • Separated at 100 million year intervals.

Human* History:

  • 10,000 years (before common time) – until the year 3,000.
  • Separated at 1000 year intervals

*Please note; the beginning of ‘human history’ that we expanded is determined at a point where there are some interesting things to add to the timeline (ie beginning of farming etc) rather than the beginning of Humans as a species. For practical scale reasons we found this to be more workable as it allowed a little more space between centuries once scaled to fit our space.

While my own little historians are not the ‘remember exact facts and figures’ type of learners, that is not our primary goal. Our aim with this timeline is to give the little historians a sense of their place in history. A sense of belonging in something much greater than themselves, an idea that things change gradually over time, and (as we enter further into human history) some understanding of how they can alter the future by their own actions.

A sense of belonging in time (as well as in space, community, culture etc) is vital for growing our young people into the adults we want in our world.