EASY ACTIVITIES TO BUILD YOUNG BRAINS: MUMMIFY AN ANCIENT EGYPTIAN (APPLE)

Mummification is a great science and history lesson if you are willing to venture into the grim topic of death with your tots. Plus, it’s surprising less complicated than you might think:

IMG_0645IMG_0610

First pick an apple. We are lucky enough to have a very prolific crabapple tree, however if your apples are full sized you may wish to quarter the apple for a speedier result.

Once your apple is selected, carve a face in the skin (for ease we used toothpicks to carve ours).

IMG_0651

Grab the scales and measure some bicarbonate soda. (The exact amount you need will depend on how many apples you are covering, how large the apples are and how small the cups you are placing them are.) we used 140g of bicarbonate soda (as it was an easy number to multiply) and this covered 3 crabapples in coffee shot cups.

IMG_0658

Once you know how much bicarbonate soda you have, add twice as much cooking salt (the ratio of 1bicarb:2salt is a good one to work out with the kids – for our 140g of bicarbonate soda we added 280g of salt.)

Mix well. Then place your carved apple in the cup and cover in your powdery mixture.

IMG_0662

We also carved a second apple as a control for our experiment. This one will sit in another cup next to the covered apple (and will likely start to rot, while the salted apple dries out.)

Leave on the bench uncovered for about 10 days and then assess what has happened to each apple.

IMG_0670

You may wish to visit the real Egyptian mummy at Tasmanian Museum and Art Gallery while you wait for your apple to mummify. (While other little girls love the butterfly’s displayed in the central gallery, my girls stand next to them pointing at the casket in the dark and announce with pride that ‘there is a dead mummy in there!’ We have had a bit of explaining to do when other kids are with us…)

Here’s a brief history you may wish to share with your tots as you go through this process. (As always, if they have questions make a point of finding the more detailed information together, it is better to model the methods for finding out than to always know the answers!)

Back before the time of the pyramids it is believed that the Egyptians berried their dead in the hot desert sands and the bodies would dry out. At the time this was thought to be good because it was important to the Egyptians that the body remained intact… but there was a problem with wild animals eating the dead bodies (yuck!). It was decided to place the dead in cases so the animals couldn’t dig them up and eat them. This stopped the animals, but meant the body decayed in the box, rather than drying out. Because the Egyptians believed it was important to preserve the body after death they began to dry out the bodies – before burying them. Over time this developed into the sacred art of mummification. It was later that the Egyptians built huge pyramids to house the mummified bodies of their rulers.

A fun fact is that the Egyptians discarded the brain, during the mummification process, but kept the heart – thinking the heart was the organ responsible for thought, and like many religions today; only a pure heart would be allowed into the afterlife.

Now, as I have talked about before, (without my promoting) my kids think about far death more than I expect is average, and this is why I am happy to venture into this topic (to normalise something they already think about.) If you feel this kind of information is not beneficial for your young people, or that it will raise issues that they are not ready to process, then simply save it for another age. Otherwise, happy mummifying!

EASY ACTIVITIES TO BUILD YOUNG BRAINS: ANCIENT EGYPTIAN JEWELS WITH BUTTONS

IMG_0721

Here’s a little activity to make your children more attractive to the gods!

It is believed that in ancient Egypt both men and women of all classes wore as much jewelry as they could afford. This was to show their wealth and status, but also because they thought it would make them more attractive to the gods.

We’re not quite up for working with real gold in our family (as the upper classes wore) or even copper (as the Middle classes wore) and while we probably could try our hand at a little bead work (as the lower classes wore) we thought we’d shake up history and make some historically inaccurate collars from paper plates, buttons, sequins and glue.

If you are keen to read a very brief overview of Egyptian fashion before you start, I suggest this link.

Then grab your supplies:

  • Paper plate
  • Any items to be ‘gemstones and jewels’ (Ie buttons, sequins, stickers, glitter, macaroni etc)
  • Glue
  • Scissors
  • (Paints, pencils etc optional)

Cut a ‘neck sized’ off-center hole in your paper plate, with a cut across at the narrowest part. (This cut is the back of the collar, and will allow the collar to open and fit over the head). Test that it fits the young royals neck before you proceed. (This way they will better understand the finished result before they start decorating.)

IMG_0723

Sit the plate upside down on the work bench and cover in glue.

Decorate as you wish and allow to dry. Wear your creation with pride.

IMG_0711

Of course each child approached this differently; Evie was all about the pattern, Elka was totally into buttons etc. this variation is healthy, and also a good reason to leave any exact ‘how to’ demonstrations out of the picture to avoid mimicry.

You can expand your collection of jewels by creating an arm cuff (toilet tube is perfect) or even a cardboard headdress.

IMG_0701

With all these supplies on hand some of your tots might not be keen to make jewelry, and if they are inspired to create something else than that is even better- let them go forth and create! (Roman had many plans of what he could make, and in the end he chose to create an electronic button disk instead of an Egyptian collar – love the way this guy thinks!)

IMG_0729

E – IS FOR EGYPT, LEGO PYRAMIDS AND DEATH

While modern day Egypt is a great topic, this time we’re just taking our Big History concepts and looking specifically at Egypt at the time that the great pyramids were built.

IMG_9965

The physical pyramids themselves are a great engineering tale, it’s a big topic to add to your timeline, and the cultural significance is a brilliant introduction to the concept of death rituals. (Kids are so fascinated by the idea of kings, pyramids and mummification that the idea of a lost life seems interesting, rather than tragic.)

At this grim point I’d like to note that while death might not be on too many early childhood agendas, I approach this as the mother of a child who (in the process of simply removing spent sunflowers from the garden) realised that everyone she loves will one day die, and then proceeded to sob for hours as it sunk in – one grim reality at a time.

It started with a throw away comment that we were removing the sunflowers because they ‘weren’t alive or growing anymore’… And after a series of small logical conclusions eventually brought her to the realisation that she too would die… and so would her whole family…. and all her friends… This was not the intended outcome of our gardening session, but it hit her like a brick wall.

This was one of the most heart breaking things I have ever had to help my children grapple with, and it seems to have stayed with her. As a ‘reward’ after her 4yo needles she asked to visit a graveyard so she could see where the first settlers were berried (yes, we’d visited the invasion room at TMAG) and even a couple of years on (when she had to write a wish on a lantern to release) her wish was ‘not to die before my birthday!’ (Said with a casual smile as though it’s something every 5yo thinks about!)  … Now I swear that I do not direct her anywhere near the topic of her own mortality, or anyone’s for that matter, but it is evidently something that is important to her!

(Releasing the wish lantern to live to her next birthday.)

While I am absolutely positive that not all children take death so seriously, I feel it’s something we need to build a healthy acceptance of (in our family at least, and dare I say it – death is probably a healthy thing for most westerners to feel a little more comfortable about!)

So, let’s get building one of histories biggest monuments to death out of lego! Woo hoo!

(Check this link for a very brief refresher on pyramids so you can add some facts to your Lego game – we were also given the Egypt book from the ‘why is’ series by a dear friend, and that’s lots of fun if you have access to it at the library/Amazon etc)

Ok. The mission is simple. Get your lego and start building a pyramid. For older kids, let them at it and watch them work it out themselves. (For younger kids they may need some assistance to understand how to overlap bricks etc for strength.)

Unlike the Egyptians, you may wish to start at the top of your structure (with a square block) then build out from there with the more common rectangle blocks. As long as you step out each level, this is all you need to repeat until you reach your desired size.

You may wish to leave an entrance at the base (remember to set some soldiers near your entrance to watch out for tomb raiders – that’s what the Egyptians did to protect their pyramids!)

IMG_9959

As you build talk about how easy it is as you click on the uniformly shaped blocks. Ask your little engineers to think about what the life sized pyramids are built out of… how would they personally do it if they were alive in an Egyptian build? (Listen to their answer in full, then remind them of a few obstacles that might come up in their story – ie there were no trucks, the stones were all different shapes, they were a long way from the building site etc – and see how they solve the problem.)

You may also like to set your lego man in his tomb with all his worldly treasure (that he wants to take with him to the next life.) Perhaps spare bringing the slaves, pets etc (unless you really want to end up talking about death and sacrifice with your tot!) We chose a treasure chest and decorated his tomb.

IMG_9928

Next time you are at a rock beach (or any other place with good supply of rocks) challenge your little builders to make a pyramid out of natural materials. See how they interact with the stones after practicing on the lego (do they remember to overlap for strength etc?) and remember to join in as part of their team – it’s quite fun and a challenge at any age!

I hope to post shortly a little more about mummification (still deciding on the best approach for this one!) and we’ll get some tomb art underway shortly.

Enjoy building your mini monument to death (I mean; ‘fun lego pyramid’) and we’ll see you soon for some more grim adventures soon!

AFTER SCHOOL ACTIVITIES (how are you programming your child?)

Programming is strong language to use when referring to a child, (and as the parent of 2 independent thinkers, I have no illusion that children are robots who will blindly do as you instruct!) but with the ever expanding research into how our brains develop, there is a good deal of ‘programming’ that we do of our children every day, weather we are thinking about it or not. From the moment they are born, what we say, what we do, and what we encourage is shaping our children’s physical brain, and thus determining (in many ways) the way our children respond in adult life.

Of course I fully support the notion that the brain is plastic into adulthood, so I’m not saying childhood experiences fully shape the mind and are irreversible (indeed quite the contrary!) but how our children develop is largely shaped by the experiences that we choose for them.

At 4 and 5 my children are somewhat late starters in the sea of classes. With classes in everything from engineering to dance, lego to piano, chess to soccer, languages to horses riding – the choice is immense, and most of their peers attend at least 2 formal classes each week. To date my own children have had no ongoing formal lessons.

My children have always attended Launch into Learning, or Rock and Rhyme, or Playgroup – and these things have been truly beneficial for my children as they developed. (I might touch on this in another upcoming post). However outside of these ‘parent and child’ preschool activities (most of which encourage free play) we have never partaken in the formal ‘out of school classes’.

This year however my children are ready. They are not too tired at the end of the day, they have plenty of time for free play (something that I believe is essential for childhood development) and they are looking to learn more; they are seeking a degree of formality.

That leaves me with the question of many parents: What should my own children be taught? With so much evidence that experience actively shapes the physical structure (and function) of these young developing minds, the decision has far more impact on their adult lives than just weather they can kick a ball or play a tune.

Of course a common solution is to let the child choose (though parents are often highly involved in selecting what choices their child is offered). Or to partly let the child choose (ie ‘you can choose what ever you like, but you must do swimming as its a matter of safety’.) Another is to go with what the child shows skills for (ie a natural climber might enrol in rock climbing or gymnastics) or in contrast what the child could improve on (ie enrolling a shy child in dance or drama to improve their ability to present.)

Ideally I would like to have my children experiences a range of activities that awaken a variety of different parts of their brain, and indeed to encourage the values I believe to to important. This seems ambitious (especially while keeping in mind that I don’t want to overload my children as I fully support the notion that a child needs free time to develop fully!)

Making concise choices about what to suggest to my own children presents a set of problems that every parent faces… What do we REALY want for our children?

In this presentation by Jennifer Senior she talks of how most parents would agree (regardless of beliefs or parenting style) that the primary thing they want for their children is ‘to be happy’. Senior suggests that the idea of ‘happiness’ is somewhat of an unreasonable expectation of any child (or parent for that matter!) – this may seem like a rather pessimistic statement, but in contrast I actually found it to be quite optimistic in tone and well supported by various studies – the presentation is well worth a watch, I can’t say it better than she does!

After having wished for happiness for so long I found this left me in a difficult position of needing to actively re-define my ambitions for my children as the values that I thought could be taught (indeed with the hope that these may in turn result in happiness as a byproduct of their endeavours, but not happiness as a primary goal.)

What do you value? What abilities or traits do you want to give to the next generation?

For me I would like for my children to have the confidence and self worth that comes from a sense of accomplishment. I would like them to extend their physical skills, as well as their analytical and creative thinking. I would like to encourage compassion for (and a genuine love and appreciation for) other people, animals and the environment they are a part of (man made and natural.)

In order to gain these skills they need to work as part of a team, understand their place in history, spend time with animals, in the environment… The list goes on.

There are many out of school activities that support these things, however the difficulty comes when you need to narrow down a selection to something your children will adore, and will also support the values you believe to be important… all while not overloading the child or sacrificing free play!

My own solution is to address some of the goals through less formal activities (ie camping can be largely child directed, and can address goals of environment and physicality as well as engaging a good deal of creative and analytical thinking – map reading, building, investigating etc).

For more formal lessons we have chosen to space these out over a month rather than have every lesson every week. (Ie music every second week, horse riding once a month and so on). This gives our kids more opportunity to experience a variety of activities without overloading each week to accommodate all the classes. This system gives my children the chance to experience a diverse range of skills (to see where their heart lies) and also ensures that their learning is still largely dictated by them (ie in the extended time between lessons it is their own initiative that drives their learning in each area.)

As my children grow I am sure they will self select the areas that they want to continue on a more regular basis, and the other aspects will fall away to a memory of something they once did. This is our solution to out of school activities. In a generations time we will see if it worked!

EASY ACTIVITIES TO BUILD YOUNG BRAINS: MAKE CHOCOLATES FOR FRIENDS!

Each year we set up a small chocolate factory at someone’s house and make simple chocolates with friends – we then divide the creations and give the assortment of chocolates to each family.

This year was a rather impromptu, and on a school day, so the younger members of the families represented their clan in the chocolate making.

If you feel like adding some home made treats to your gifts, then here are our top 3 child friendly chocolate making endeavours:

FullSizeRender
White chocolate (melted) mixed with shredded coconut and then simply heaped into blobs of sweet goodness on your foil/baking paper.

We then chose to add some sugar bling to these, just for fun.

IMG_0186

Similarly easy is dark chocolate (melted) mixed with nuts (we like slivered almonds, though any fruit and/nut will do). These then also become blobs of tasty treats on your baking paper.

IMG_0197

Each of these are delicious and very easy for even the youngest hands to master. If you want to get a little creative with an actual Easter egg then you may like to try the following. (Afraid we didn’t do this one this year so there are no pictures to go along with the instructions this time, but it is a simple activity even without pictures.)

  • Obtain a pre-made Easter egg and chocolate chips of the opposing colour. (Ie white chocolate egg with dark chocolate chips, or dark chocolate egg with white chocolate chips.) The colour of your base egg will be the primary taste, so choose as per your gift recipients tastes!
  • Open your Easter egg and sit in an egg cup.
  • Melt you chocolate chips in a separate bowl.
  • Using a paintbrush (suitably clean for edible artworks!) simply paint your own pattern onto the existing egg (using the melted chocolate chips of the opposing colour as the ‘paint’).

If you are ‘painting’ with white chocolate you can even add a little colour paste to your chocolate (just as you would normally when colouring chocolate) and this gave us a range of coloured ‘paints’ to work with. We did this last year and even added a few edible sparkles to our eggs.

Of course once you have finished your chocolates let them set while you make a card to accompany the chocolates, and lick the bowl clean!

IMG_0209

Enjoy your Easter creations.

EASY ACTIVITIES TO BUILD YOUNG BRAINS: EGG DECORATING.

IMG_0253Happy Easter holidays! Here’s a lovely little activity to do for Good Friday (durable for the whole family, and no shopping required, all you need is an egg, a pin and some paint – or pens etc).

Firstly make a pin hole in the top of your egg, and a slightly larger hole in the base of your egg (by poking the pin in a few times). Also poke the yoke inside your egg so it is broken.
IMG_0264
Now for the fun part! Hold the egg to your mouth and blow into the smaller top hole, holding the larger bottom hole over a bowl so you catch the egg that will come out! This will likely get a few little shrieks of delight. (If it is too hard to blow, simply make the bottom hole a little bigger.)
IMG_0262
Yay! You now have a blown egg! (At this point it is a good idea to rinse your egg out to prevent later smell!) Now you can decorate as you wish, we used paints – though pens, or glitter, or even melted crayons also work a treat. (To help hold the egg while painting we ‘mounted’ our creations on a sick over a small bowl. This allowed the children to turn the egg without smearing their creations.)
IMG_0235
The youngest member of our group to blow out their egg was 3yo, though the egg is surprisingly strong while being blown so I suspect younger children would also enjoy doing it with a little help. I am certain that older siblings (and indeed adults!) would excel at decorating a more elaborate egg for decoration.
IMG_0237
Once finished (and dry!) you can thread up your egg with beads to make a beautiful hanging decoration. Happy easter everyone!

BIG HISTORY CONCEPTS FOR LITTLE TOTS.

We’ve talked before about the importance of introducing a bit of ‘big history’ into early learning, and with everything from the dinosaurs to when mumma was born classed as ‘the olden days’ this project will help give a little perspective to our place in time.

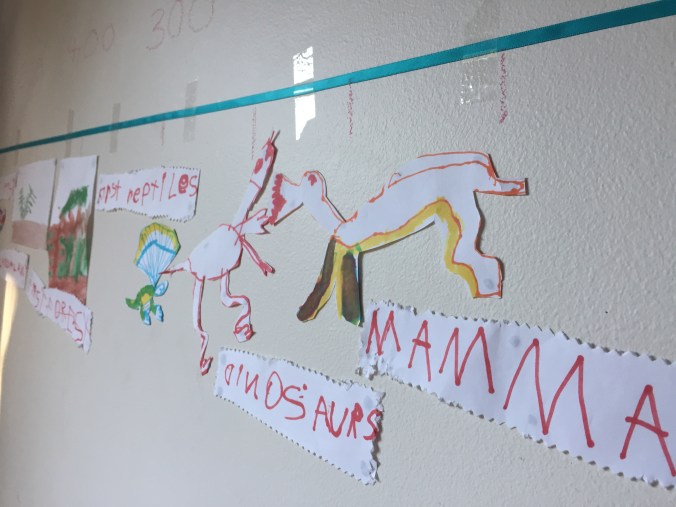
IMG_0573

Our strategy for the year is to provide some understanding of big history concepts. We have created a time line on one wall and as we come across facts, figures, dates and details we add them to our timeline.

When we visited a cave (that began forming tens of millions of years ago) we added that to our timeline, giving the experience even more historical wonder than the simple beauty they saw. When we talked about how the waterwheel that was used to make flour in the ‘olden days’ we were able to add that to our time line and see that it is relatively recent in our history. When the kids asked when the first person was born (being a believer in evolution rather than creation) we added that to our timeline and could explain the idea of evolution far more simply when they could physically see the degree of time passing and the changes happening.

We have left some space for the future too, so they can imagine and dream about what might be in store in the near future. We hope to get to this after a few more history concepts are visited. (Over the coming months as we work through the letters we will look back at the first civilizations, dinosaurs, and so on). I am also excited to see a few more concepts overlapping (ie “this was happening at the same time the pyramids were being built” etc).

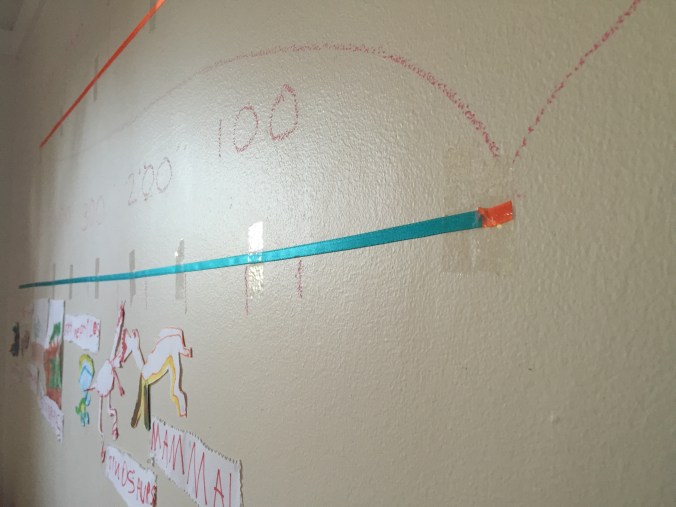
Now, if you plan to set up your own timeline you may wish to ‘cheat history’ a little as we did. Human history is so tiny in relation to many of the other big history concepts (such as the evolution of plants, Dinosaurs, mammals etc) that our entire human history is just a dot at the end of a 2m stretch of history (and that’s not even going back to the formation of planets etc!)

IMG_0575

To solve this problem of scale we ‘expanded’ our little dot of history into another timeline to allow for more detail in the human history. We used a coloured ribbon for each timeline (blue for the overall time line, with a dot of orange at the end. And orange for the human history.) This colour reference made it easer for the little historians to understand that the orange line represented that tiny little dot at the end of the blue line. We marked up our history over a 3m stretch of wall, simply using chalk directly on the wall to label the periods in time, and to add new concepts. When adding new ideas the little historians often create an image (painting, gluing, drawing etc) and we blue-tack that image to the wall at the relevant place on the timeline. This visual cue that they created is far easier for them to remember and explain to the other adults in their life than a simple text ‘entry’ on our timeline. By re-visiting the concepts as they explain their work they re-enforce their understanding of what they have learnt.

If you wish to create a similar timeline in your own learning space, we used this as a guide for our own timeline (you can calculate and measure this out to fit your space, but we were not so precise as the exact accuracy of the spacing is not so important – it’s a general concept that we are working towards at this stage so just sketching up an approximation is totally fine!)

World History:

  • 600 million years (before common time) – until the year 3,000(ish)
  • Separated at 100 million year intervals.

Human* History:

  • 10,000 years (before common time) – until the year 3,000.
  • Separated at 1000 year intervals

*Please note; the beginning of ‘human history’ that we expanded is determined at a point where there are some interesting things to add to the timeline (ie beginning of farming etc) rather than the beginning of Humans as a species. For practical scale reasons we found this to be more workable as it allowed a little more space between centuries once scaled to fit our space.

While my own little historians are not the ‘remember exact facts and figures’ type of learners, that is not our primary goal. Our aim with this timeline is to give the little historians a sense of their place in history. A sense of belonging in something much greater than themselves, an idea that things change gradually over time, and (as we enter further into human history) some understanding of how they can alter the future by their own actions.

A sense of belonging in time (as well as in space, community, culture etc) is vital for growing our young people into the adults we want in our world.

BAKING GEOGRAPHY (THE IMPORTANCE OF CAKE IN A CLASSROOM)

We’ve talked before about our mission to cook around the world, but in this case we are baking the actual world it’s self!

IMG_4688

To link in with our concepts surrounding volcanoes (inspired by our destination of the week; the volcanic islands Wallis and Futuna) we’ve been investigating the layers that make our world.

The inner core is the hottest (imagine the seed of a tick skinned fruit) the outer core is still darn hot, but a little cooler than the very centre (think of the flesh of your fruit) then there is the far thinner crust of solid, hard rock (imagine the skin of the fruit) and on top of that are all our oceans and islands. That’s our world in a fruity sense, but we decided it would have a more memorable impact on our learning to EAT CAKE!

IMG_4444IMG_4519

I’ve reflected a little in the past about the importance of a ‘Purple Cow’ approach applied to learning activities (that is, a thing so remarkable that you actually remake on it, and then by re-telling that exciting story you wire those nurons again and again). It’s a marketing concept (by marketing guru Seth Godin) combined with the brain science (best explained in easy reading books like The Whole Brain Child By Dan Siegel and Tina Payne Bryson). While you might not want to fill your kids up on sugar every time you learn a new concept, tossing in a ‘purple cow’ now and then (something they’ll be excited enough to talk about) will enhance their learning as well as bring a wide grin to their faces.

IMG_4313

First get measuring and mix up a cake batter, any think cake batter will do, but we used this slightly modified recipe from the Country Women’s Association Cook Book (that I’m proud to report 3yo Elka corrected me to: ‘Country Women’s and Men’s cookbook’ – I’m glad to see equality going both ways in my young lass!)

RECIPE:

  • 2 Large tablespoons butter
  • 1 cup sugar
  • 2 eggs
  • 2 cups self-raising flour
  • 3/4 cup milk

Mix all. Bake at 180 until a skewer comes out clean.

IMG_4308IMG_4335

We doubled this recipe (making 2 sides of the globe) though I have left it in it’s single form. The task of doubling the recipe was given to the 5yo, who (on top of the usual measuring and mixing) enjoyed the challenge of a little extra numeracy. The fraction was a little too advanced for her, but she was able to deduce that 2 halves were one cup, and 2 quarters were half when it was broken down for her. Fractions is not really something that she needs to concern herself with in terms of formal learning, but introducing the concept in relation to cooking (where there are so many fractions!) is a great place to begin to build her understanding.

IMG_4371

We then separated the mixture into 2 bowls and each child was responsible for mixing the colour for a different layer in the centre of the world. One for the inner core (red) and the other mixed the outer core (yellow/orange). This sense of ownership (and also colour reference) came in particularly handy when we re-visited the concept of layers later.

We then poured our otter core (yellow mixture) into the ‘ball tin’ (yes, I bought a ball tin on impulse years ago and it gets very little use – 2 rounded bowls would be just as effective!)

IMG_4421IMG_4428

We piped our inner core into the centre of each tin, and then popped it in the oven.

Due to the nature of cooking both colours at the same time the exact shape of your core will be a little unpredictable, but the thick mixture should hold it’s place fairly well. (Plus the neater alternative of cooking 2 separate cakes and ‘nesting’ the cakes during the icing process is far too complex for me to attempt with children!)

IMG_4451

We then iced the world in blue butter icing, and made some (roughly shaped) continents to place on our world. To create the continents we printed this map, taped it down with clear plastic on top. The kids then filled the continent shapes with fondant (we happened to have some coloured fondant left over from a cake, but most supermarkets also stock batches of ready made pre-colourd fondant in an easy pack).

IMG_4452

Elka (3yo) particularly enjoyed making these play dough like shapes out of fondant – though she did ‘accidentally’ eat Australia (see the photo of her face just as she was caught popping Australia in her mouth!)

IMG_4458

The kids learnt the continents more than I thought they would from this exercise, more than I thought they would. They also took a lot away from the concept of a world made out of layers. When entering a cave they asked if we would get far enough down to see the lava, and each time we talked about the layers after they would tell me ‘that’s the one I mixed’ and so on.

IMG_4770

EASY ACTIVITIES TO BUILD YOUNG BRAINS: BUILD A VOLCANO!

Volcanos in the Pacific – a tactile science experiment for kids of all ages.

IMG_3162

Wallis and Futuna are two small island groups in the South Pacific between Fiji and Samoa that were settled by French missionaries at the beginning of the 19th century. It is now classed as an “Overseas Territory” of France and there are 3 kings who assist in rule with a parliament of 20. While Wallis and Futuna are not necessarily a “country” in a technical term, they do have one very exciting element that can’t be missed in any child’s upbringing… Volcanos!
Futuna in particular is a volcanic island, and thus we can’t pass up the opportunity to bring out the baking soda and vinegar experiment that we all loved so much as children.

IMG_3134

Now, if you need a refresher on volcanoes (also linking up that big picture by making clear links to the work we’ve been doing around the sea and space) then check out this video (with or without your child, depending on how old they are and how much they watch).

The video will run you through how to create your volcano (instead of building one you may wish to do it at the beach with a sand volcano with bottle inside, though our little group enjoyed the measuring, mixing and making of the volcano just as much as the actual eruption.)

IMG_3196

When you conduct this experiment, you may wish to focus entirely on the power of volcano’s to form the land (such as the islands Wallis and Futuna) but if you have a budding chemist in your group, then you might want to take it further and conduct a series of volcanic experiments to asses the chemical reaction in their own right. Ie Bicarb and water (no visible reaction), Bicarb and vinegar (bubbles), Mentos and diet cola (explosive bubble reaction).

Ask kids to predict what they think will happen in each instance, hypothesise what the reason is for the different reactions and realise that there is nothing “wrong with being wrong” in science (A negative result tells you as much as a positive one!)

IMG_3205

Having read a little about chemicals with the 5yo, I was surprised that she later formulated a hypothesis about the volcano that was quite accurate; She thought that there was a chemical reaction that made a gas and that created the bubbles that she saw. While this is probably not going to be a fact that she remembers later, the process of linking known information and apply it to new situations and observations to form a new hypothesis is something we want to encourage at every point possible on the road to adulthood!

IMG_3252

We’ll later have a little road trip to look at more detail about where the heat for real Volcanoes comes from, but this little science experiment is a great place to get those little scientists thinking!

EASY ACTIVITIES TO BUILD YOUNG BRAINS: MAKE SIMPLE BUTTON CASTANETS.

Simple button castanets are a delightfully easy way to bring a little spanish culture into your home.

spain2b

Ask your tot to choose 2 large buttons.

Give them some elastic to thread through the holes.

Tie off the back of the elastic and attach to fingers.

This takes just a few moments, then they’ll want to make a set for the other hand!

We then held a little dance performance where each child showed us their moves. What we intended as a simple fine motor skills activity with some cultural background (making the castanets) turned into a full body improvisation of spanish dance and the kids couldn’t have loved it more! (Even Anica, who typically shys away from any performance, allowed her whole body to become a proud spanish dancer – see her take the stage with gusto below!)

spain2c

Allowing children to act (and excell) out of their usual comfort zone allows those parts of the brain that are rarely accessed to get more of a look in and build stronger connections for other areas of their life. What triggers this will be different for each child, just as will the skills that are outside their comfort zone! Anica in this instance showed all the traits of a percussive, passionate, extravert in her Spanish solo – where as previously she has told me she is the best at ‘staying in the middle and not being seen’! Anica is likely to always be a little more shy than her outgoing sister, and we don’t want to change this about her, but the more she has the opportunity to choose to venture outside her comfort zone, the more she will be able to function with her whole brain in day to day life.

Without getting carried away talking about the plasticity of the brain, this applies to a variety of what we deem to be inbuilt ‘personality traits’ – Our brain changes to physically become stronger at what we are told we are and what we are allowed to do. As parents, carers and educators we have a huge responsibility to the young ones around us to explore all the possibilities of who they could be, rather than predict or label their personality and limit their ability to grow into the well rounded adults we all want to see in our future!

As an ex-dance teacher I was also delighted to see how this simple prop changed the way the children moved from a technical movement point of view. Having watched a video as part of our research last week (that showed some spanish dancing) the children instantly changed their default flowing movement (influenced by their friends mimicking ballet) into a staccato passionate movement that they had seen in the flamenco dance. Their feet stomped, their arms held power and their little castanets went wild!