EASY ACTIVITIES TO BUILD YOUNG BRAINS: OCEAN SCIENCE IN A BOTTLE.

IMG_5030

This is a brilliant little experiment (inspired by happy hooligans) is great to teach the layers of the ocean and also a little science regarding that good old oil vs water experiment! (Plus it’s really easy to make with household items, we put this one together on a whim before bed last night – too easy!)

If your young ones watch Octonauts then they might already have a bit more of an understanding (than most adults) of how the Ocean is made up of ‘layers’ or ‘zones’. (We’ve talked before about Screen time, and my own children do enjoy a bit of Octonauts thus have lots to say about the layers of the ocean!)

For a bit more detail (and a refresher for yourself) take a quick read through this short article that explains the layers as well as a few other great facts about the ocean that you might want to pull out this week!

You will need:

  • Cooking oil
  • Water coloured with blue dye
  • Clear bottle
  • (Safety goggles entirely optional, but after our explosive volcanic science 5yo Anica felt it would be necessary to wear them!)

Half fill your bottle with water, mix in colour, then fill the remaining with oil. Secure lid and mix.

IMG_4988IMG_4991

The oil and water will separate into a gradient and then into layers. While it is mixed is a great time to talk about the gradient of layers that exist in the ocean and how the different levels of light affects the creatures living there.

As the oil separates you will probably also want to talk about why that oil doesn’t mix with the water – for a short explanation of what is going on you can read this great article. The details of polarities of molecules is not something my young ones are ready for, but this can be simplified and the idea of density is something that is far easier to explain.

IMG_5017

It is also a great to mention that because oil and water don’t mix, sea creatures can use oily feathers or fur to stop the water getting to their skin. If you feel ready you could cover one of your little scientists hands in oil, leaving the other without oil. When both hands are submerged in the food coloured water one had will come out wet (and coloured) while the other will come out with the water (and colour) running off. This involves a little clean up, but is something that will really drive home the concept of animals using oil as a form of protection from water.

Note that these pictures do not do the movement of the oil on water justice, the wave like swirls as it was mixed were mesmerising, and if I didn’t have to get the kids to bed I’m sure they would have enjoyed watching it for hours!

IMG_5047

EASY ACTIVITIES TO BUILD YOUNG BRAINS: WINDOW WONDERLAND.

Transform a window into a wonderful water wonderland that can house all your sea creatures.

IMG_4910

What you will need:

  • Cellophane (blue)
  • Tape
  • Scissors
  • Whiteboard markers (or we used chalk pens, the kind they use to write menus – there are a good selection to choose from at Artary)

Hand your children a ‘special window pen’ (and in our part of the world it’s important that we make that definition – drawings tend to ‘creep’ here!) Talk about all the things they might like to draw in their watery wonderland. Do they want to draw a seahorse like last week? How many legs do crabs really have? Where is that fish swimming to? (While drawing you may like to show them images of the creatures that they are drawing to assist them in ‘seeing’ rather than simply representing with the symbols they have learnt represent particular features – though if your fish still needs a belly button and a nose to be complete, then let them go for it!)

IMG_4920

After the artwork is complete simply tack your cellophane waves to the window (overlapping looks great as it gives various shades of blue). On a sunny day this will give blue light to your room, with little shadows of their drawings – it is quite sweet to see.

Once you have finished take a photo of your young tots from the other side of the window so they can see themselves ‘swimming’ in the water. (Seeing ourselves is an important part of developing self-reflection – plus they will think it’s a hoot!)

THINGS TO SEE AND DO: JOURNEY TO THE CENTRE OF THE WORLD!

Well that’s a slight exaggeration, but Hastings caves does reach a good long way into the crust of our world (we’re not really going to get anywhere near the core… but it’s a great adventure in to the depth of our planet never the less!)

IMG_4608

Newdegate Cave is around 1.5hrs – 2hrs drive from Hobart and is remarkably the largest tourist cave in Australia which occurs in dolomite, rather than limestone. Its richly decorated chambers began forming tens of millions of years ago (great for bringing in those Big History concepts on your young ones timeline) and is formed by water! (Showing the immense power of water – in an entirely different way to the power of water in our recent water wheel investigation!)

IMG_4543

During the walk to the cave the excitement built, and the kids were keen to read and learn everything they could about the caves. As we waited for the tour guide we looked at the map and tried to think of what could have made such a big hole. This is Anica’s face when she learnt it was water that created the giant caves that we were about to enter.

IMG_4565

Once inside with our small tour group the crystal cave was beautifully lit and totally captured the imagination of the kids. The guide explained how the stalactites and stalagmites were formed, and answered questions as we moved though the upper section of the cave. (The cave is considerably deeper than the public are able to explore, but the 45min tour was perfectly timed for us and we were very happy to see the amazing sights in the public areas of the cave.)

IMG_4562

We were also lucky enough to see some critters inhabiting the caves (a rare occurrence) and with the help of our guide we managed to spot a small cave spider and a cave cricket. The caves and tour are very well run, and impressively they have a wealth of free printable educational sheets relating to the caves available here. Many of these sheets are a little old for my own youngsters, but I look forward to re-visiting the ideas when they are older.

IMG_4596

The caves are also near a hot (warm) spring that fills a pool that you can swim in during your visit. Unfortuantly a large tree had fallen over the boardwalk just before our visit, so the Hot Springs walks (where you can feel the water from the spring running joining the water from the creek) is closed until further notice while they repair the track, but a splash in the pool gave the kids a great concept of water coming up from the warmer parts of the earth as they could see where it entered the pool (warmed) and then left the pool to join the creek. (The staff when asked were very helpful at explaining this, and obviously possess a great deal of knowledge beyond simply selling park tickets!)

IMG_4548

Despite the daunting idea of a 3-4hour round trip to see the caves, I recommend inviting a few friends, bring a picnic, stop on the way and making a day of it – the cave tour followed by a swim in the warm springs was great fun, (and surprisingly relaxing!) way to spend a family day!

BAKING GEOGRAPHY (THE IMPORTANCE OF CAKE IN A CLASSROOM)

We’ve talked before about our mission to cook around the world, but in this case we are baking the actual world it’s self!

IMG_4688

To link in with our concepts surrounding volcanoes (inspired by our destination of the week; the volcanic islands Wallis and Futuna) we’ve been investigating the layers that make our world.

The inner core is the hottest (imagine the seed of a tick skinned fruit) the outer core is still darn hot, but a little cooler than the very centre (think of the flesh of your fruit) then there is the far thinner crust of solid, hard rock (imagine the skin of the fruit) and on top of that are all our oceans and islands. That’s our world in a fruity sense, but we decided it would have a more memorable impact on our learning to EAT CAKE!

IMG_4444IMG_4519

I’ve reflected a little in the past about the importance of a ‘Purple Cow’ approach applied to learning activities (that is, a thing so remarkable that you actually remake on it, and then by re-telling that exciting story you wire those nurons again and again). It’s a marketing concept (by marketing guru Seth Godin) combined with the brain science (best explained in easy reading books like The Whole Brain Child By Dan Siegel and Tina Payne Bryson). While you might not want to fill your kids up on sugar every time you learn a new concept, tossing in a ‘purple cow’ now and then (something they’ll be excited enough to talk about) will enhance their learning as well as bring a wide grin to their faces.

IMG_4313

First get measuring and mix up a cake batter, any think cake batter will do, but we used this slightly modified recipe from the Country Women’s Association Cook Book (that I’m proud to report 3yo Elka corrected me to: ‘Country Women’s and Men’s cookbook’ – I’m glad to see equality going both ways in my young lass!)

RECIPE:

  • 2 Large tablespoons butter
  • 1 cup sugar
  • 2 eggs
  • 2 cups self-raising flour
  • 3/4 cup milk

Mix all. Bake at 180 until a skewer comes out clean.

IMG_4308IMG_4335

We doubled this recipe (making 2 sides of the globe) though I have left it in it’s single form. The task of doubling the recipe was given to the 5yo, who (on top of the usual measuring and mixing) enjoyed the challenge of a little extra numeracy. The fraction was a little too advanced for her, but she was able to deduce that 2 halves were one cup, and 2 quarters were half when it was broken down for her. Fractions is not really something that she needs to concern herself with in terms of formal learning, but introducing the concept in relation to cooking (where there are so many fractions!) is a great place to begin to build her understanding.

IMG_4371

We then separated the mixture into 2 bowls and each child was responsible for mixing the colour for a different layer in the centre of the world. One for the inner core (red) and the other mixed the outer core (yellow/orange). This sense of ownership (and also colour reference) came in particularly handy when we re-visited the concept of layers later.

We then poured our otter core (yellow mixture) into the ‘ball tin’ (yes, I bought a ball tin on impulse years ago and it gets very little use – 2 rounded bowls would be just as effective!)

IMG_4421IMG_4428

We piped our inner core into the centre of each tin, and then popped it in the oven.

Due to the nature of cooking both colours at the same time the exact shape of your core will be a little unpredictable, but the thick mixture should hold it’s place fairly well. (Plus the neater alternative of cooking 2 separate cakes and ‘nesting’ the cakes during the icing process is far too complex for me to attempt with children!)

IMG_4451

We then iced the world in blue butter icing, and made some (roughly shaped) continents to place on our world. To create the continents we printed this map, taped it down with clear plastic on top. The kids then filled the continent shapes with fondant (we happened to have some coloured fondant left over from a cake, but most supermarkets also stock batches of ready made pre-colourd fondant in an easy pack).

IMG_4452

Elka (3yo) particularly enjoyed making these play dough like shapes out of fondant – though she did ‘accidentally’ eat Australia (see the photo of her face just as she was caught popping Australia in her mouth!)

IMG_4458

The kids learnt the continents more than I thought they would from this exercise, more than I thought they would. They also took a lot away from the concept of a world made out of layers. When entering a cave they asked if we would get far enough down to see the lava, and each time we talked about the layers after they would tell me ‘that’s the one I mixed’ and so on.

IMG_4770

EASY ACTIVITIES TO BUILD YOUNG BRAINS: THE POWER OF THE WIND.

If the breeze is blowing grab a few craft supplies, your young engineers, and head down to Sullivans Cove Waterfront for an investigation into the invisible force that is wind.

IMG_3818

What you will need:

  • 4 paper cups
  • Strong cardboard (2 lengths about the shape of a ruler)
  • Pin (drawing pin, dress makers pin, or sewing needle)
  • Pencil (with rubber on top)
  • Tape
  • Scissors

Make a cross with the 2 lengths of cardboard, and tape at the middle so they form a ridged and evenly spaced ‘X’

Tape a cup to the end of each of the ‘arms’ of the X (ensuring they are all facing the same way when it turns)

Place the pin though the centre of the X and attach it to the pencil (by sticking the pin into the rubber end of the pencil as in the picture).

IMG_3830

The X should now rotate freely and the cups should catch the wind to make it spin.

Finished! You just built a wind turbine (admittedly it is not turning anything at the base, but that is probably an engineering feat for slightly older children!)

Of course this is a great time to talk with kids about how the wind holds energy, and how that energy can be ‘caught’ and transferred through rotation to create power that we can use.

If you do this experiment on the waterfront you will be able to point out the wind turbines turning in the wind on top of the buildings.

If you are venturing through the midlands (or feel like a day trip) you may like to visit the Callington Mill at Oatlands for this experiment. We visited this earlier in the year and being able to reference the internal cogs that they saw at the windmill really helped our kids understand that the rotation caused by catching wind was able to to run a ‘motor.’

FullSizeRender

We’ll show you how water can generate power in a post soon, so no worries if you don’t get to Oatlands today… that turbine action will come back into play soon with another little potential road trip!

EASY ACTIVITIES TO BUILD YOUNG BRAINS: BUILD A VOLCANO!

Volcanos in the Pacific – a tactile science experiment for kids of all ages.

IMG_3162

Wallis and Futuna are two small island groups in the South Pacific between Fiji and Samoa that were settled by French missionaries at the beginning of the 19th century. It is now classed as an “Overseas Territory” of France and there are 3 kings who assist in rule with a parliament of 20. While Wallis and Futuna are not necessarily a “country” in a technical term, they do have one very exciting element that can’t be missed in any child’s upbringing… Volcanos!
Futuna in particular is a volcanic island, and thus we can’t pass up the opportunity to bring out the baking soda and vinegar experiment that we all loved so much as children.

IMG_3134

Now, if you need a refresher on volcanoes (also linking up that big picture by making clear links to the work we’ve been doing around the sea and space) then check out this video (with or without your child, depending on how old they are and how much they watch).

The video will run you through how to create your volcano (instead of building one you may wish to do it at the beach with a sand volcano with bottle inside, though our little group enjoyed the measuring, mixing and making of the volcano just as much as the actual eruption.)

IMG_3196

When you conduct this experiment, you may wish to focus entirely on the power of volcano’s to form the land (such as the islands Wallis and Futuna) but if you have a budding chemist in your group, then you might want to take it further and conduct a series of volcanic experiments to asses the chemical reaction in their own right. Ie Bicarb and water (no visible reaction), Bicarb and vinegar (bubbles), Mentos and diet cola (explosive bubble reaction).

Ask kids to predict what they think will happen in each instance, hypothesise what the reason is for the different reactions and realise that there is nothing “wrong with being wrong” in science (A negative result tells you as much as a positive one!)

IMG_3205

Having read a little about chemicals with the 5yo, I was surprised that she later formulated a hypothesis about the volcano that was quite accurate; She thought that there was a chemical reaction that made a gas and that created the bubbles that she saw. While this is probably not going to be a fact that she remembers later, the process of linking known information and apply it to new situations and observations to form a new hypothesis is something we want to encourage at every point possible on the road to adulthood!

IMG_3252

We’ll later have a little road trip to look at more detail about where the heat for real Volcanoes comes from, but this little science experiment is a great place to get those little scientists thinking!

EASY ACTIVITIES TO BUILD YOUNG BRAINS: STARDUST PLAY DOUGH GALAXY.

IMG_3493

We’ve talked before about the benefits of cooking with children, and we all know the benefits of playing with dough… adding a little glitter to your next batch of playdough just brings a bit of sparkle to the imagination (and the kitchen!)

IMG_3382

Use your standard play dough recipe.

I use the one below, though any will do:

  • 2 cups plain flour
  • 1 cup salt
  • 4 tbs cream of tartar
  • 2 tbs oil
  • 2 cups [boiling*] water

Then to create ‘ stardust playdough’ simply add the left over glitter from your sparkle writing tray, and a splash of black food colour.

IMG_3387

*Due to laziness I personally opt to boil the water before adding to the mix, thus I don’t need to stir a hot pot on the stove, but instead just leave it churning in the mixer until it is fully combined. I find this better for my own process, but also easier for the kids to be involved. If a little sticky I add a pinch more flour until it reaches the right texture.

IMG_3403

After mixing give the dough to the children so they can get those little fingers working while they finish kneading the still warm dough (I’ve found kids explore the warm dough differently to once it is cold). Then simply let them go wild with what ever their minds dream up. We chose to bring out our planets from our solar system adventure so the older created a mini solar system in her dough, while the younger acted out scenarios between the planets.

IMG_3481

Once you have finished with the playdough remember to wrap it so that you can use it for many days to come. There will be a bit of glitter lost each session, but I think the delight of playing with it is worth a few extra sparkles floating around the house.

THINGS TO SEE AND DO: SORELL STRAWBERRY FARM

A Sumptuous day of picking strawberries in the sunshine, who wouldn’t enjoy that!?

IMG_3633

Somewhere along the line we (collectively) stopped producing our own food in favour of supermarkets. While many families (ourselves included) are bringing back a bit of token home grown produce to the table, the true art of gardening for sustenance is not as common as it once was.

As a result, a growing trend in teaching kids about the process of ‘paddock to plate’ is emerging as an essential learning area to cover in the early years. This is a concept we will re-visit regularly throughout the year… And strawberry picking surely has to be one of the tastiest and most enjoyable ways to get started!

IMG_3745

Just past Sorell, this fruit farm was perhaps the children’s favourite experience yet. We met at tthe entrance, paid our entrance fee, and then were let loose to pick as much as we desired (provided that we didn’t leave with more than our container full – eating as much as you can on the farm is entirely encouraged.)

The costs are:

$13.50 per adult

$6.00 per child (3yo and under free)

By the time we left I had no doubt that we had well and truly got our money worth. We were at the farm for about 5 hours, exploring the different fruits at various states of growth, picked continually, filled our containers and our bellies with an array of fruits and all 5 kids were fully engaged throughout process.

IMG_3652

So while we left with a tub of berries each, we achieved far more than the acquisition of fruit:

  • We expanded our berry tasting pallet (even the pickiest eater was willing to try each new fruit that we came across while in this environment, and she found a new berry that is her favourite food now!)
  • We ran, laughed, jumped through the rows (with fairly good sight lines the kids had a little more freedom to explore independently while we could still see them easily). For young children the responsibilities to explore freely with friends are few and far between!IMG_3679
  • We searched, spotted, assessed for ripeness, plucked and tasted each fruit. The day was like a giant tasty tactile game of hide and seek, even the youngest member was delighted with this sensory rich experience.

IMG_3719

  • The kids asked lots of questions and we all expanded our technical fruit knowledge. (The different kinds of bushes that different fruits grow on, what shows us it is ripe for different fruits, what season each fruit ripens etc.) The kids (having seen corn and apples in the field near the berries) can’t wait to return in Autumn for another harvest experience.

IMG_3689

As always, learning is re-enforced by re-telling and/or acting out what has been learnt. The story telling process fires up and connects those exact same neurons almost as effectively as the actual experience itself. I’m delighted that the ‘harvesting’ has continued after we returned from the farm. We have even been treated to a ‘harvest festival’ entirely planned by the children. (With a selection of fruit, herbs (and weeds!!) that they picked from the garden – a good opportunity to hi-light that not all plants are good to eat!

With strawberry season coming to an end, get yourself out to Sorell Fruit Farm for a delightful day of exploration and learning. There are good facilities (toilets, a little shop and even a cafe) it is easy to find, open 7 days, and we highly recommend the experience!

EASY ACTIVITIES TO BUILD YOUNG BRAINS: MEASURE OUR GALAXY.

IMG_3055 Now, you’ve made a solar system – let’s get some idea of how vast that solar system is… for this you will need a wide-open space and some skewers. Initially we printed little planets for colouring. (Alternatively you could bring the solar system that you just made, but with a little wind in the air we thought it safer to opt for the smaller representation of each planet!) Attach each planet to a skewer with tape and head to a wide open space (we went to the local sports field). Place your sun in the centre of the field and begin to measure your planets. For accurate measurements of the distances between planets you can look here. We chose to be more approximate in our own measurements, with ‘kids steps’ as our form of measurement, and the furthest being 30 steps from our sun (to allow for shorter counting attention span of the 3yo!) IMG_3042 
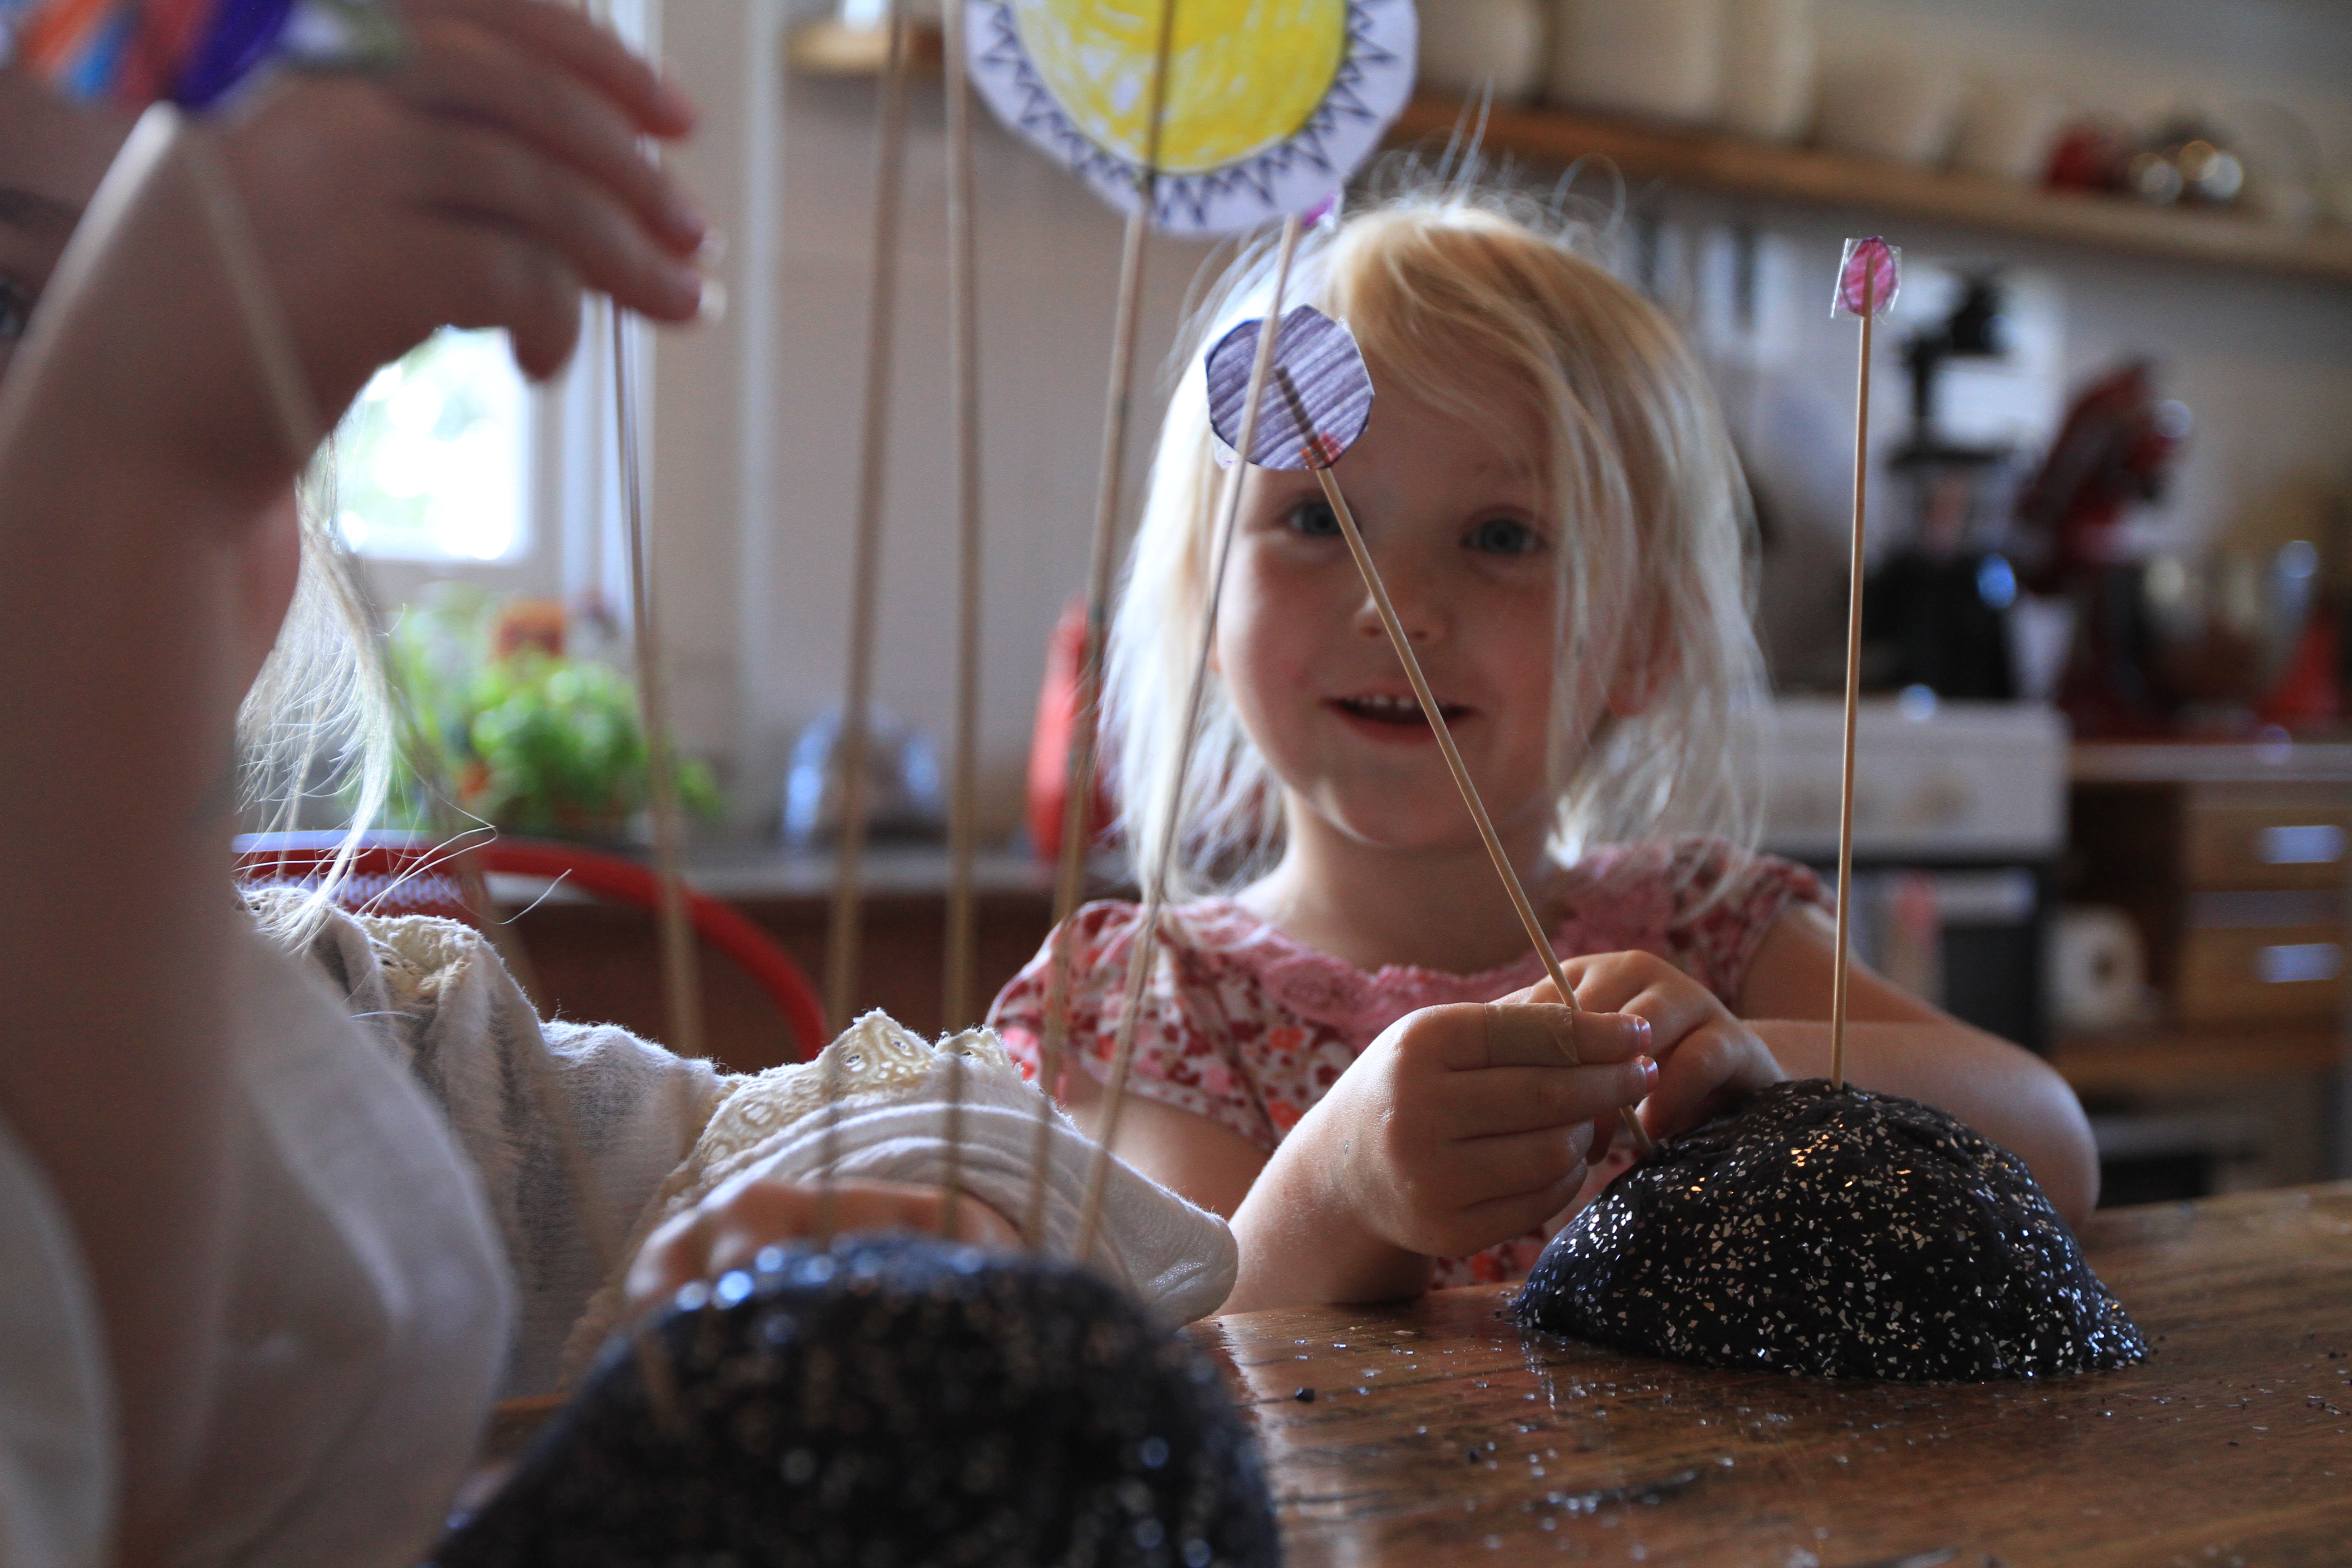
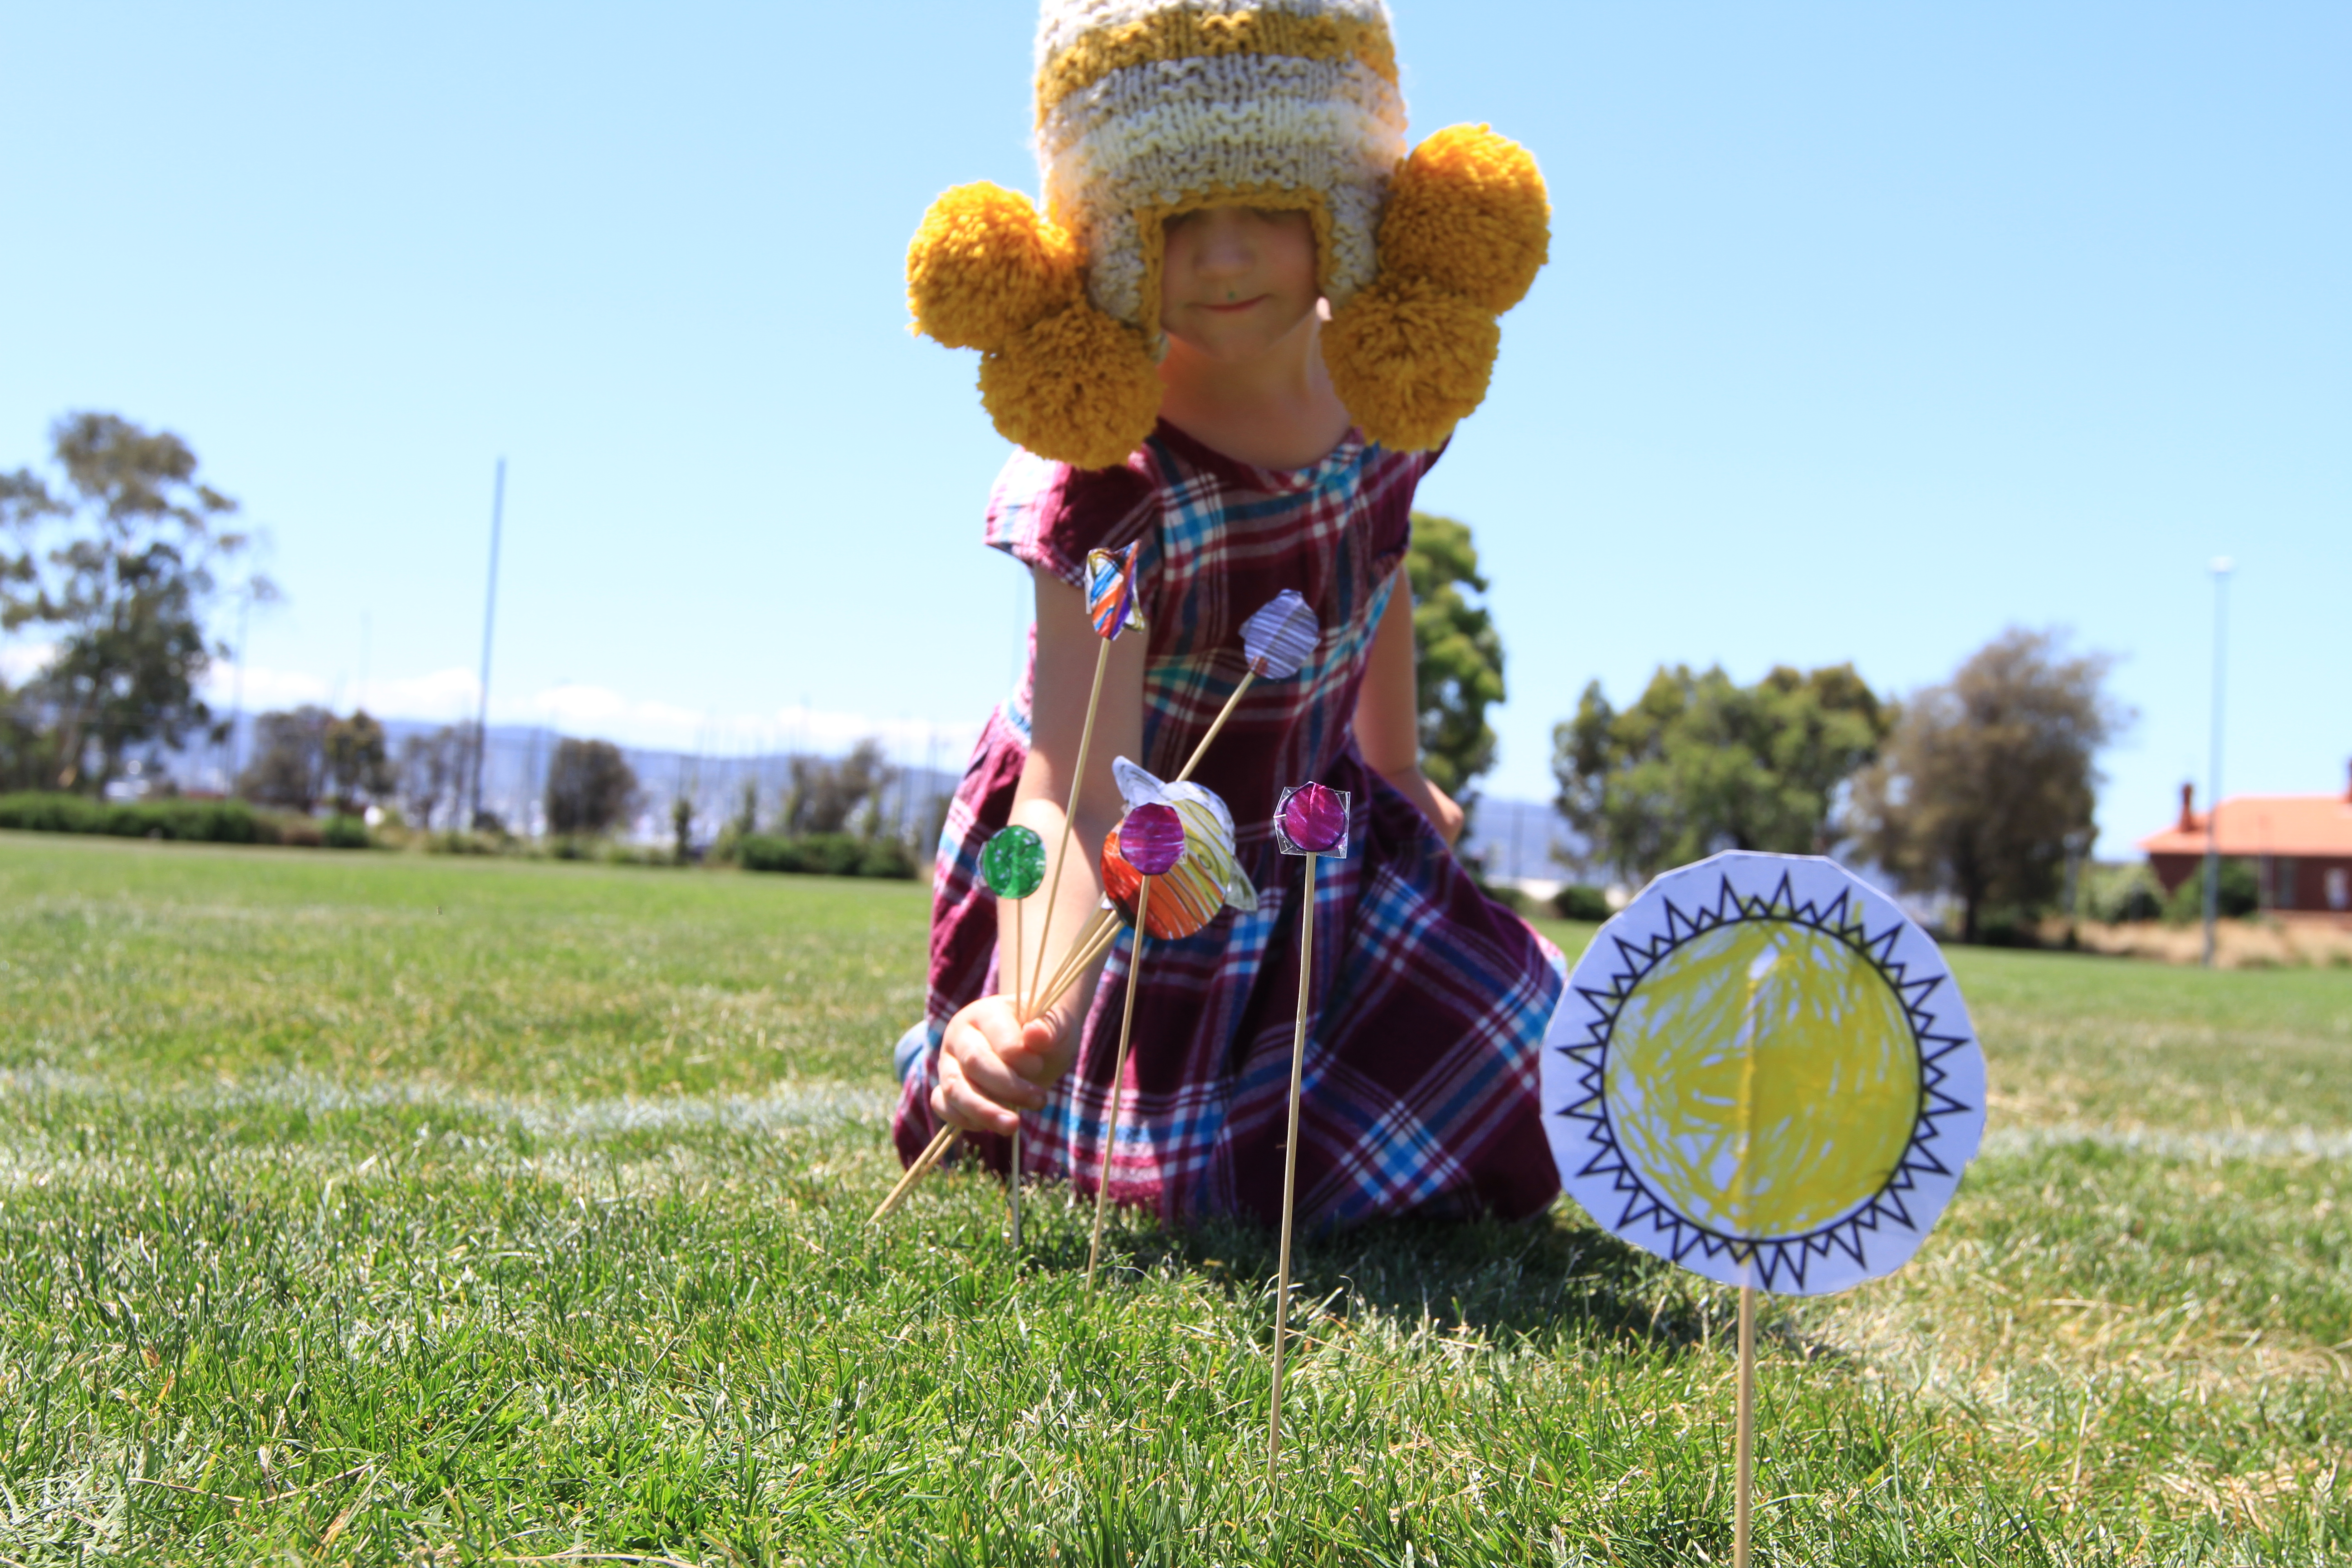
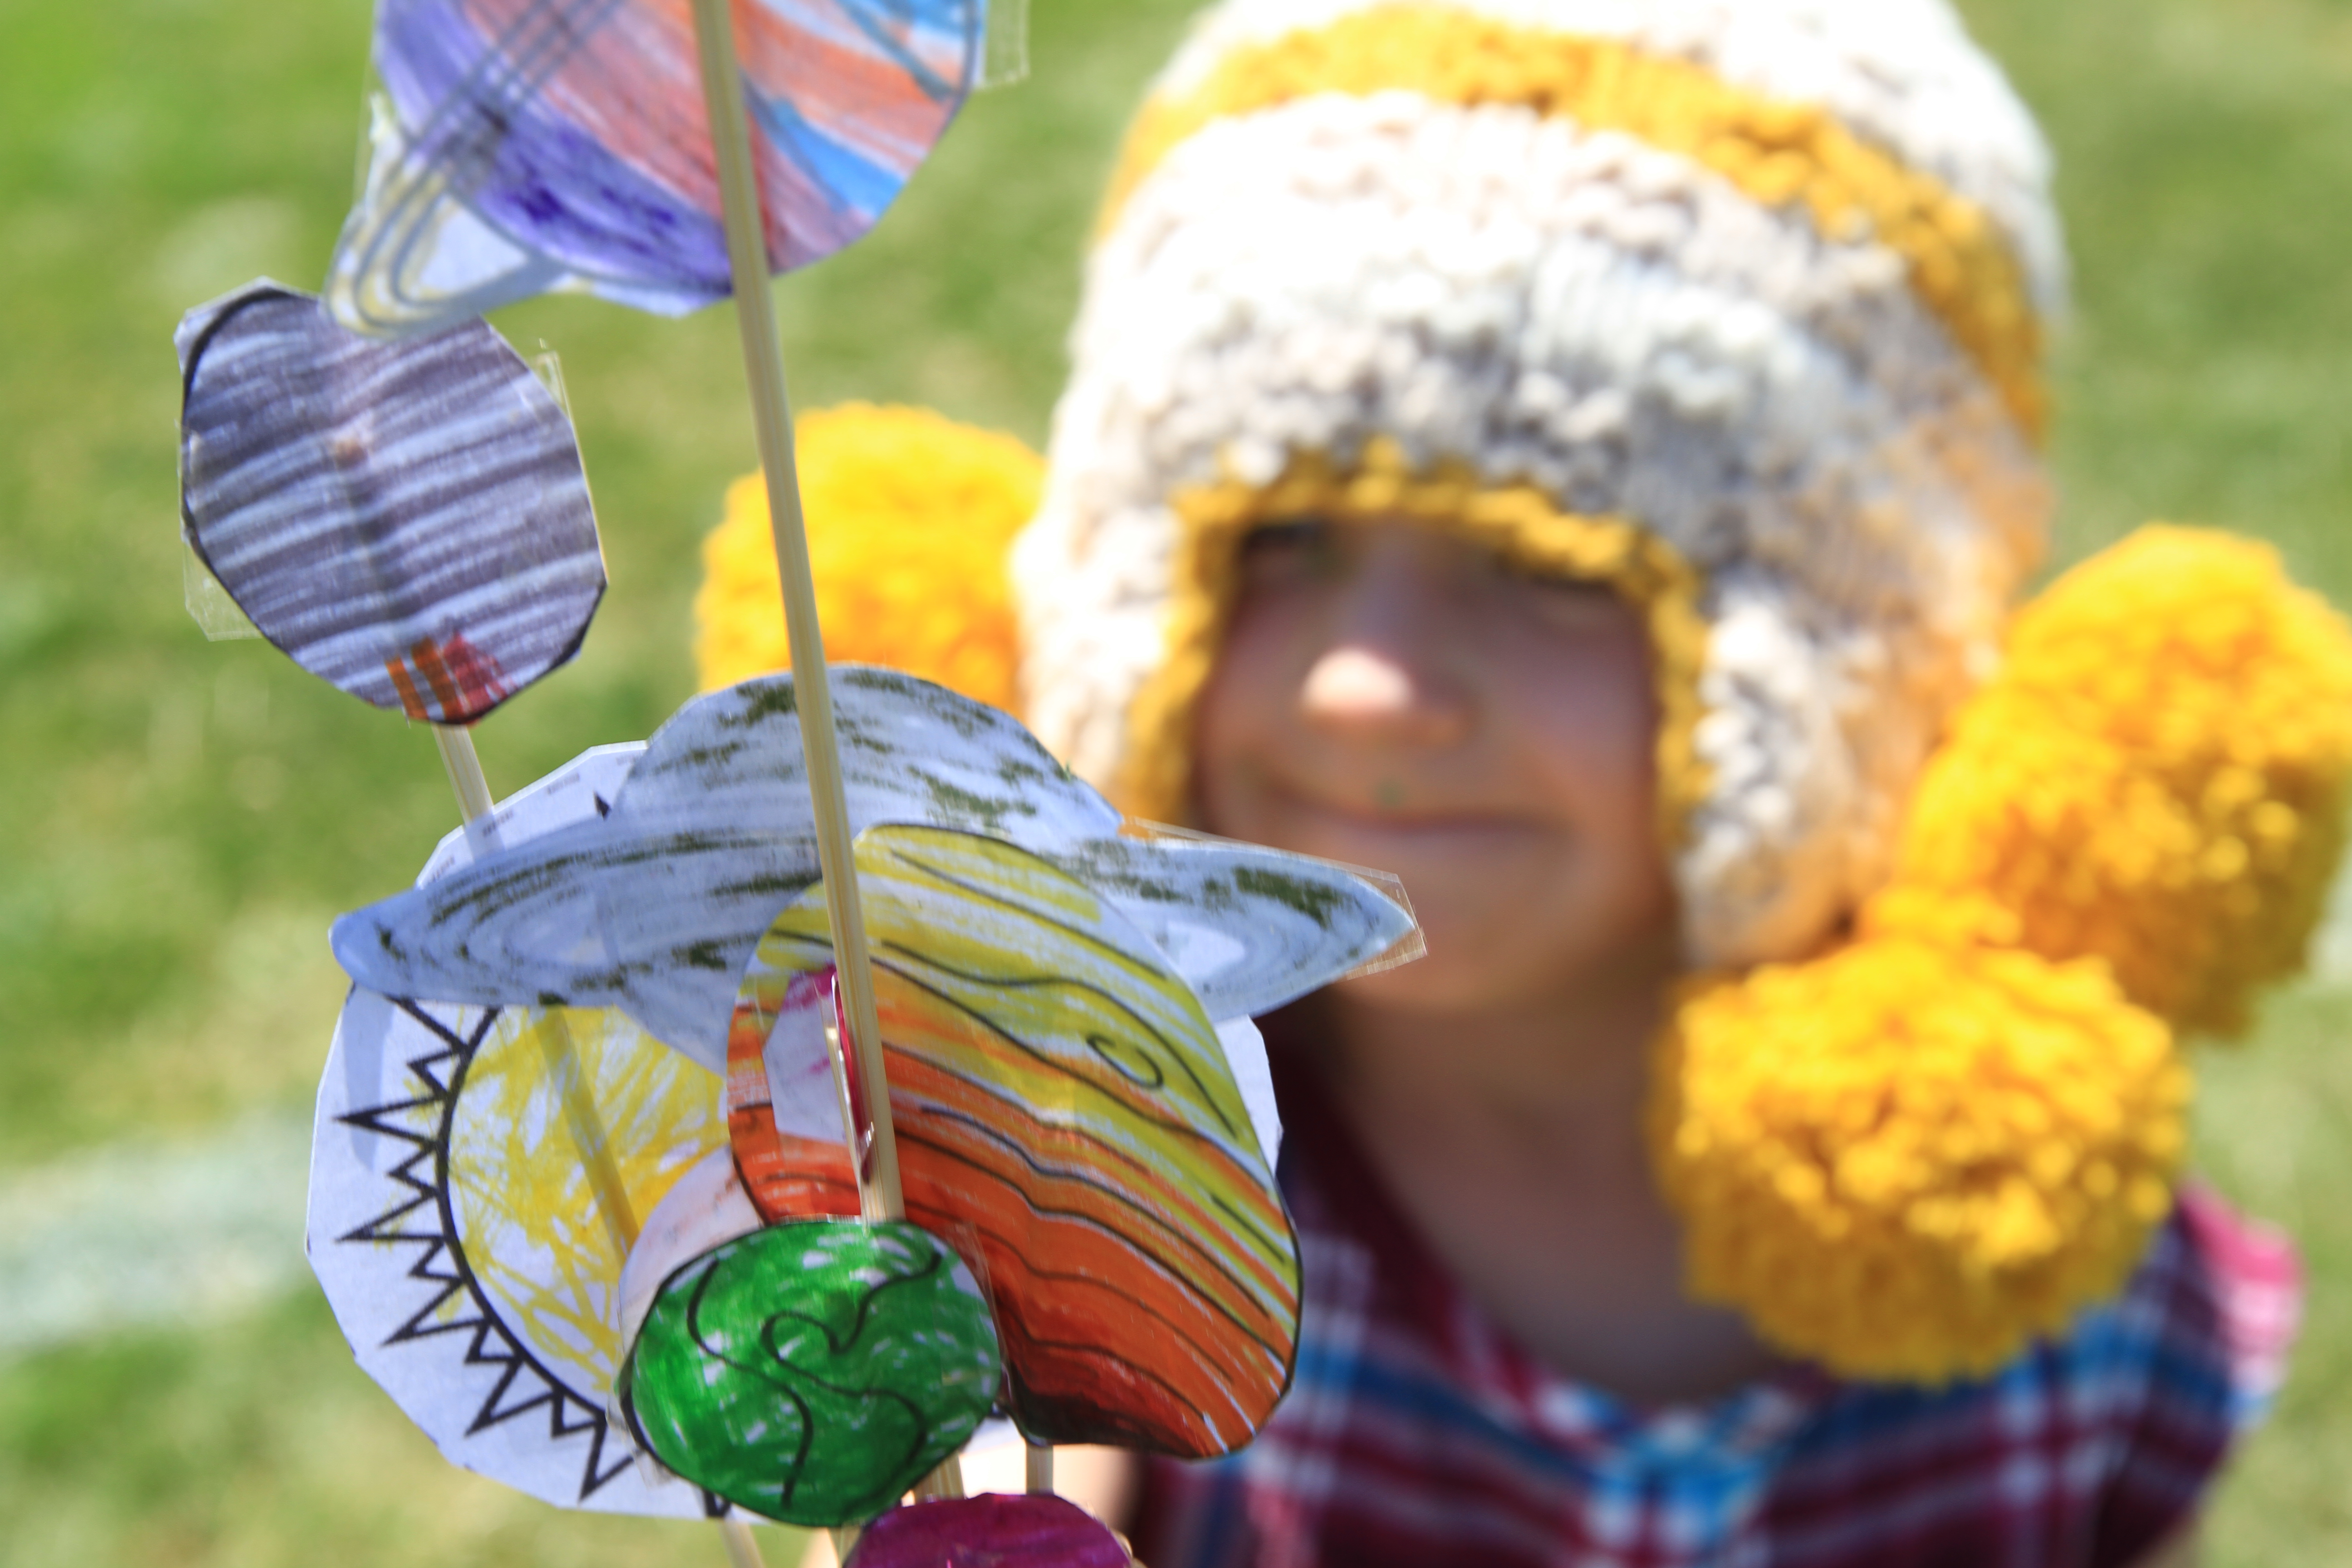
Each time you pace out your planets, place your skewer as a marker. You should end up with a little gathering of planets near your sun, then some so far away that you can barely see them! (Well, 30 large steps away at least!) Before you head out you may like to watch this demonstration that I was delighted to find (after doing ours, but still great to watch!) – he did it on a slightly larger scale but has some great facts about the planets that you might like to include when you are doing it with your young ones. Once all in place have a look at how long it takes to walk around the sun if you were Venus, or perhaps Mars… now how long does it take to you to move around the sun if you were Neptune! (See Neptune (3yo Elka) taking a bit of a shortcut as she orbits the sun (5yo Anica) below) IMG_3052 Depending on your young ones you may like to talk about how our Earth year is determined by a rotation around the sun. (We will be looking at weather a little shortly, so we’ll answer some of those seasons questions in the coming week!) – and make sure you bring your planets home again, they will be useful for our upcoming galaxy play-dough! IMG_3066

EASY ACTIVITIES TO BUILD YOUNG BRAINS: BUILD OUR SOLAR SYSTEM

There are many wonderful ways to represent the solar system but we chose a simple one that will stay with us as a reference point for the rest of the year.

Unless you are a keen stargazer you may want to refresh a few interesting points about the planets before you start. This is a good place to start.

IMG_3036

With research book (or iPad) in hand tell your kids the most interesting things you know about the first planet from the sun. Ask them how best to represent these qualities in their planet and get those paints mixing!

IMG_3039

Repeat this process for each of the planets as you work your way out from the sun. To re-enforce the idea of colour mixing I encouraged the kids to choose at least 2 colours for each planet. (The delight of kids learning red and yellow forms orange never grows old!)

Depending on your kids you may like to mix up your paining technique to ensure each planet is a unique; we started with brushes, moved onto squish painting (where you put dobs of paint, fold the paper and squish to see what happens) and then ended up making hand prints to decorate the last of our planets.

IMG_3027

Once all are dry, cut your planets to scale. I referred to this site, with the diagram below, to get approximate scale, though found that accurate scale was not necessarily practical (I didn’t want to smallest to be the size of a pin head, nor did I want the largest to be the size of an umbrella – we compromised and made them all a little closer in size for practical reasons!)

These planets now decorate our upper walls and we have a small paper rocket (left over from our straw spaceship adventure) that visits a different planet each day, finding facts and reminding us that we are just a tiny part of this huge universe!

IMG_3371