EASY ACTIVITIES TO BUILD YOUNG BRAINS: KIDS FOLD AN ORIGAMI PENGUIN COLONY

Now, I’m no origami buff (I’ve never even made the classic bird!) but this little penguin was easy enough for all of us to make (the 5yo was rather capable of making her own, the 4yo needed some assistance!)

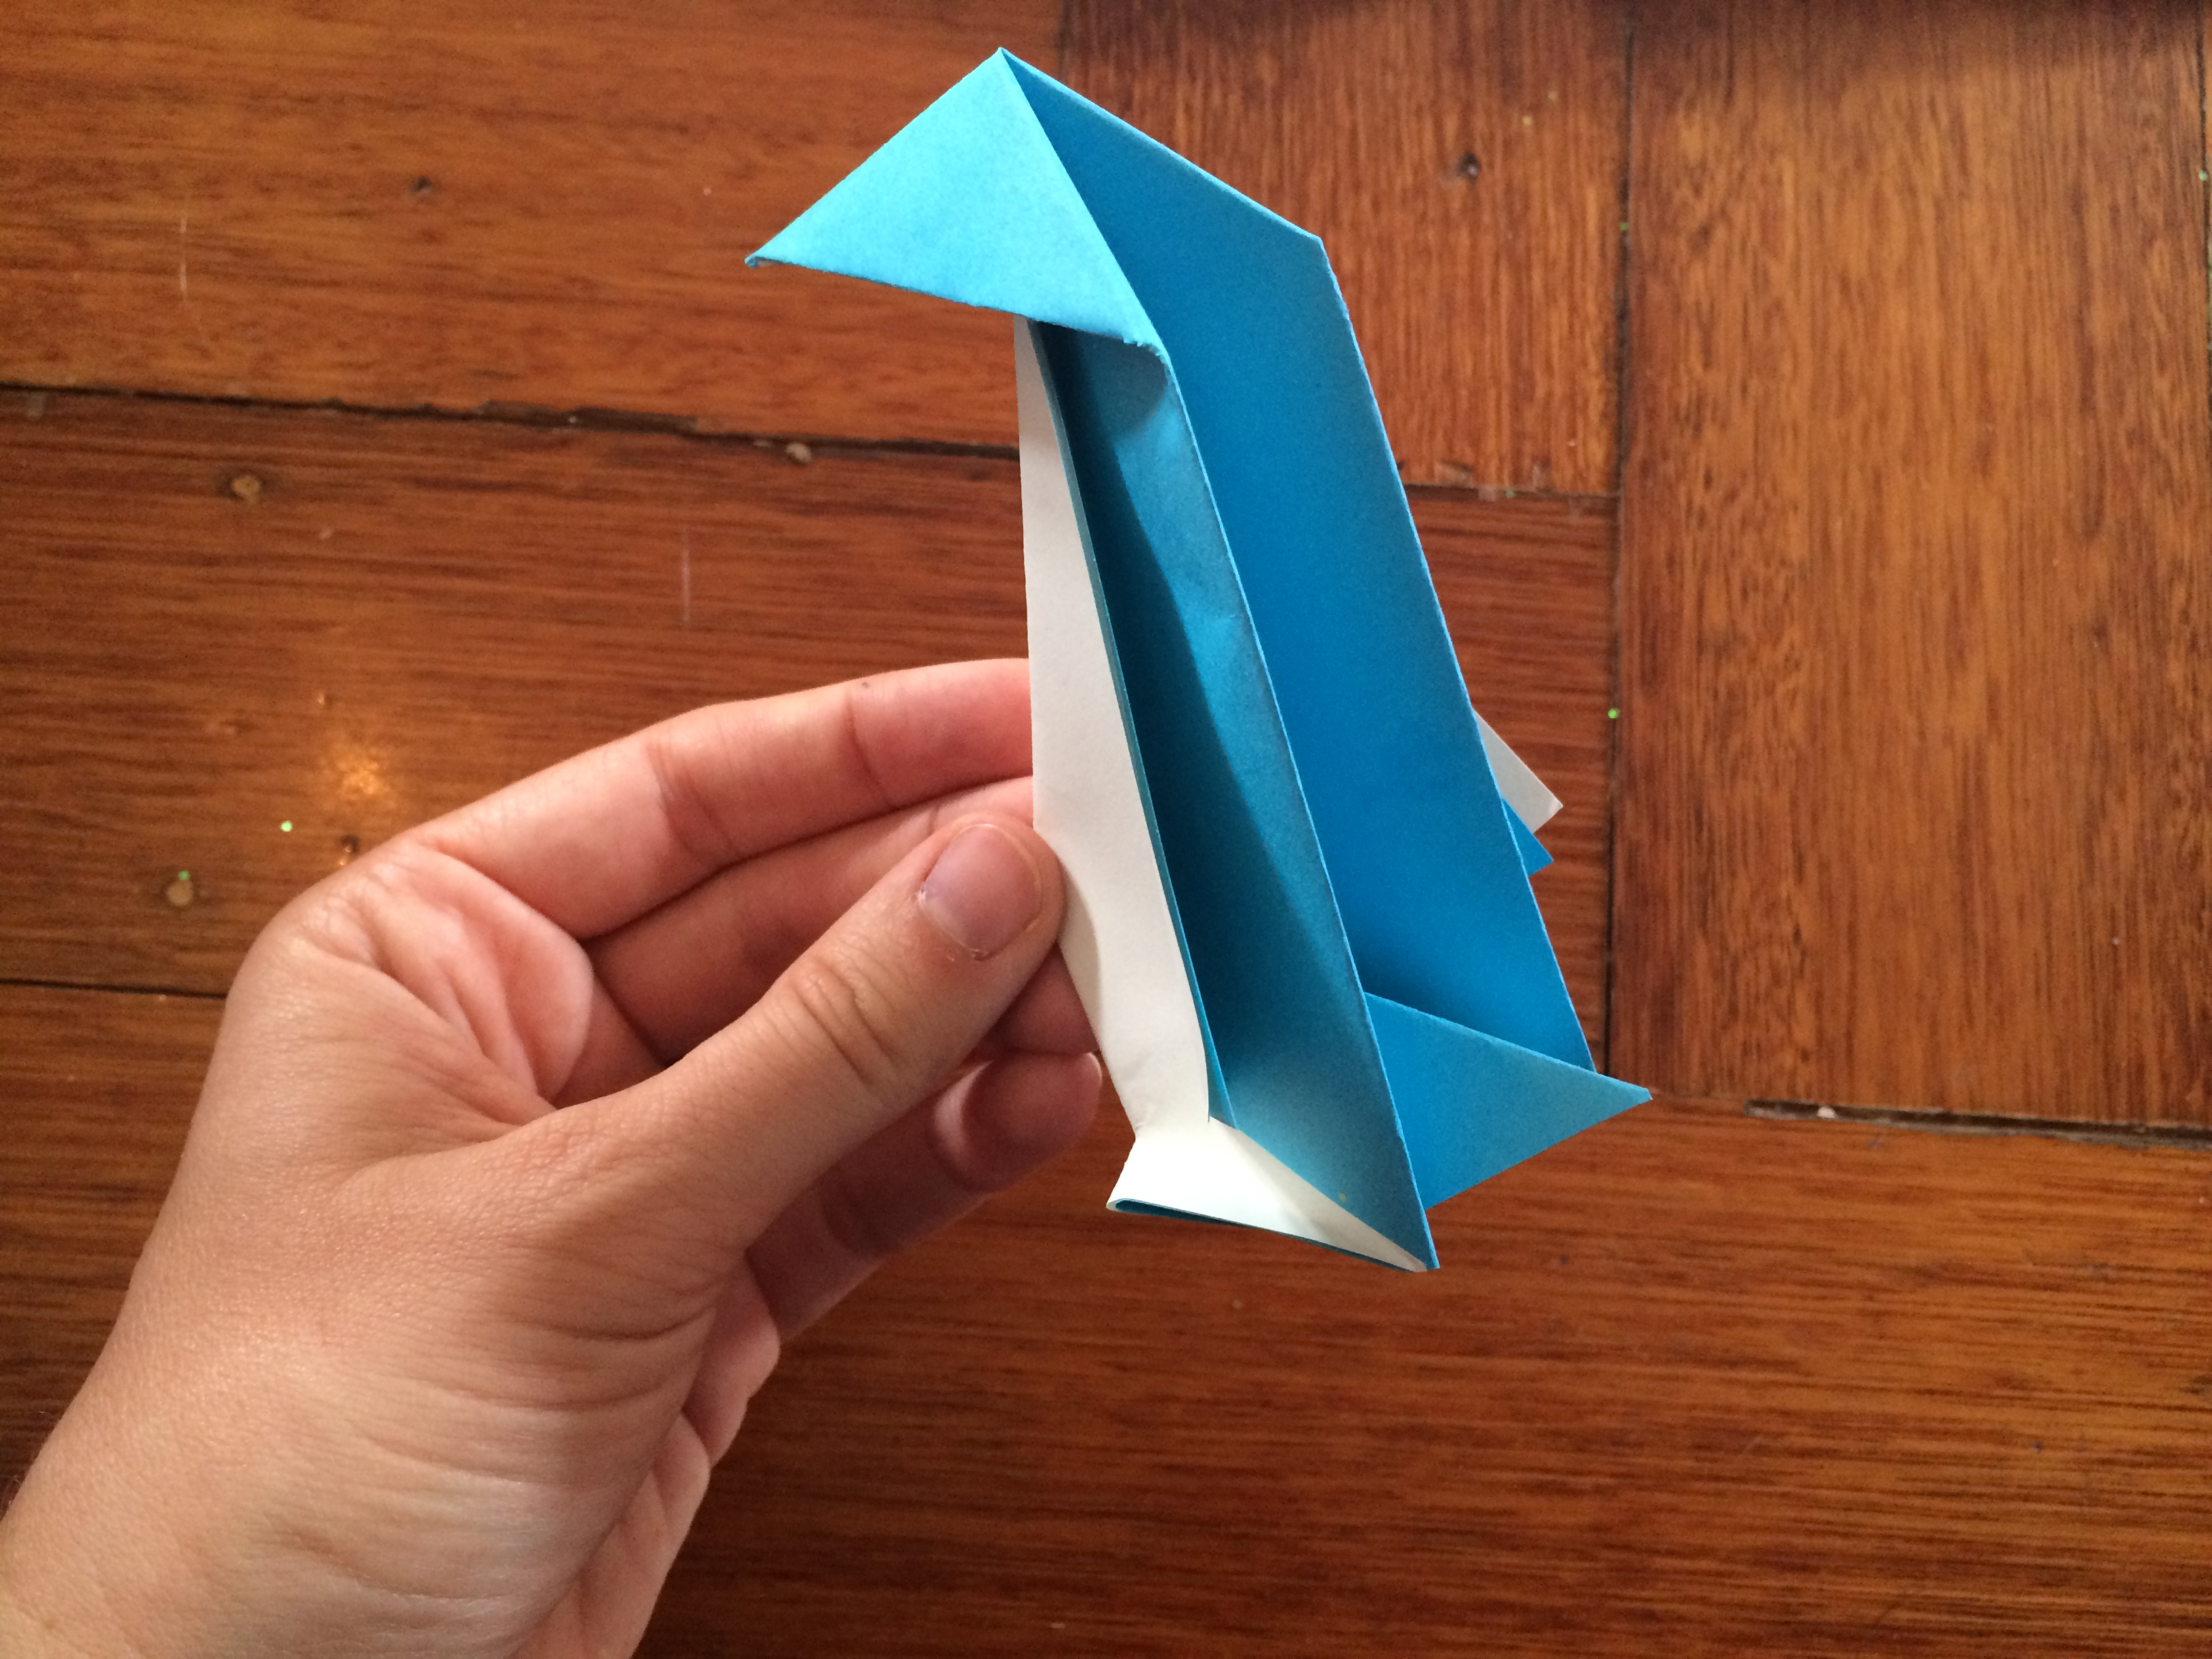
To make the photo instructions easier for you to read I made a penguin myself with 2 colours (so you can see the folds easier, and also see where the folds are intended to fall – my kids folds may were a little less accurate, but work just fine if they are close to the intended position!)

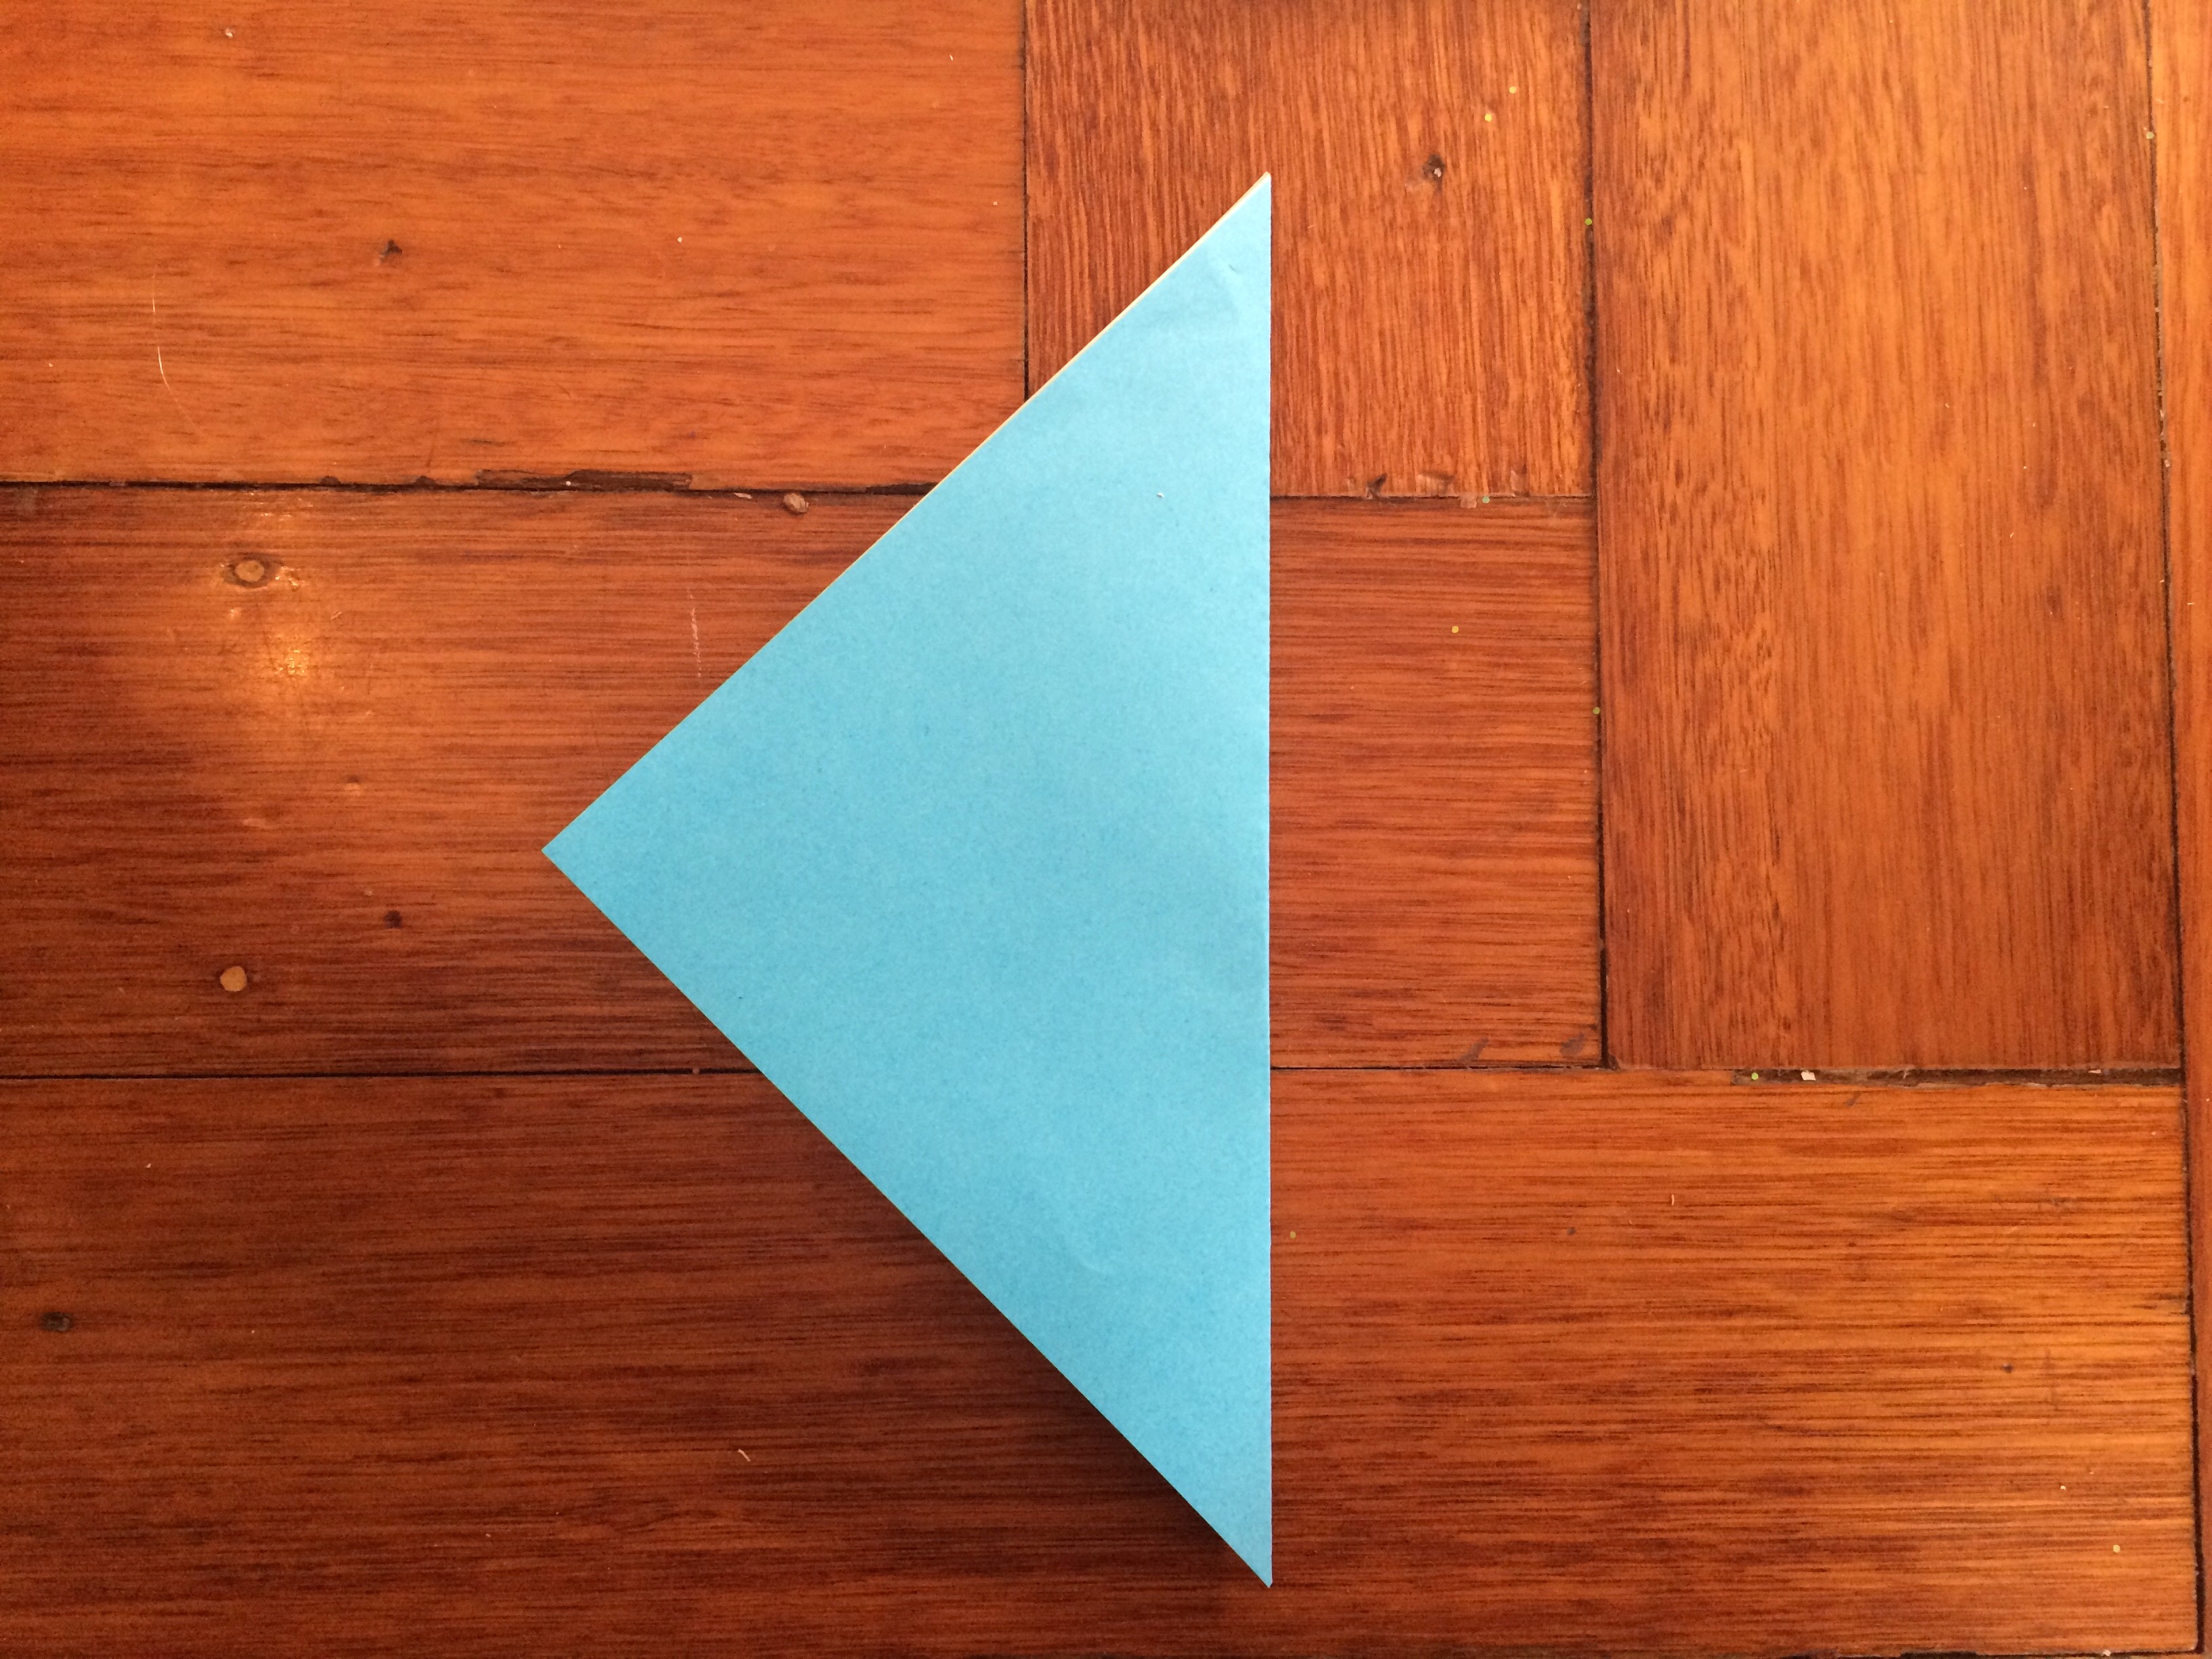
All you will need to make this little guy is a square of paper. Fold it into a triangle as below (to make a centre line) then open it out again.

FullSizeRender

Fold the two top corners of your diamond into the centre, as below.

FullSizeRender

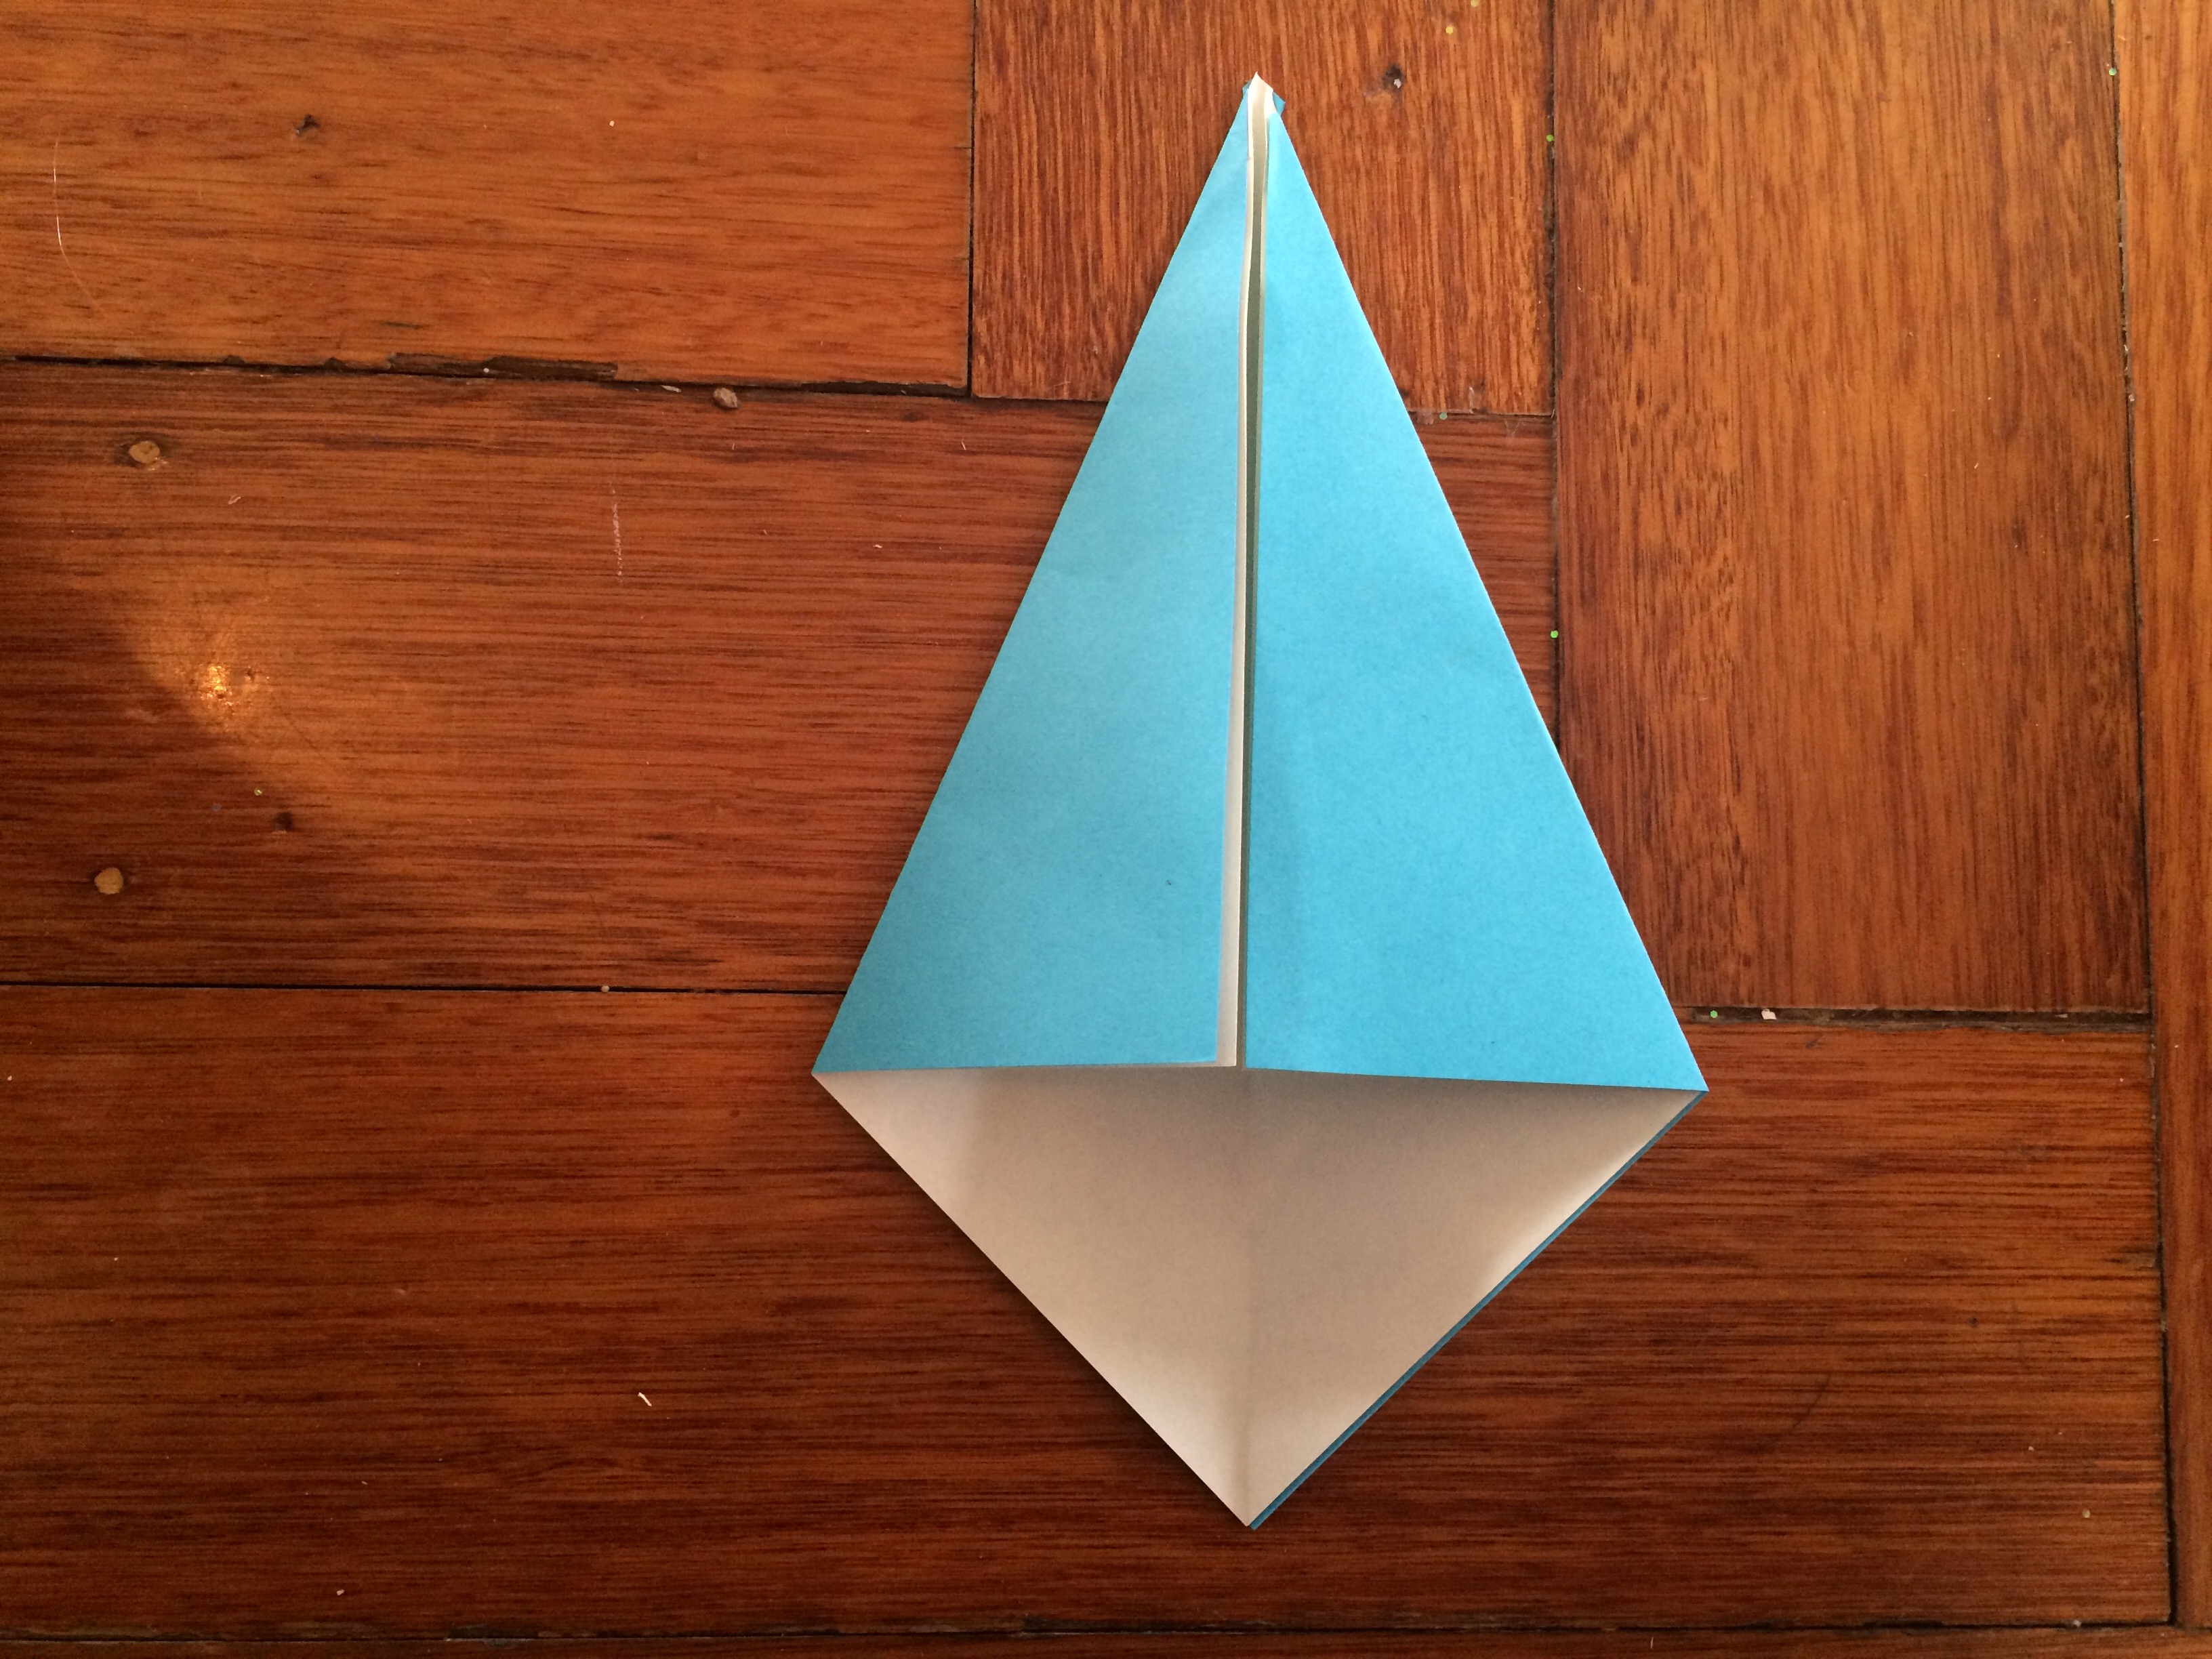
Now turn the diamond over and fold in half (as below).

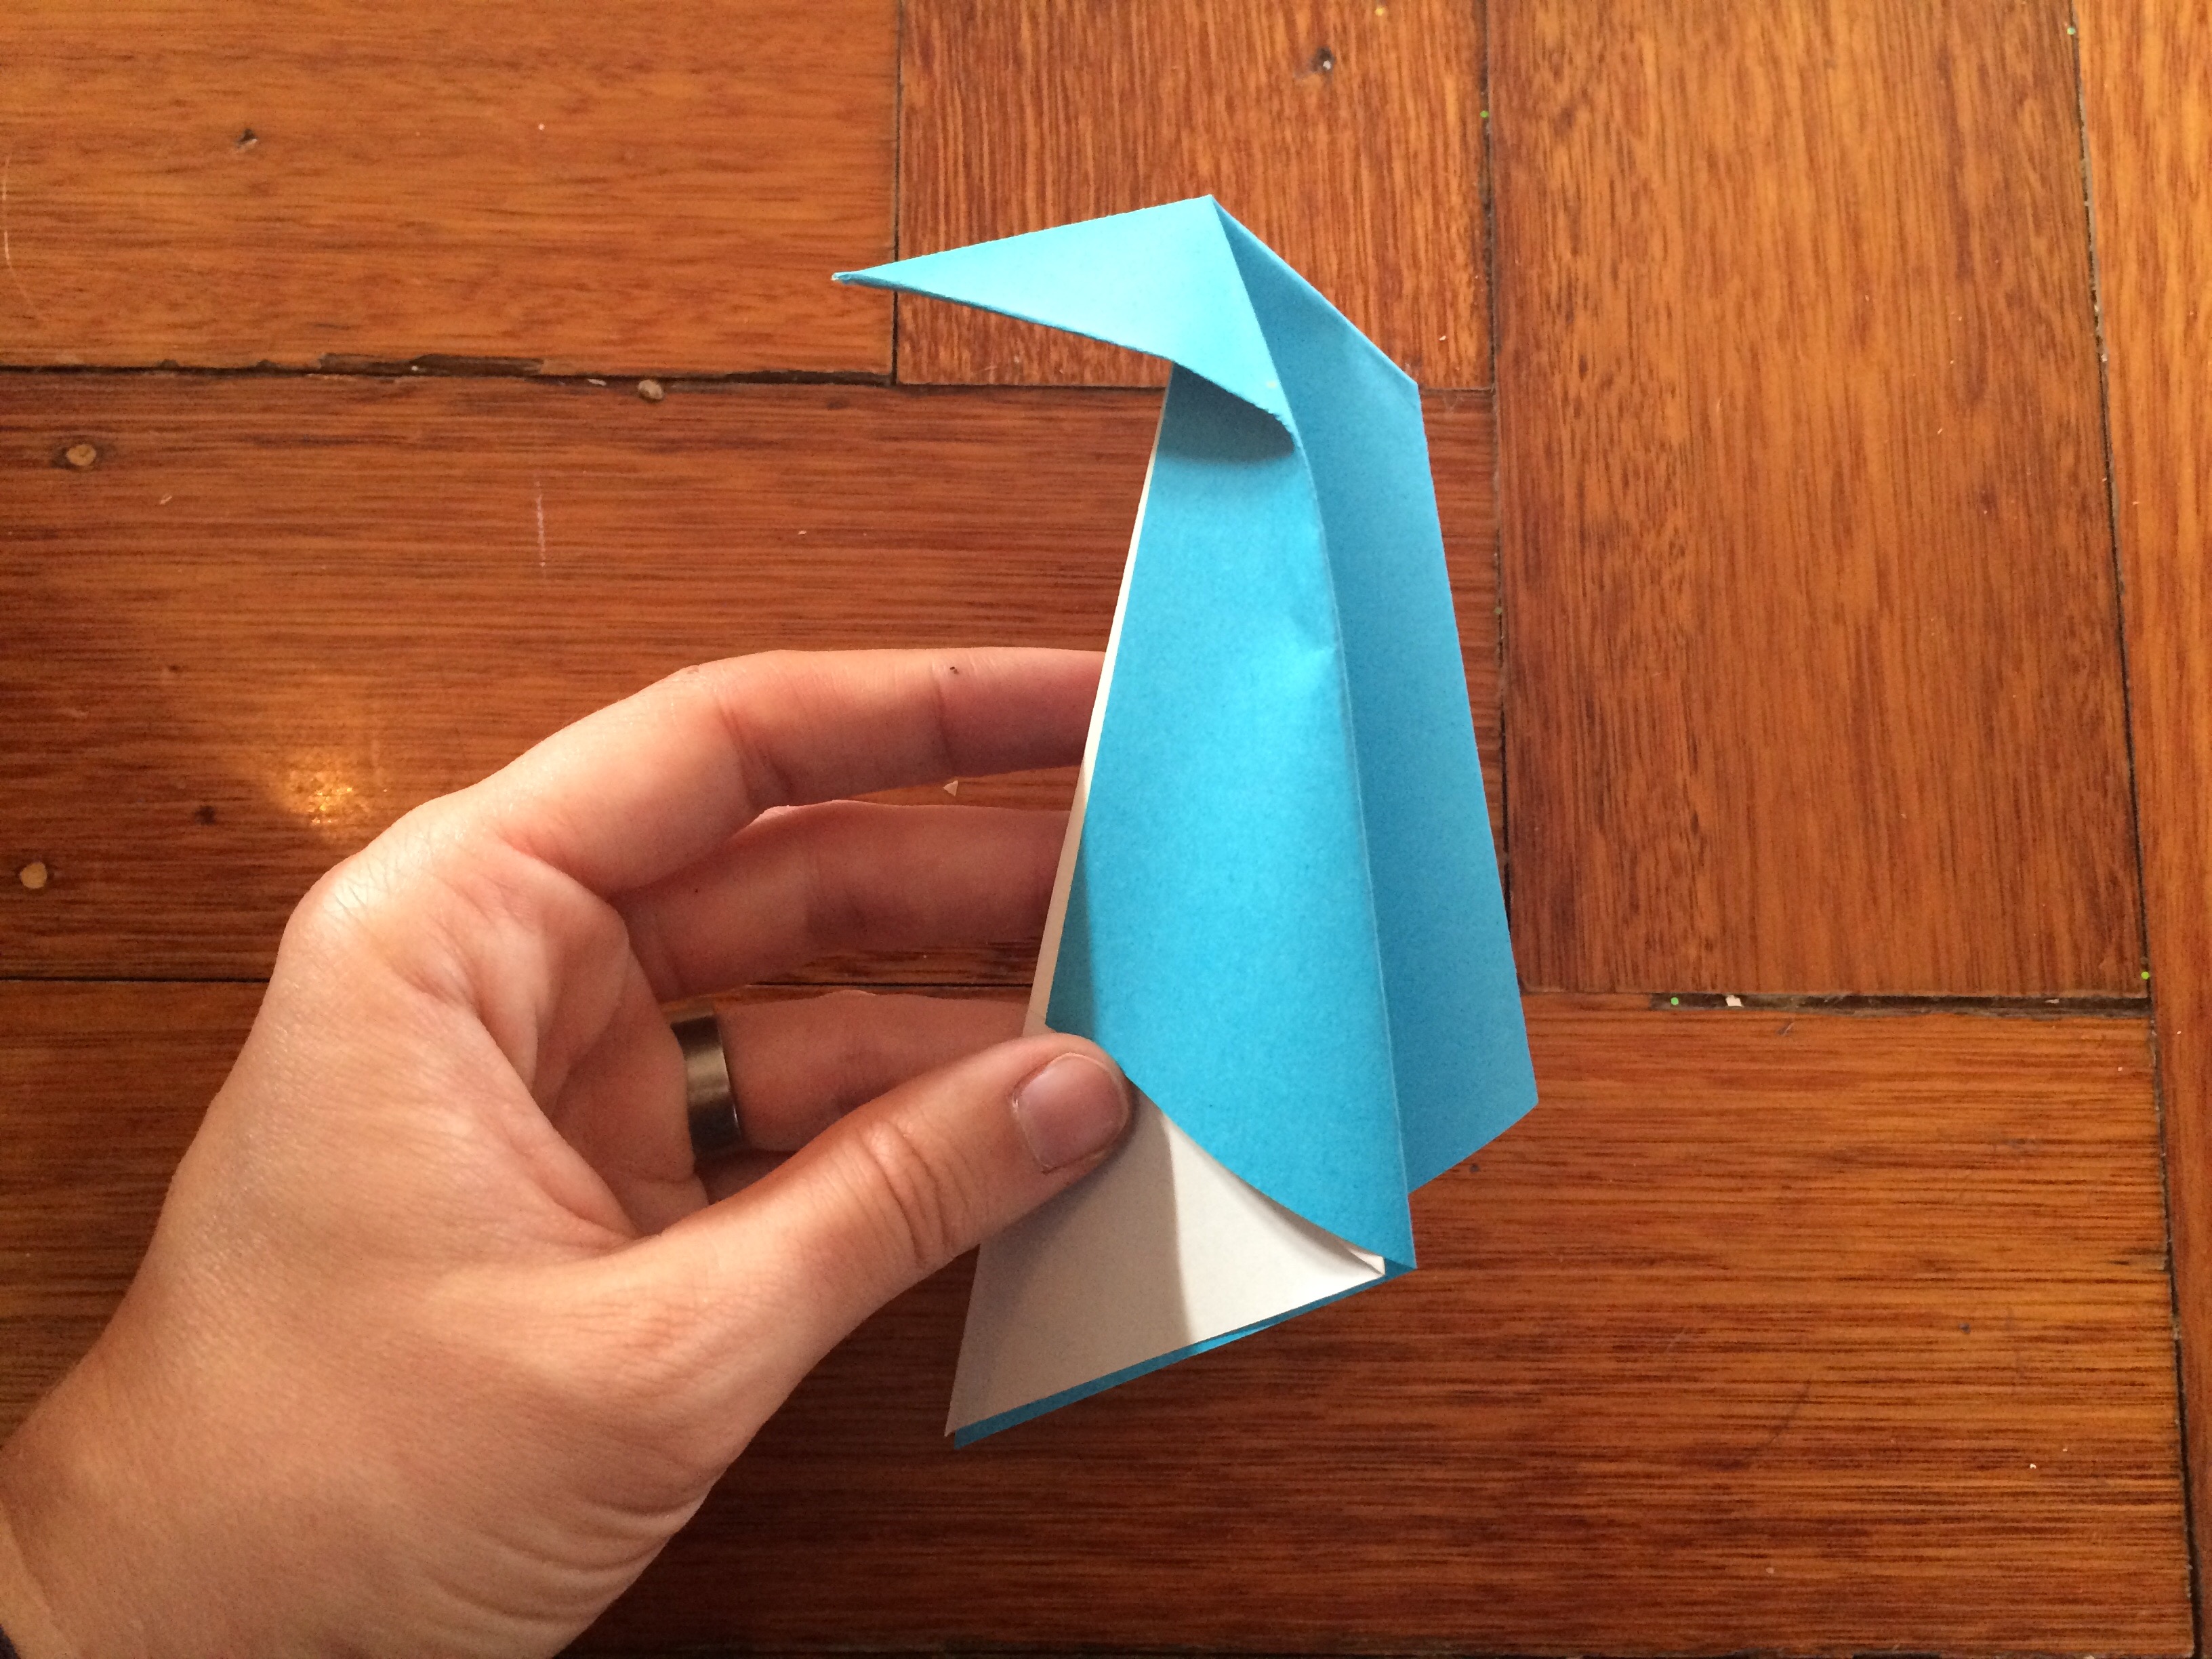
Fold the top point on an angle as shown. Then fold it to the other side, and back again, and again. (basically we just want the paper to fold at this point in the next step so you are reminding it where it should fold!)

FullSizeRender

Open your diamond back up (with the point you were just folding pointing up) and then fold it in half again, this time ensuring that the point you had been folding bends over to form our beak. This sound a little complicated, but is easy to do once you have the paper in your hand. it should look like this:

FullSizeRender

Now fold back your wings (on both sides)

FullSizeRender

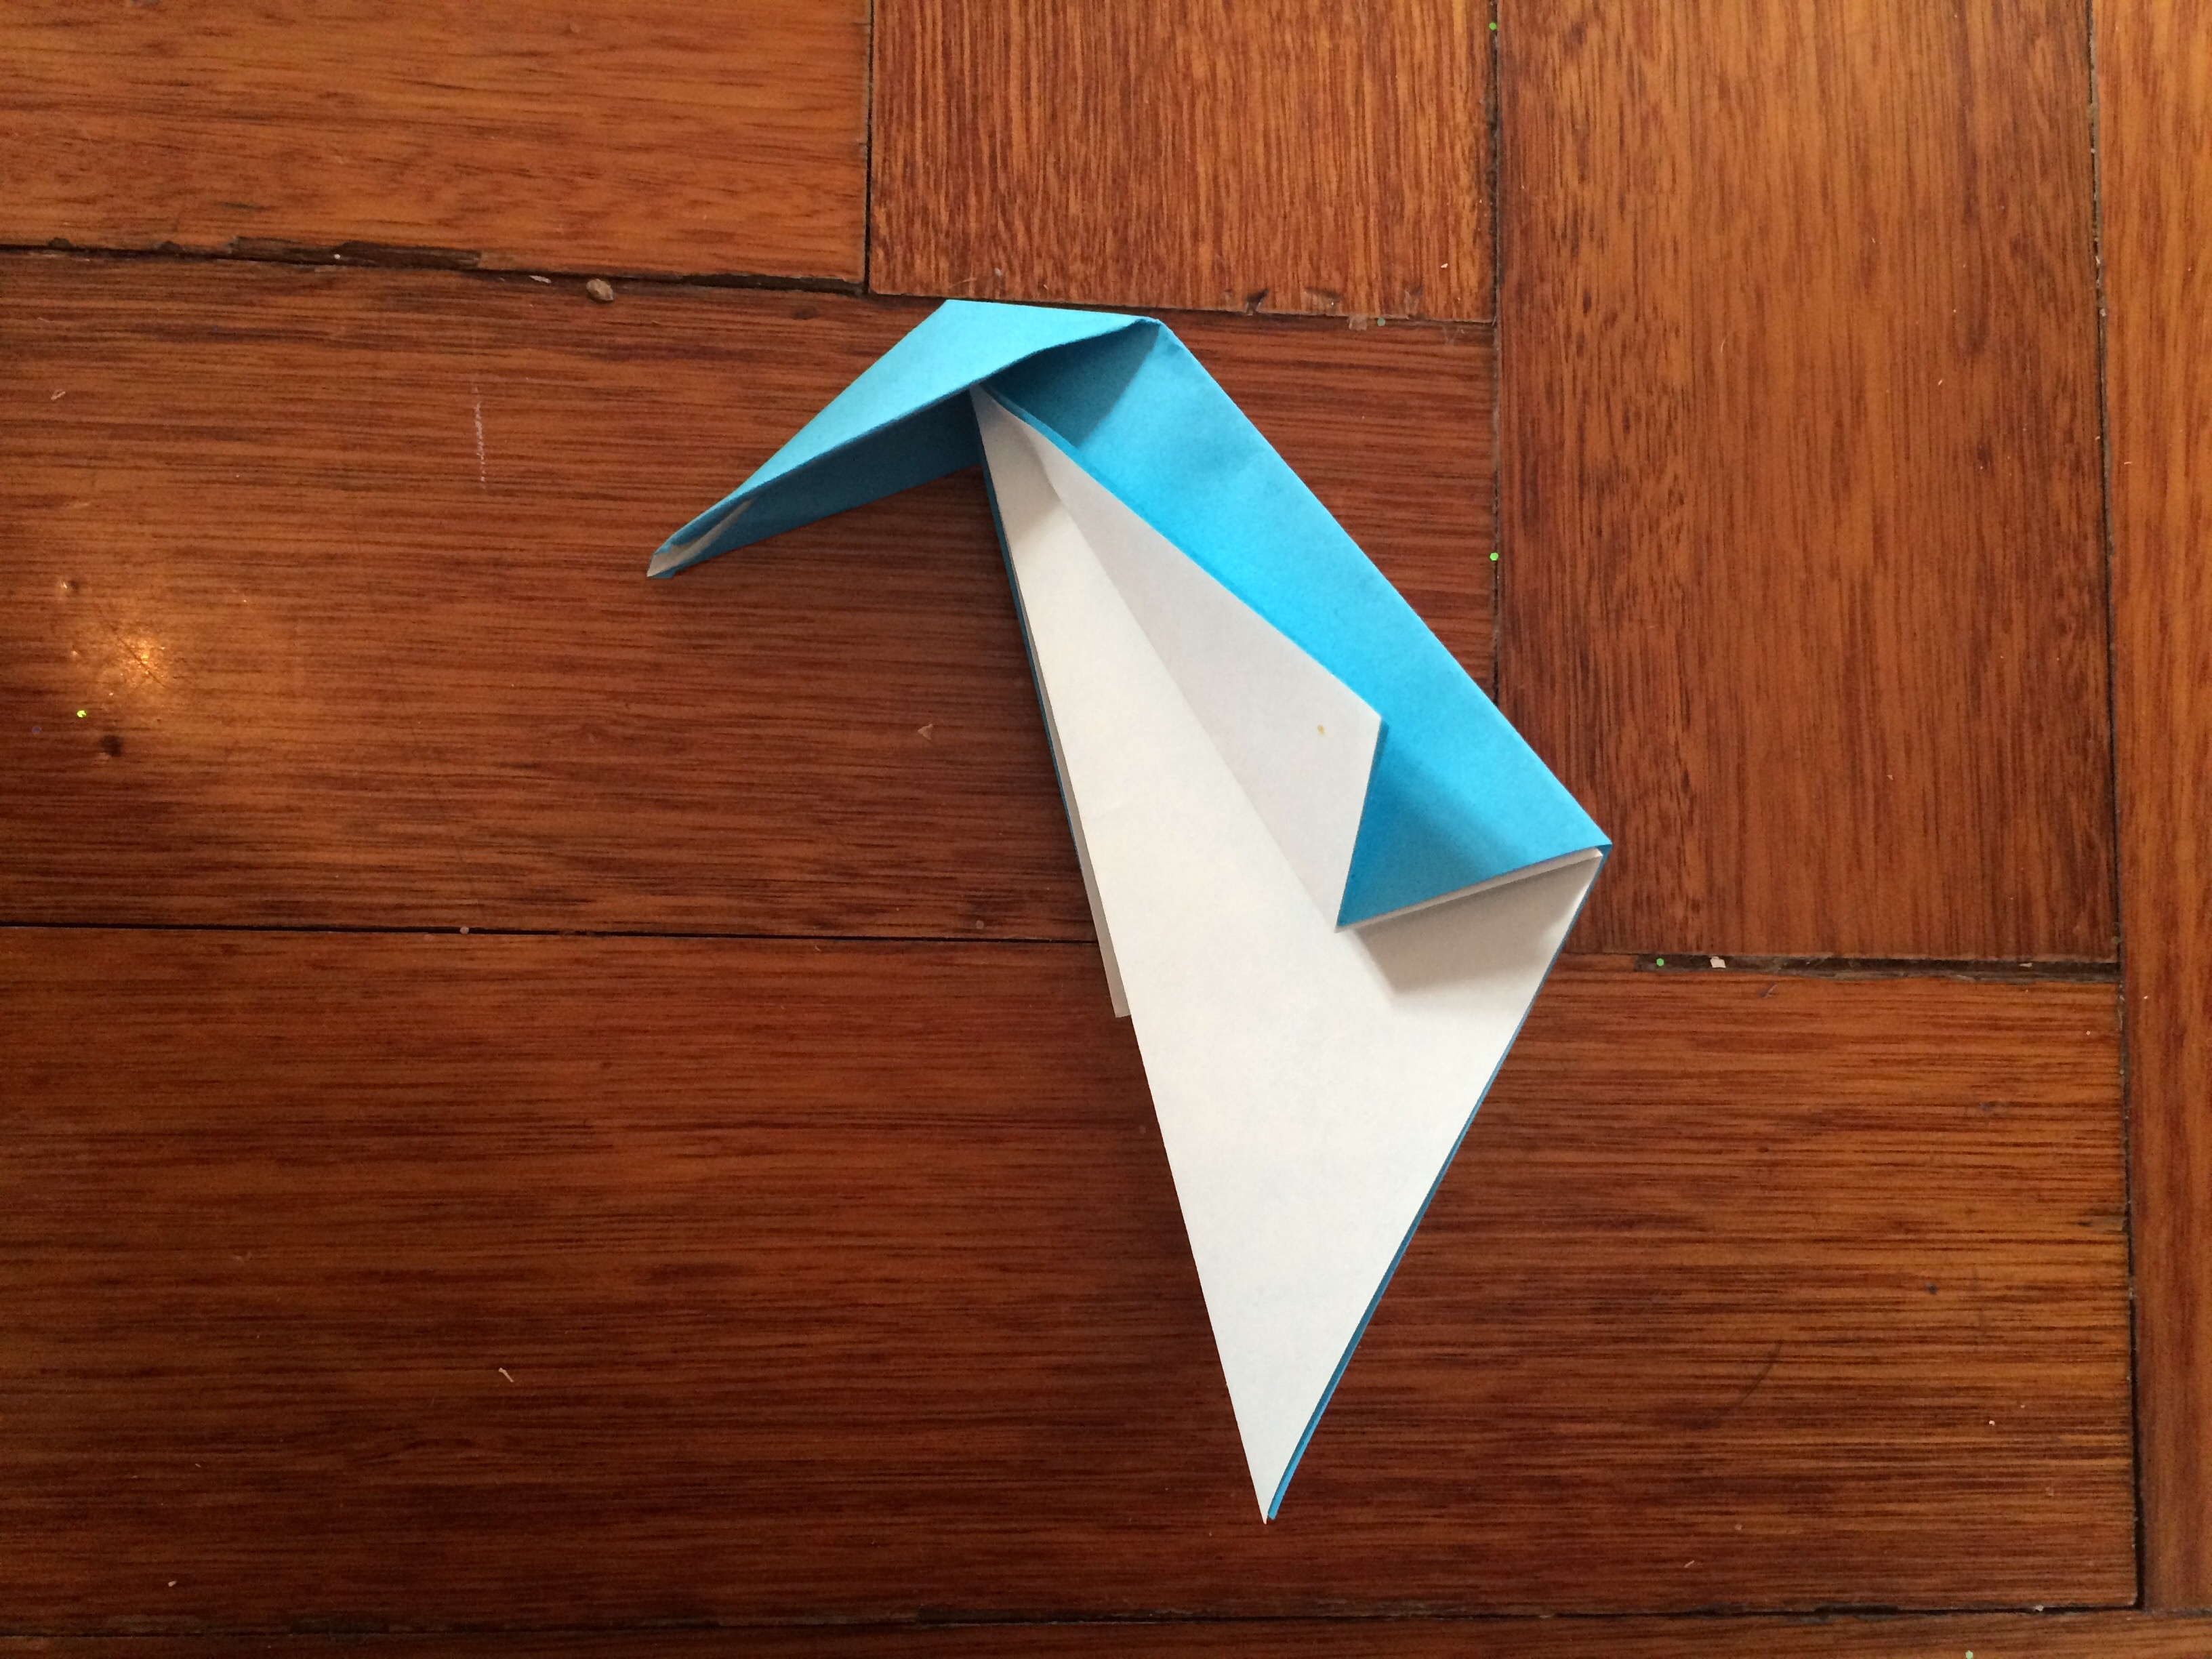
And fold up that long pointy tummy. Do the fold back and forth thing again (to remind it where to bend for the next step)

FullSizeRender

Now open your penguin a little so you can tuck under that tummy you have just been folding backwards and forwards, this is even easier to do than the beak, and should look a little like this:

FullSizeRender

Now those little points at the bottom of your penguin are not very good for balancing on, so fold then out for some little waddling feet.

IMG_9989

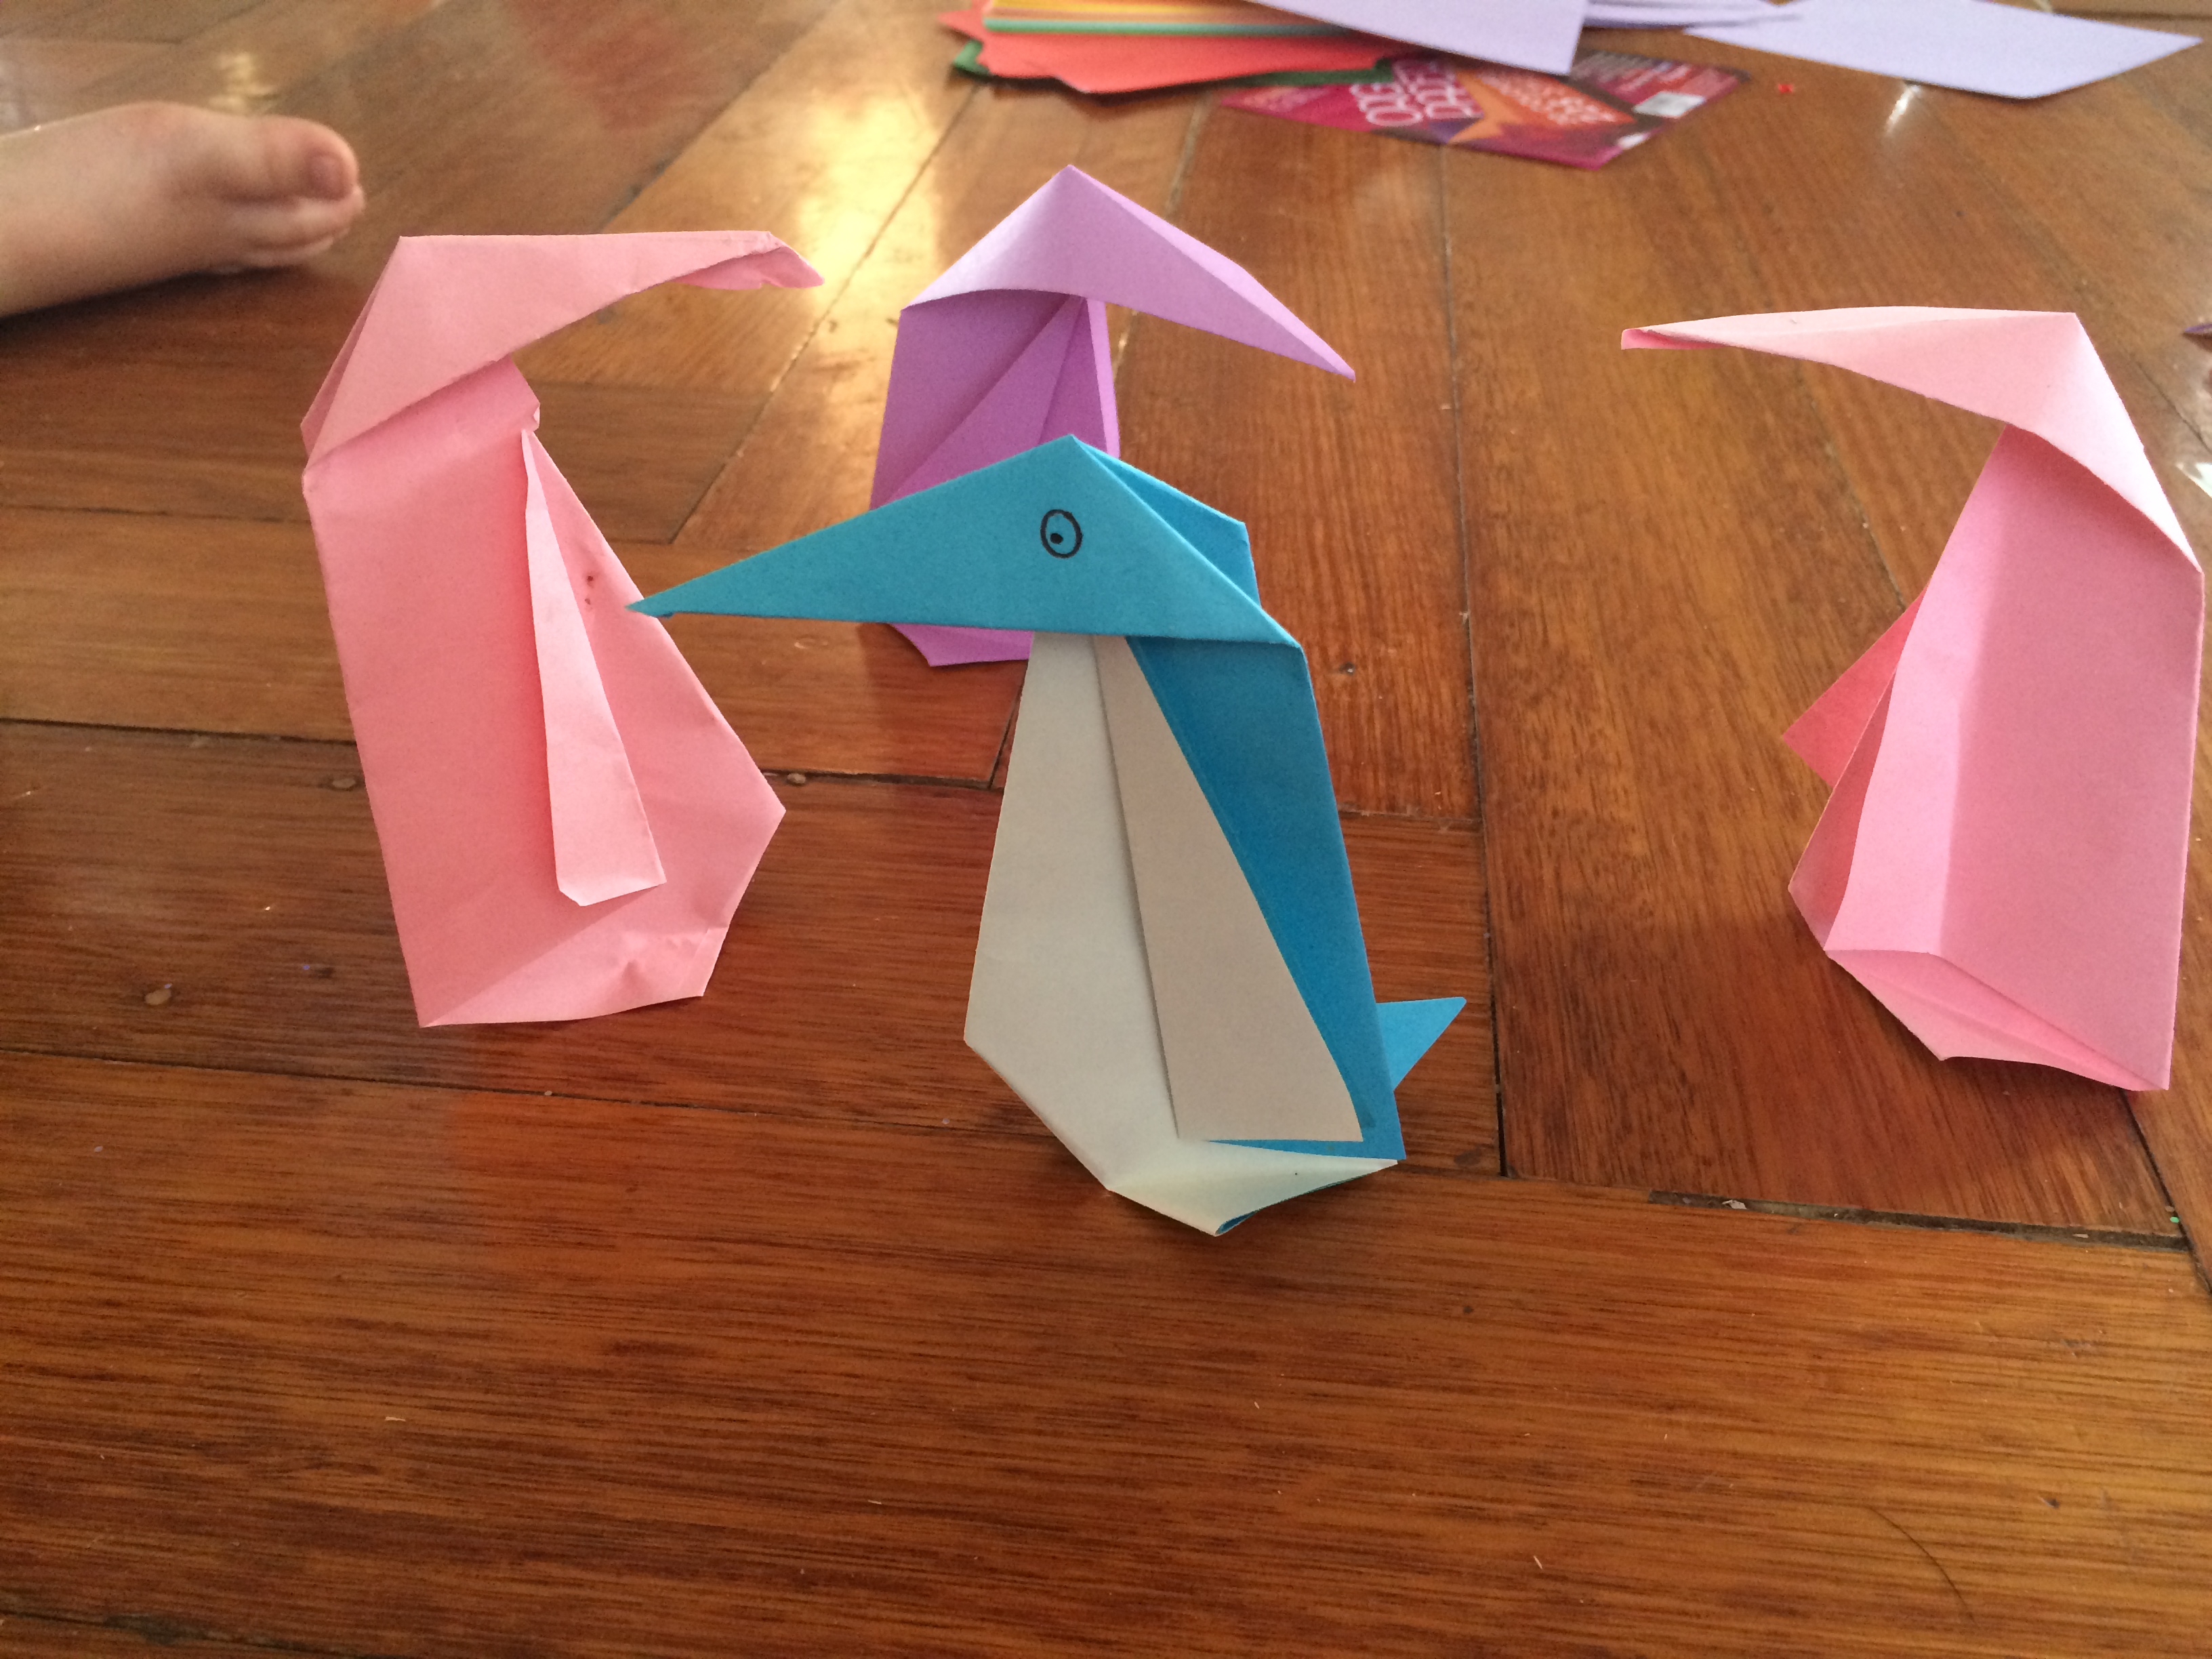
Add an eye, and any extra decoration you desire.

IMG_9992

Now you can add your little penguin to his colony for a play. Anica (5yo) loved following the instructions to make these, and only needed a little assistance (you can see her pink ones here turned out rather well, and fortunately with this design even if the folds are not accurate the penguin still functions very well!) Elka was less interested in the making, and more interested in the playing afterwards. These penguins were a lovely way to add a little Antarctica to our play, without having to expand our permanent toy collection!

IMG_9996

PADDOCK TO PLATE WITH KIDS.

IMG_9681

We are lucky enough to know a lovely couple who invited us to their small home farm for a day of fruit picking and pie making. If you don’t happen to know such a lovely couple with a farm, then there is apple and pear picking at Sorrel Fruit Farm (as we did earlier this year for strawberries) or another PYO farm will do just fine!

IMG_9673

We pilled in the car and headed 40min South. It has been a year since we last visited and but during our drive the girls recalled so much of our last visit (explaining it to us as though we hadn’t been there!) and looked forward to re-living each moment of it this year.
When we arrived we were greeted by smiles and fury friends who’s happy tail wags could brighten any day. My young ladies instantly wanted to start the harvest so we headed first for the blackberries, then the pears and apples, then the tomatoes.

IMG_9645 IMG_9651

It is wonderful for the kids to see how much this productive garden progresses each year, and indeed how much food it yields. (With our own vegetable garden still being constructed, it is the perfect opportunity to see how much we can grow and eat ourselves – indeed it wasn’t that long ago in our big history that home grown was the norm!)
IMG_9683
With old varieties of apples, and tomatoes fresh of the vine the taste is so different to the supermarket varieties, and for every spare patch of soil the kids want to know what will be planted there next.
Next it was off to the kitchen to make some pies (and indeed, we even tried our hand at ice-cream making to accompany our pies, though we have not quite mastered this one yet!) Each made (and then ate!) their own special pie (and of course the adults had a good share too!)


IMG_9703 IMG_9710

On our way home we stopped by to feed the fallen apples to the calves that the girls had chosen names for last year; Haha, Hoho and Alice are all growing into beautiful bovine. The girls asked after the calf they fed on their first visit (pictured below) and we explained that he had been sold on to make way for the new calves, and that the land could only sustain a certain number of cows healthily. Introducing farming practices in this gentle environment is the ideal way for children to grasp the early concepts needed to understand some of the larger environment issues that face our growing population who loves so much farm intensely so we can have steak for dinner every night!
269330_4182814814934_829934315_n
598621_4182812934887_282524477_n
After a busy weekend, this was the perfect way for the entire family to re-set for the week ahead. Thank you Jane and David for your wonderful hospitality!

THINGS TO SEE AND DO: PENGUIN SPOTTING.

Here in Tasmania we are lucky enough to have penguin colonies living literally on our back door step. The most centrally located one that I am aware of is located on Sandy Bay road, a place we walk past every day on our way to school.

Penguin spotting is bast done a particular times of year and it also requires a degree of stillness and silence in the evening. Unfortunately my own children have not yet mastered enough stillness and silence (at least in the evenings!) to make it safe to take them penguin watching at our local colony. (I say ‘safe’ because noisy children disturbing these birds can interfere with their mating and nesting patterns, so we’re talking about ‘penguin safety’ rather than ‘child safety’ in this case!)

IMG_8243Instead we opted to see our penguins at Singapore Zoo, and simply talk about where they live in the wild. One day I hope to share the wild penguin experience with my own kids. However, if your children are better at keeping their excitement quite, then pack a thermos of hot chocolate and head on down for a memorable evening of waddling penguins. Please read this guide from Parks and Wildlife before you head out to help make sure you care for these little creatures while you watch.

As you sit sea side and watch the penguins waddle in from the sea this is the perfect time to explain that these animals (along with many other species of wildlife that live in our towns and cities) were here long before the houses built in the area. That these fragile animals are afraid of dogs and cats (because they eat them!) so it is really important that we keep our pets contained. It is our responsibility as pet owners to make sure that our pets (and yes, that includes cats!) don’t wonder freely because they are skilled hunters who can do far more damage than we see.

THINGS TO SEE AND DO: MEET A PILOT.

IMG_9719
When we were kids we used to look forward to our mid flight visit to the cockpit to say hello to the captain. Then security measures changed and the cockpit was locked… But even now your young tots can still enjoy meeting the Captain next time you fly.
When flying simply ask the flight attendant if your child can visit the captain after you have landed. (This is at the discretion of the individual pilot, but most know how exciting it is for kids).
Once the attendant confirms you can visit (or more likely says ‘maybe’) you will need to wait in your seats until the other passengers have disembarked and then you can go forward and ask to see the captain.
"Me and the Captain together. He told me how the wind keeps the plane up" drawn by Anica just after her visit to the pilot.

“Me and the Captain together. He told me how the wind keeps the plane up” drawn by Anica just after her visit to the pilot.

Use the time waiting on the plane (while the other passengers leave) to talk with your kids about what they might like to ask the pilot (as the adult leading by example; try not to refer to the pilot solely as a male, while it still is a male dominated profession, there is no reason to presume only boys can fly planes!)
Anica wanted to know how the plane stays up (our pilot explained the basics of wind pressure over the curved wings lifting the plane) and Elka wanted to know how rainbows are made (while it wasn’t really a plane question, he was happy to answer).
While I didn’t take and photos in the cockpit (this photo was taken later at a flight simulation that we were lucky enough to visit in Malaysia) I was carrying a large intimidating camera with me when we entered the cockpit so I believe photos are allowed should you wish to get a snap with your pilot. Remember to thank him/her immensely for giving your tot the additional time.

THINGS TO SEE AND DO: MAKE A GIANT SAND OCTOPUS.

IMG_4963 We have built large sand sculptures before, and they are a great hit for the young construction workers. This time however we had a change in focus beyond a simple sculpture, we want to talk a bit about camouflage.

We chose an appropriate spot and drew a large circle in the sand (for the body). Each child took control of one tentacle (mapping it out and digging around their shape to pile it up as a long 3d sand arm).

IMG_4947

We didn’t have 8 children building tentacles at once so this allowed for some great maths questions during construction; how many have we made now? How many do octopuses have? How many more do we need to make?

IMG_4969

As the tentacles shaped up the kids moved on and created the body and eyes in the centre, decorating with shells. The small group used great negotiation techniques throughout the process to organise themselves to finish the octopus, helping each other when they needed it, and collectively deciding on plans.

IMG_4952

Now, that’s a great physical project, but it was not our focus as we built. We wanted to talk as much as we could while building – What do the kids know about octopuses? (They take a long time to have their babies, they live in the water, they shoot ink at predators, they have no bones – these were the things the kids collectively knew about octopuses and it was a delight watching them inform each other and add to the knowledge that the other children were sharing.)

When we came to the idea of camouflage we stayed on the topic for a little longer. We talked about what would be good camouflage for an octopus, and how it can manipulate the shape of it’s skin to form different textures. It can change the shape of it’s body to mimic other creatures, and can even change the colour of it’s skin to form different patterns to blend into it’s surroundings! No other creature has all these camouflage skills.

IMG_4959

In our case we talked about our octopus being ‘camouflaged’ in the sand around it, but over the next couple of days we will revisit the concept as the opportunities present themselves. (See how that bird blends into it’s background? Why do you think that tiger in the book has stripes? What makes good camouflage? Why is it important for each of these animals to be able to hide?) Camouflage is a topic that is of great interest when learning about animals and it will come up time and time again as we work our way through the year, and a physically active project of building a sand sculpture is a fun way to introduce it!

EASY ACTIVITIES TO BUILD YOUNG BRAINS: OCTOPUS OUT OF A GUM NUT.

IMG_0025

At a recent beach trip we had some craft supplies and these delightfully simple Gumnut Octopus proved to be a very easy and fun activity.

IMG_0026

Firstly gather some gumnuts (there is a large gumtree in the middle of Kingston Beach if you are keen to combine gumnut hunting with a beach octopus adventure.)

Choose your favourite gumnut and cut 4 lengths of string. (at this point your intelligent little marine biologist is almost certainly going to correct you – everyone knows octopuses have 8 tentacles, not 4!)

IMG_0055

Tie a knot in the middle of your 4 lengths of string (so all 4 are joined, leaving 8 ends hanging from your knot)IMG_0129

Insert the knot into the hole of the gumnut (depending on the size of your gumnut and the thickness of your string you may need to tie a double knot to make it the right size to stay, we found 1 knot suited some gumnuts, 2 knots worked better for others.)

IMG_0240

Simply attach some eyes and you have your little critter ready for his ocean adventure.

This activity was a winner for Anica (5yo with arthritis) as her knees were not on their best behaviour on this particular day and it gave her the chance to do something special while her friends ran and played in the sand. Later the other children came to investigate what we were doing and created their own creatures, but Anica is developing a real sense of ownership and accomplishment for these type of activities that let her quietly distract herself from more challenging things in her world at this time. She has even written her own blog on how to make a wombat, which I’ll post with her help shortly.

BIG HISTORY CONCEPTS FOR LITTLE TOTS.

We’ve talked before about the importance of introducing a bit of ‘big history’ into early learning, and with everything from the dinosaurs to when mumma was born classed as ‘the olden days’ this project will help give a little perspective to our place in time.

IMG_0573

Our strategy for the year is to provide some understanding of big history concepts. We have created a time line on one wall and as we come across facts, figures, dates and details we add them to our timeline.

When we visited a cave (that began forming tens of millions of years ago) we added that to our timeline, giving the experience even more historical wonder than the simple beauty they saw. When we talked about how the waterwheel that was used to make flour in the ‘olden days’ we were able to add that to our time line and see that it is relatively recent in our history. When the kids asked when the first person was born (being a believer in evolution rather than creation) we added that to our timeline and could explain the idea of evolution far more simply when they could physically see the degree of time passing and the changes happening.

We have left some space for the future too, so they can imagine and dream about what might be in store in the near future. We hope to get to this after a few more history concepts are visited. (Over the coming months as we work through the letters we will look back at the first civilizations, dinosaurs, and so on). I am also excited to see a few more concepts overlapping (ie “this was happening at the same time the pyramids were being built” etc).

Now, if you plan to set up your own timeline you may wish to ‘cheat history’ a little as we did. Human history is so tiny in relation to many of the other big history concepts (such as the evolution of plants, Dinosaurs, mammals etc) that our entire human history is just a dot at the end of a 2m stretch of history (and that’s not even going back to the formation of planets etc!)

IMG_0575

To solve this problem of scale we ‘expanded’ our little dot of history into another timeline to allow for more detail in the human history. We used a coloured ribbon for each timeline (blue for the overall time line, with a dot of orange at the end. And orange for the human history.) This colour reference made it easer for the little historians to understand that the orange line represented that tiny little dot at the end of the blue line. We marked up our history over a 3m stretch of wall, simply using chalk directly on the wall to label the periods in time, and to add new concepts. When adding new ideas the little historians often create an image (painting, gluing, drawing etc) and we blue-tack that image to the wall at the relevant place on the timeline. This visual cue that they created is far easier for them to remember and explain to the other adults in their life than a simple text ‘entry’ on our timeline. By re-visiting the concepts as they explain their work they re-enforce their understanding of what they have learnt.

If you wish to create a similar timeline in your own learning space, we used this as a guide for our own timeline (you can calculate and measure this out to fit your space, but we were not so precise as the exact accuracy of the spacing is not so important – it’s a general concept that we are working towards at this stage so just sketching up an approximation is totally fine!)

World History:

  • 600 million years (before common time) – until the year 3,000(ish)
  • Separated at 100 million year intervals.

Human* History:

  • 10,000 years (before common time) – until the year 3,000.
  • Separated at 1000 year intervals

*Please note; the beginning of ‘human history’ that we expanded is determined at a point where there are some interesting things to add to the timeline (ie beginning of farming etc) rather than the beginning of Humans as a species. For practical scale reasons we found this to be more workable as it allowed a little more space between centuries once scaled to fit our space.

While my own little historians are not the ‘remember exact facts and figures’ type of learners, that is not our primary goal. Our aim with this timeline is to give the little historians a sense of their place in history. A sense of belonging in something much greater than themselves, an idea that things change gradually over time, and (as we enter further into human history) some understanding of how they can alter the future by their own actions.

A sense of belonging in time (as well as in space, community, culture etc) is vital for growing our young people into the adults we want in our world.

EASY ACTIVITIES TO BUILD YOUNG BRAINS: PLAY OCTOPUS WITH TOILET TUBES

IMG_0302

Octopuses are wonderful creatures, and the slimy things have managed to work their way into every childhood. Maybe it’s because they start with O (and that’s handy for the alphabet), or because their distinctive body shape is so easy to recognise, or maybe it’s that they conveniently have 8 legs (and that’s nice when we’re looking at numbers!)… Whatever the reason, we’re in love with the concept of an octopus.

Yet their truly fascinating qualities are often overlooked, this little hands on project is a fun thing to make with little hands, but it is also a good chance to talk about a few of the things you know about the lovely Octopus.

You might talk about how Octopuses are considered the most intelligent of all invertebrates. That the ink they shoot out even contains a substance that dulls a predator’s sense of smell, making the fleeing octopus harder to track… and if they are really under threat they can loose an arm and grow it back latter! Here is a good site for a brief refresher on your Octopus knowledge.

Make a couple of these little Octopuses and get playing with your knew found knowledge!

You will need:

  • Cardboard tube
  • Scissors
  • Paints/drawing or decorating implements
  • Googly eyes and string (optional)

Let’s make an octopus.

Cut the base into 4 equal sections (you may like to refer to this as quarters to help with fractions)

IMG_0283IMG_0291

Ask what would happen if you made each of these into 2 parts, how many would you have all together? (In our house we talk about it as 4 “lots of” 2, or 2 “lots of” 4)

Once you have worked out your sum, check by cutting each in half… count 8 parts… how many legs does an octopus have? You just made an octopus!

IMG_0371IMG_0309

We then decorated our octopus and added googly eyes.

To create a more ‘swim like motion’ we hung our octopus from string, and like our tube kites we watched it fly with much joy.

IMG_0421

EASY ACTIVITIES TO BUILD YOUNG BRAINS: OCEAN SCIENCE IN A BOTTLE.

IMG_5030

This is a brilliant little experiment (inspired by happy hooligans) is great to teach the layers of the ocean and also a little science regarding that good old oil vs water experiment! (Plus it’s really easy to make with household items, we put this one together on a whim before bed last night – too easy!)

If your young ones watch Octonauts then they might already have a bit more of an understanding (than most adults) of how the Ocean is made up of ‘layers’ or ‘zones’. (We’ve talked before about Screen time, and my own children do enjoy a bit of Octonauts thus have lots to say about the layers of the ocean!)

For a bit more detail (and a refresher for yourself) take a quick read through this short article that explains the layers as well as a few other great facts about the ocean that you might want to pull out this week!

You will need:

  • Cooking oil
  • Water coloured with blue dye
  • Clear bottle
  • (Safety goggles entirely optional, but after our explosive volcanic science 5yo Anica felt it would be necessary to wear them!)

Half fill your bottle with water, mix in colour, then fill the remaining with oil. Secure lid and mix.

IMG_4988IMG_4991

The oil and water will separate into a gradient and then into layers. While it is mixed is a great time to talk about the gradient of layers that exist in the ocean and how the different levels of light affects the creatures living there.

As the oil separates you will probably also want to talk about why that oil doesn’t mix with the water – for a short explanation of what is going on you can read this great article. The details of polarities of molecules is not something my young ones are ready for, but this can be simplified and the idea of density is something that is far easier to explain.

IMG_5017

It is also a great to mention that because oil and water don’t mix, sea creatures can use oily feathers or fur to stop the water getting to their skin. If you feel ready you could cover one of your little scientists hands in oil, leaving the other without oil. When both hands are submerged in the food coloured water one had will come out wet (and coloured) while the other will come out with the water (and colour) running off. This involves a little clean up, but is something that will really drive home the concept of animals using oil as a form of protection from water.

Note that these pictures do not do the movement of the oil on water justice, the wave like swirls as it was mixed were mesmerising, and if I didn’t have to get the kids to bed I’m sure they would have enjoyed watching it for hours!

IMG_5047