THINGS TO SEE AND DO: MEET A PILOT.

IMG_9719
When we were kids we used to look forward to our mid flight visit to the cockpit to say hello to the captain. Then security measures changed and the cockpit was locked… But even now your young tots can still enjoy meeting the Captain next time you fly.
When flying simply ask the flight attendant if your child can visit the captain after you have landed. (This is at the discretion of the individual pilot, but most know how exciting it is for kids).
Once the attendant confirms you can visit (or more likely says ‘maybe’) you will need to wait in your seats until the other passengers have disembarked and then you can go forward and ask to see the captain.
"Me and the Captain together. He told me how the wind keeps the plane up" drawn by Anica just after her visit to the pilot.

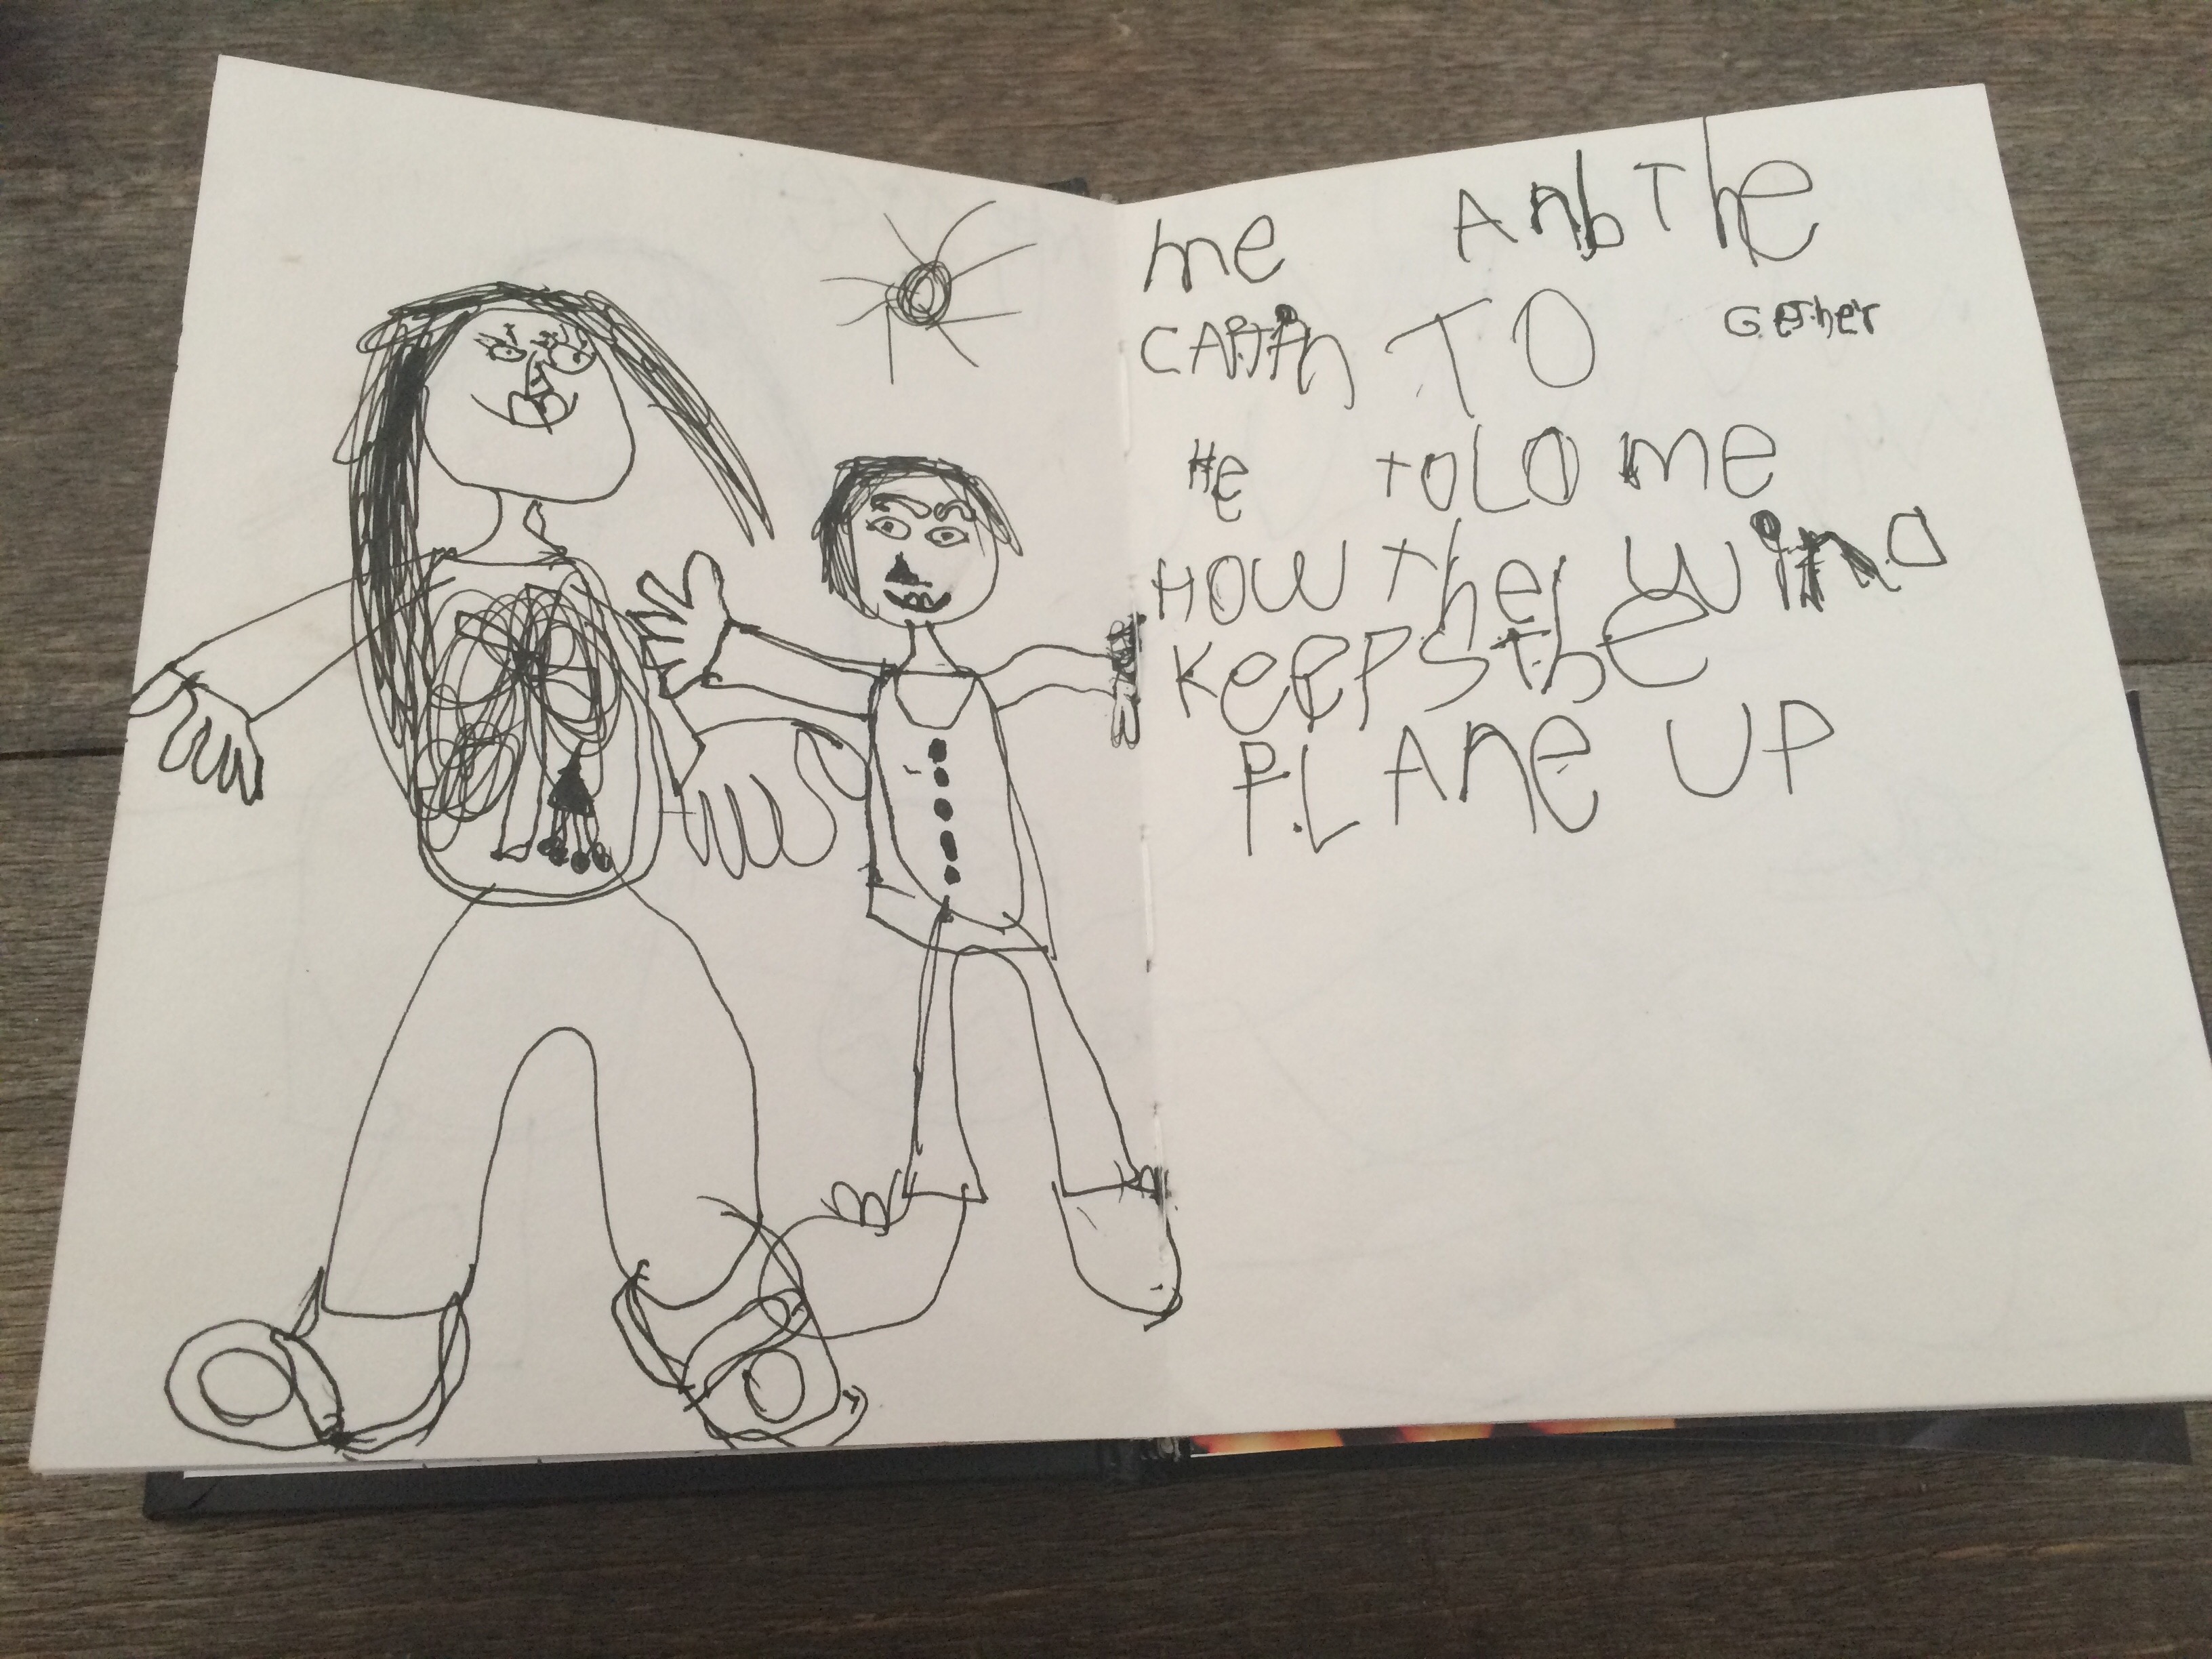
“Me and the Captain together. He told me how the wind keeps the plane up” drawn by Anica just after her visit to the pilot.

Use the time waiting on the plane (while the other passengers leave) to talk with your kids about what they might like to ask the pilot (as the adult leading by example; try not to refer to the pilot solely as a male, while it still is a male dominated profession, there is no reason to presume only boys can fly planes!)
Anica wanted to know how the plane stays up (our pilot explained the basics of wind pressure over the curved wings lifting the plane) and Elka wanted to know how rainbows are made (while it wasn’t really a plane question, he was happy to answer).
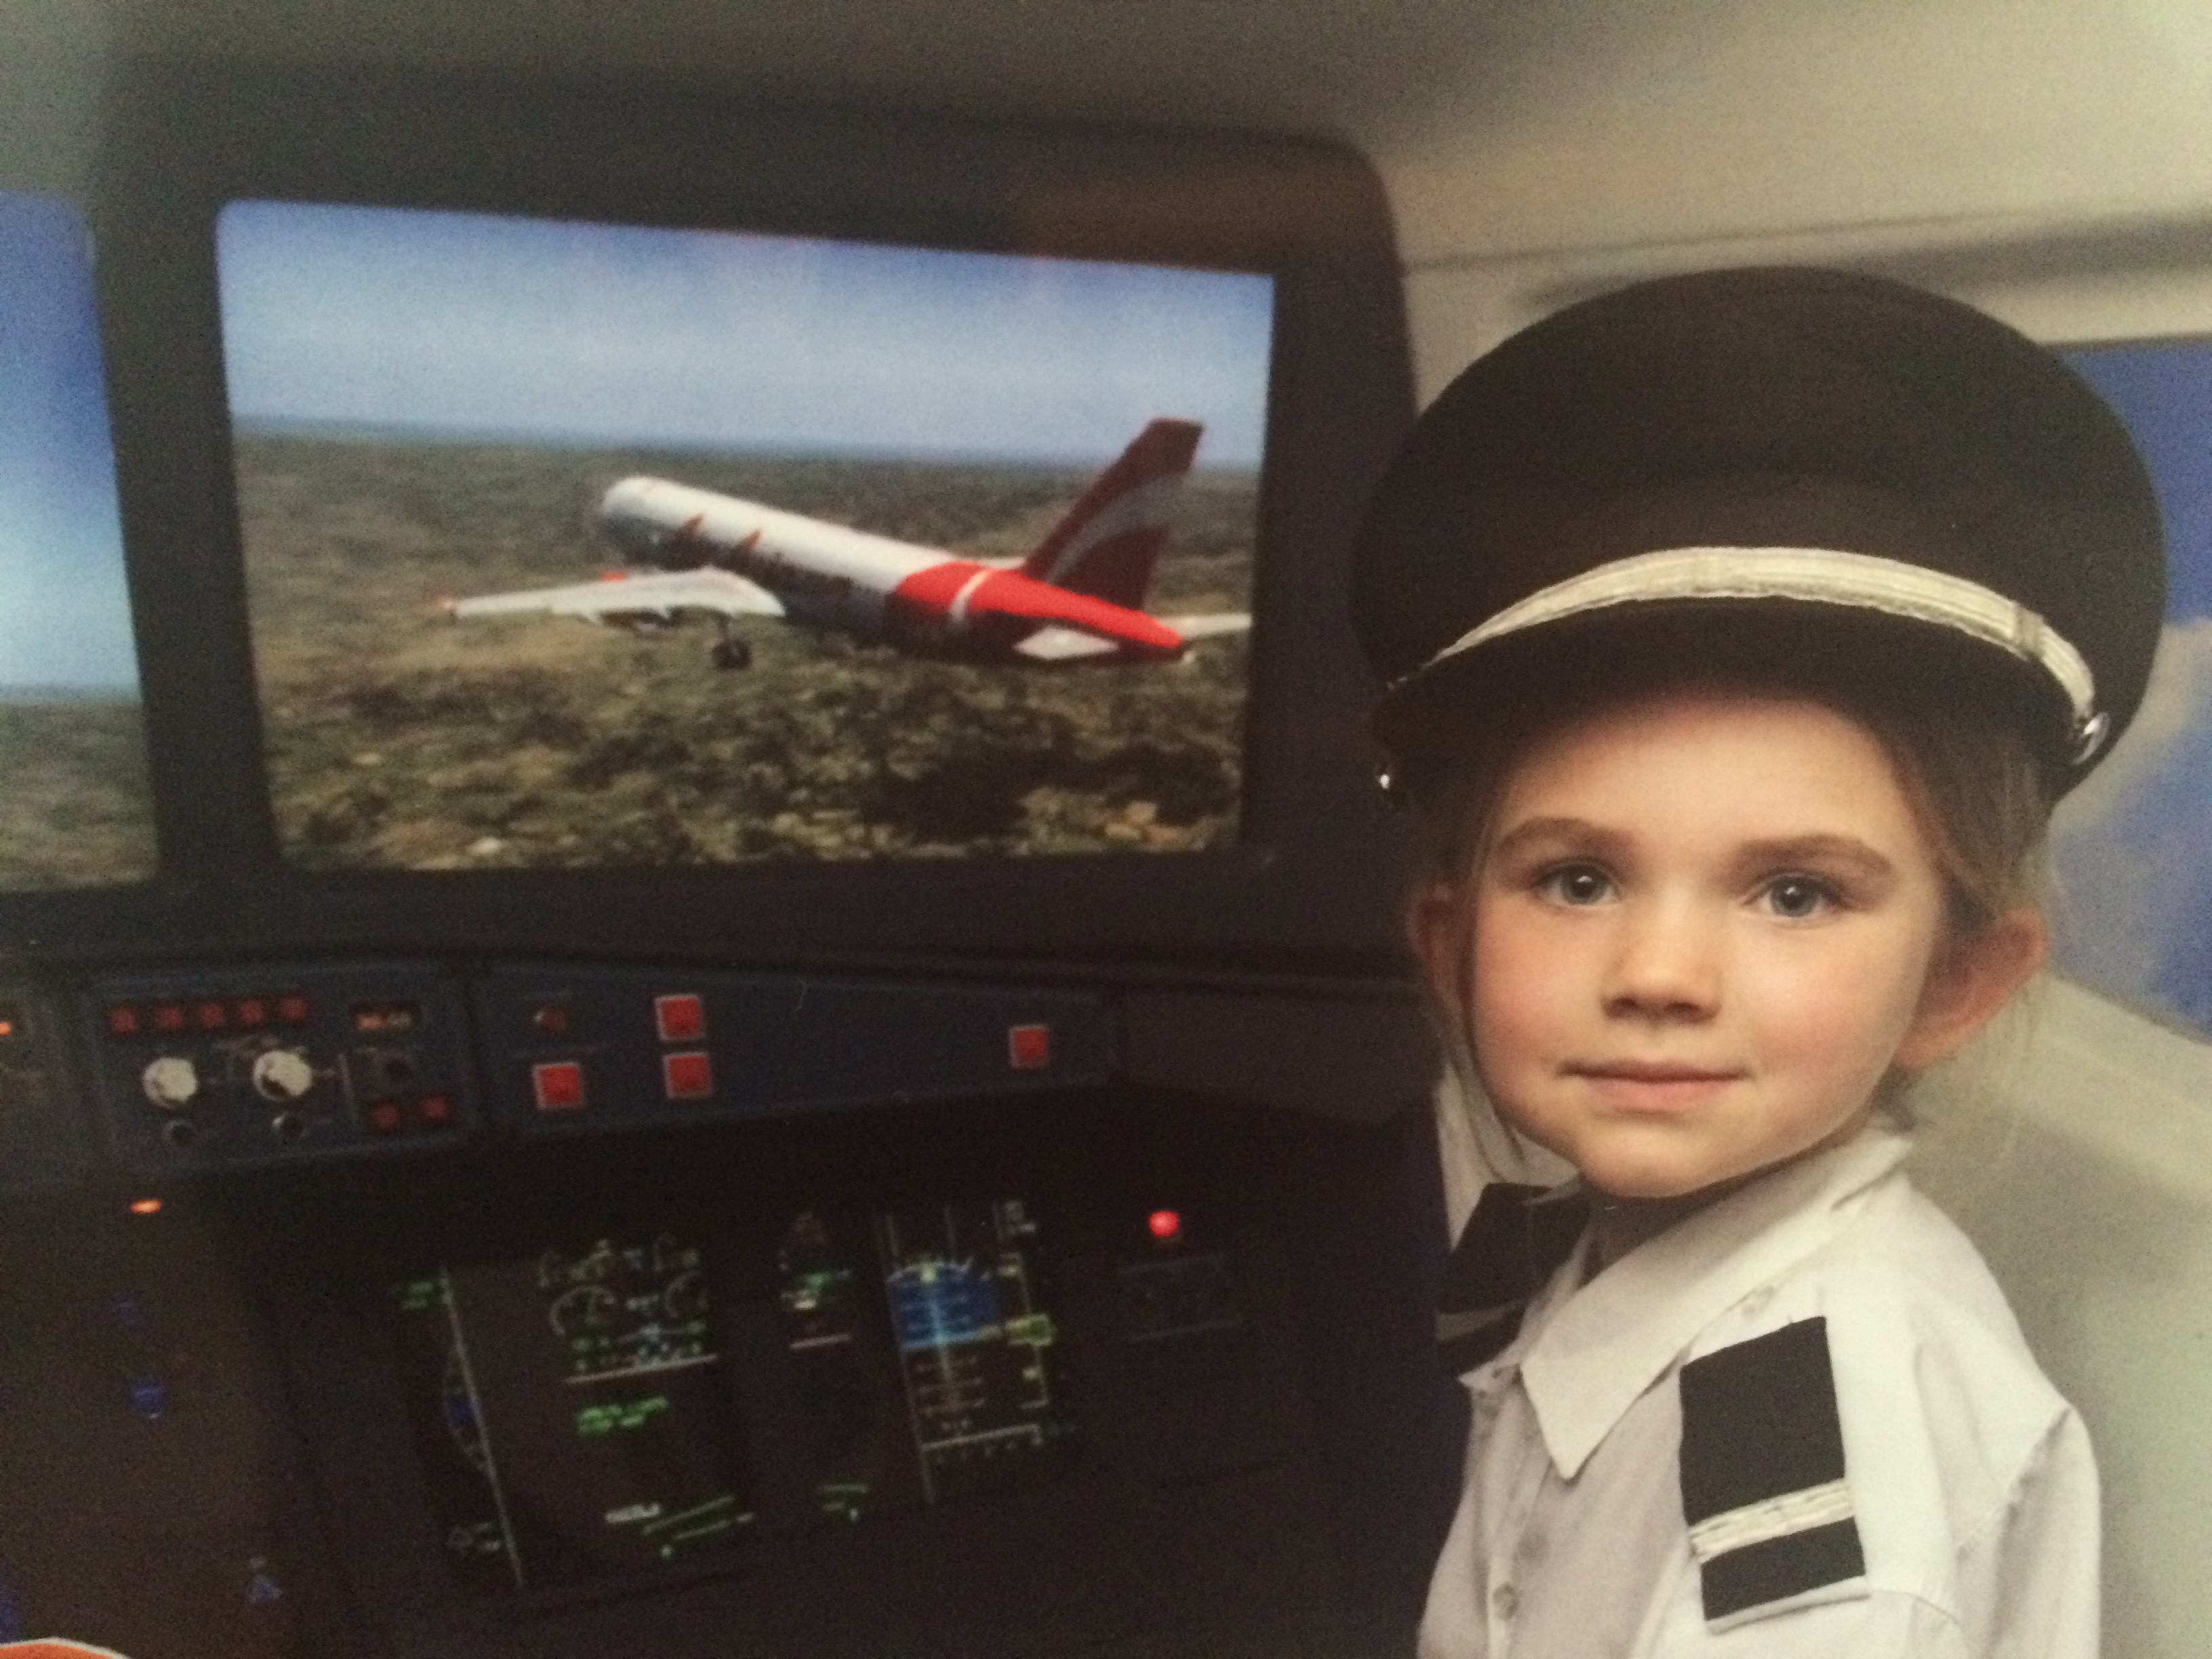
While I didn’t take and photos in the cockpit (this photo was taken later at a flight simulation that we were lucky enough to visit in Malaysia) I was carrying a large intimidating camera with me when we entered the cockpit so I believe photos are allowed should you wish to get a snap with your pilot. Remember to thank him/her immensely for giving your tot the additional time.

NOW SHOWING – STAND BACK (at Moonah arts centre until April 4)

IMG_9570

A world class exhibition of Tasmanian contemporary art curated with children in mind. Seriously an opportunity not to be missed.

Anyone who’s been following the ‘Life at…’ Series on ABC (based on the more involved research of the Longitudinal Study of Australian Children) knows how critical creativity is to our children’s overall success.

This creativity is not talking about their ability to draw a nice picture of Nan for us to display on the fridge, but rather their ability to think creatively and apply that to all aspects of their life.

This is what Moonah Arts Centre is doing so well in their current exhibition; STAND BACK curated by Josie Hurst. (As well as introducing the young tots to a contemporary art gallery – and every creative growing mind should get a good dose of the pure creative thinking applied in contemporary art!)

Self Mediation Other by Jamin, 2013

The joy of this exhibition is that it talks to the child, but doesn’t ‘talk down’ at them. The art is exquisite, and accessible, and it is a joy to watch as the children navigate the space with their program investigating the art that is hung for them, at a child’s eye level.

The gallery catalogues are what impressed me most, perfectly considered for the young viewers. These beautifully presented little books come apart to form a series of cards (one for each artwork). On the back of each artwork there is simple accessible information about that work, what the artist was trying to achieve – and even additional information about something the child might like to try themselves.

IMG_9717IMG_9718

Upon entering the gallery we laid out our cards in the corner of the gallery. The children each chose one, and then set out to find the work they had chosen. We then read the card, talked about the work, how it was made, what the artist was saying in the work… And then ran back excitedly to get the next card for what they wanted to explore next.

Now, encouraging children to run in a gallery is not necessarily the best model, and this ‘cards in the corner’ method is only one way of approaching the gallery. But for my children this was the perfect gallery experience and they can’t wait to go to more galleries! (For active 4 and 5 year olds, this impressed me!)

Questions on the cards such as ‘what do you think this work sounds like’ sparked conversations about the work that I never would have anticipated. Anicas favourite work was of the inside of a beating heart (according to her), Anne Morrisons Camouflage, 2015. Elkas favourite work she told us was of the 3 little pigs houses (and one more) – Paul Gundrys Suburban Bushland, 2011.

IMG_9599

As an adult (with an honours degree in fine art under my belt) I was not disappointed at what the gallery had to offer adults either. There is no sense that the work has been ‘dumbed down for the kids.’ I enjoyed my time there as much as the kids, and had plenty to keep myself occupied with as the kids enjoyed adding their own creations to Janine Morris’s Mater, 2015.

IMG_9592IMG_9590

Over all we spent a good solid 30min engrossed in the gallery (right up until closing time), we’ve spent a good deal of time with the gallery cards afterwards, and we’ll head back again with friends to see more another day soon. I can’t recommend the experience highly enough!

Opening times
March 6 – April 4 2015

Monday to Friday: 10am – 5pm
Saturday: 10am – 2pm

Moonah Arts Centre
65 Hopkins Street, Moonah TAS

Free entry.

EASY ACTIVITIES TO BUILD YOUNG BRAINS: FREE PENGUIN PRINTABLE.

This week we’ve got a little reader book for your young tots to colour (it’s a free download, but you will need to sign up to the free membership for Teachers Pay Teachers – I signed up myself and have not regretted it.)

Sample of the work found in the full pack of penguin printables made by teacher Jennifer Drake of Crayons and Cuties in Kindergarten.

This download is great for learning the different penguins and also early readers. Because my oldest is right at the transition into independent reading I splashed out the $10 and downloaded the full set of penguins for us to carry with us on our travels. You can see what is included at the creators blog. The books don’t just give an opportunity to colour, but also give great facts about the different types of penguins, their environments and what similarities and differences there are between the different species!

INTRODUCING THE LETTER P

The letters in focus are not usually in alphabetical – rather associated with things that happen though the year (ie E near Easter etc) in such a way that the associated activities are appropriate (ie playing with ice is more fun in summer, growing beans will work better in spring etc!) …but this time we have some alphabetical order O is followed by P!

Letter: P

Creature: Penguin

Country: Puru (think Inca civilisation!)

Focus learning areas: Planes and Passports

(we are travelling during this time so there may be some delay in posts as we move between internet friendly destinations.)

In the following posts I will detail more activities surrounding each of these areas, but for now simply pop your P printables (from earlier, find them here) in your mail box ready for your little one to discover their new letter!

THINGS TO SEE AND DO: MAKE A GIANT SAND OCTOPUS.

IMG_4963 We have built large sand sculptures before, and they are a great hit for the young construction workers. This time however we had a change in focus beyond a simple sculpture, we want to talk a bit about camouflage.

We chose an appropriate spot and drew a large circle in the sand (for the body). Each child took control of one tentacle (mapping it out and digging around their shape to pile it up as a long 3d sand arm).

IMG_4947

We didn’t have 8 children building tentacles at once so this allowed for some great maths questions during construction; how many have we made now? How many do octopuses have? How many more do we need to make?

IMG_4969

As the tentacles shaped up the kids moved on and created the body and eyes in the centre, decorating with shells. The small group used great negotiation techniques throughout the process to organise themselves to finish the octopus, helping each other when they needed it, and collectively deciding on plans.

IMG_4952

Now, that’s a great physical project, but it was not our focus as we built. We wanted to talk as much as we could while building – What do the kids know about octopuses? (They take a long time to have their babies, they live in the water, they shoot ink at predators, they have no bones – these were the things the kids collectively knew about octopuses and it was a delight watching them inform each other and add to the knowledge that the other children were sharing.)

When we came to the idea of camouflage we stayed on the topic for a little longer. We talked about what would be good camouflage for an octopus, and how it can manipulate the shape of it’s skin to form different textures. It can change the shape of it’s body to mimic other creatures, and can even change the colour of it’s skin to form different patterns to blend into it’s surroundings! No other creature has all these camouflage skills.

IMG_4959

In our case we talked about our octopus being ‘camouflaged’ in the sand around it, but over the next couple of days we will revisit the concept as the opportunities present themselves. (See how that bird blends into it’s background? Why do you think that tiger in the book has stripes? What makes good camouflage? Why is it important for each of these animals to be able to hide?) Camouflage is a topic that is of great interest when learning about animals and it will come up time and time again as we work our way through the year, and a physically active project of building a sand sculpture is a fun way to introduce it!

EASY ACTIVITIES TO BUILD YOUNG BRAINS: OCTOPUS OUT OF A GUM NUT.

IMG_0025

At a recent beach trip we had some craft supplies and these delightfully simple Gumnut Octopus proved to be a very easy and fun activity.

IMG_0026

Firstly gather some gumnuts (there is a large gumtree in the middle of Kingston Beach if you are keen to combine gumnut hunting with a beach octopus adventure.)

Choose your favourite gumnut and cut 4 lengths of string. (at this point your intelligent little marine biologist is almost certainly going to correct you – everyone knows octopuses have 8 tentacles, not 4!)

IMG_0055

Tie a knot in the middle of your 4 lengths of string (so all 4 are joined, leaving 8 ends hanging from your knot)IMG_0129

Insert the knot into the hole of the gumnut (depending on the size of your gumnut and the thickness of your string you may need to tie a double knot to make it the right size to stay, we found 1 knot suited some gumnuts, 2 knots worked better for others.)

IMG_0240

Simply attach some eyes and you have your little critter ready for his ocean adventure.

This activity was a winner for Anica (5yo with arthritis) as her knees were not on their best behaviour on this particular day and it gave her the chance to do something special while her friends ran and played in the sand. Later the other children came to investigate what we were doing and created their own creatures, but Anica is developing a real sense of ownership and accomplishment for these type of activities that let her quietly distract herself from more challenging things in her world at this time. She has even written her own blog on how to make a wombat, which I’ll post with her help shortly.

BIG HISTORY CONCEPTS FOR LITTLE TOTS.

We’ve talked before about the importance of introducing a bit of ‘big history’ into early learning, and with everything from the dinosaurs to when mumma was born classed as ‘the olden days’ this project will help give a little perspective to our place in time.

IMG_0573

Our strategy for the year is to provide some understanding of big history concepts. We have created a time line on one wall and as we come across facts, figures, dates and details we add them to our timeline.

When we visited a cave (that began forming tens of millions of years ago) we added that to our timeline, giving the experience even more historical wonder than the simple beauty they saw. When we talked about how the waterwheel that was used to make flour in the ‘olden days’ we were able to add that to our time line and see that it is relatively recent in our history. When the kids asked when the first person was born (being a believer in evolution rather than creation) we added that to our timeline and could explain the idea of evolution far more simply when they could physically see the degree of time passing and the changes happening.

We have left some space for the future too, so they can imagine and dream about what might be in store in the near future. We hope to get to this after a few more history concepts are visited. (Over the coming months as we work through the letters we will look back at the first civilizations, dinosaurs, and so on). I am also excited to see a few more concepts overlapping (ie “this was happening at the same time the pyramids were being built” etc).

Now, if you plan to set up your own timeline you may wish to ‘cheat history’ a little as we did. Human history is so tiny in relation to many of the other big history concepts (such as the evolution of plants, Dinosaurs, mammals etc) that our entire human history is just a dot at the end of a 2m stretch of history (and that’s not even going back to the formation of planets etc!)

IMG_0575

To solve this problem of scale we ‘expanded’ our little dot of history into another timeline to allow for more detail in the human history. We used a coloured ribbon for each timeline (blue for the overall time line, with a dot of orange at the end. And orange for the human history.) This colour reference made it easer for the little historians to understand that the orange line represented that tiny little dot at the end of the blue line. We marked up our history over a 3m stretch of wall, simply using chalk directly on the wall to label the periods in time, and to add new concepts. When adding new ideas the little historians often create an image (painting, gluing, drawing etc) and we blue-tack that image to the wall at the relevant place on the timeline. This visual cue that they created is far easier for them to remember and explain to the other adults in their life than a simple text ‘entry’ on our timeline. By re-visiting the concepts as they explain their work they re-enforce their understanding of what they have learnt.

If you wish to create a similar timeline in your own learning space, we used this as a guide for our own timeline (you can calculate and measure this out to fit your space, but we were not so precise as the exact accuracy of the spacing is not so important – it’s a general concept that we are working towards at this stage so just sketching up an approximation is totally fine!)

World History:

  • 600 million years (before common time) – until the year 3,000(ish)
  • Separated at 100 million year intervals.

Human* History:

  • 10,000 years (before common time) – until the year 3,000.
  • Separated at 1000 year intervals

*Please note; the beginning of ‘human history’ that we expanded is determined at a point where there are some interesting things to add to the timeline (ie beginning of farming etc) rather than the beginning of Humans as a species. For practical scale reasons we found this to be more workable as it allowed a little more space between centuries once scaled to fit our space.

While my own little historians are not the ‘remember exact facts and figures’ type of learners, that is not our primary goal. Our aim with this timeline is to give the little historians a sense of their place in history. A sense of belonging in something much greater than themselves, an idea that things change gradually over time, and (as we enter further into human history) some understanding of how they can alter the future by their own actions.

A sense of belonging in time (as well as in space, community, culture etc) is vital for growing our young people into the adults we want in our world.

EASY ACTIVITIES TO BUILD YOUNG BRAINS: PLAY OCTOPUS WITH TOILET TUBES

IMG_0302

Octopuses are wonderful creatures, and the slimy things have managed to work their way into every childhood. Maybe it’s because they start with O (and that’s handy for the alphabet), or because their distinctive body shape is so easy to recognise, or maybe it’s that they conveniently have 8 legs (and that’s nice when we’re looking at numbers!)… Whatever the reason, we’re in love with the concept of an octopus.

Yet their truly fascinating qualities are often overlooked, this little hands on project is a fun thing to make with little hands, but it is also a good chance to talk about a few of the things you know about the lovely Octopus.

You might talk about how Octopuses are considered the most intelligent of all invertebrates. That the ink they shoot out even contains a substance that dulls a predator’s sense of smell, making the fleeing octopus harder to track… and if they are really under threat they can loose an arm and grow it back latter! Here is a good site for a brief refresher on your Octopus knowledge.

Make a couple of these little Octopuses and get playing with your knew found knowledge!

You will need:

  • Cardboard tube
  • Scissors
  • Paints/drawing or decorating implements
  • Googly eyes and string (optional)

Let’s make an octopus.

Cut the base into 4 equal sections (you may like to refer to this as quarters to help with fractions)

IMG_0283IMG_0291

Ask what would happen if you made each of these into 2 parts, how many would you have all together? (In our house we talk about it as 4 “lots of” 2, or 2 “lots of” 4)

Once you have worked out your sum, check by cutting each in half… count 8 parts… how many legs does an octopus have? You just made an octopus!

IMG_0371IMG_0309

We then decorated our octopus and added googly eyes.

To create a more ‘swim like motion’ we hung our octopus from string, and like our tube kites we watched it fly with much joy.

IMG_0421

O – IS FOR FREE OCTOPUS COLOURING FROM TASSIE ILLUSTRATOR!

To introduce you to our creature of the week we have another free designer printable for you to download, this time it’s an octopus from Tasmanian children’s illustrator, Bec Adamczewski of Bon Mot. You can download the free printable PDF here:

Octopus_colouring

(Simply download, print and get to work!)

If you’d like to meet this awesome illustrator then she’ll be holding stalls at the following upcoming markets;

  • Hobart Twilight Market 4pm-8pm February 20
  • Barn Market 10am-3pm March 1
  • Niche Market Bazaar 9am-3pm March 28 (Launceston)

In the mean time shoot on over to Facebook and send her a Like to keep up to date with what she’s creating, and to say a big thank you for sharing this lovely work with us and our tots!

Octopus_colouring

Enjoy your colouring and remember to sing along as you colour. (The “Octopus’s Garden” is a song by The Beatles written by Ringo Starr from their 1969 album Abbey Road – and it’s perfect for young ones to enjoy!)

EASY ACTIVITIES TO BUILD YOUNG BRAINS: OCEAN SCIENCE IN A BOTTLE.

IMG_5030

This is a brilliant little experiment (inspired by happy hooligans) is great to teach the layers of the ocean and also a little science regarding that good old oil vs water experiment! (Plus it’s really easy to make with household items, we put this one together on a whim before bed last night – too easy!)

If your young ones watch Octonauts then they might already have a bit more of an understanding (than most adults) of how the Ocean is made up of ‘layers’ or ‘zones’. (We’ve talked before about Screen time, and my own children do enjoy a bit of Octonauts thus have lots to say about the layers of the ocean!)

For a bit more detail (and a refresher for yourself) take a quick read through this short article that explains the layers as well as a few other great facts about the ocean that you might want to pull out this week!

You will need:

  • Cooking oil
  • Water coloured with blue dye
  • Clear bottle
  • (Safety goggles entirely optional, but after our explosive volcanic science 5yo Anica felt it would be necessary to wear them!)

Half fill your bottle with water, mix in colour, then fill the remaining with oil. Secure lid and mix.

IMG_4988IMG_4991

The oil and water will separate into a gradient and then into layers. While it is mixed is a great time to talk about the gradient of layers that exist in the ocean and how the different levels of light affects the creatures living there.

As the oil separates you will probably also want to talk about why that oil doesn’t mix with the water – for a short explanation of what is going on you can read this great article. The details of polarities of molecules is not something my young ones are ready for, but this can be simplified and the idea of density is something that is far easier to explain.

IMG_5017

It is also a great to mention that because oil and water don’t mix, sea creatures can use oily feathers or fur to stop the water getting to their skin. If you feel ready you could cover one of your little scientists hands in oil, leaving the other without oil. When both hands are submerged in the food coloured water one had will come out wet (and coloured) while the other will come out with the water (and colour) running off. This involves a little clean up, but is something that will really drive home the concept of animals using oil as a form of protection from water.

Note that these pictures do not do the movement of the oil on water justice, the wave like swirls as it was mixed were mesmerising, and if I didn’t have to get the kids to bed I’m sure they would have enjoyed watching it for hours!

IMG_5047